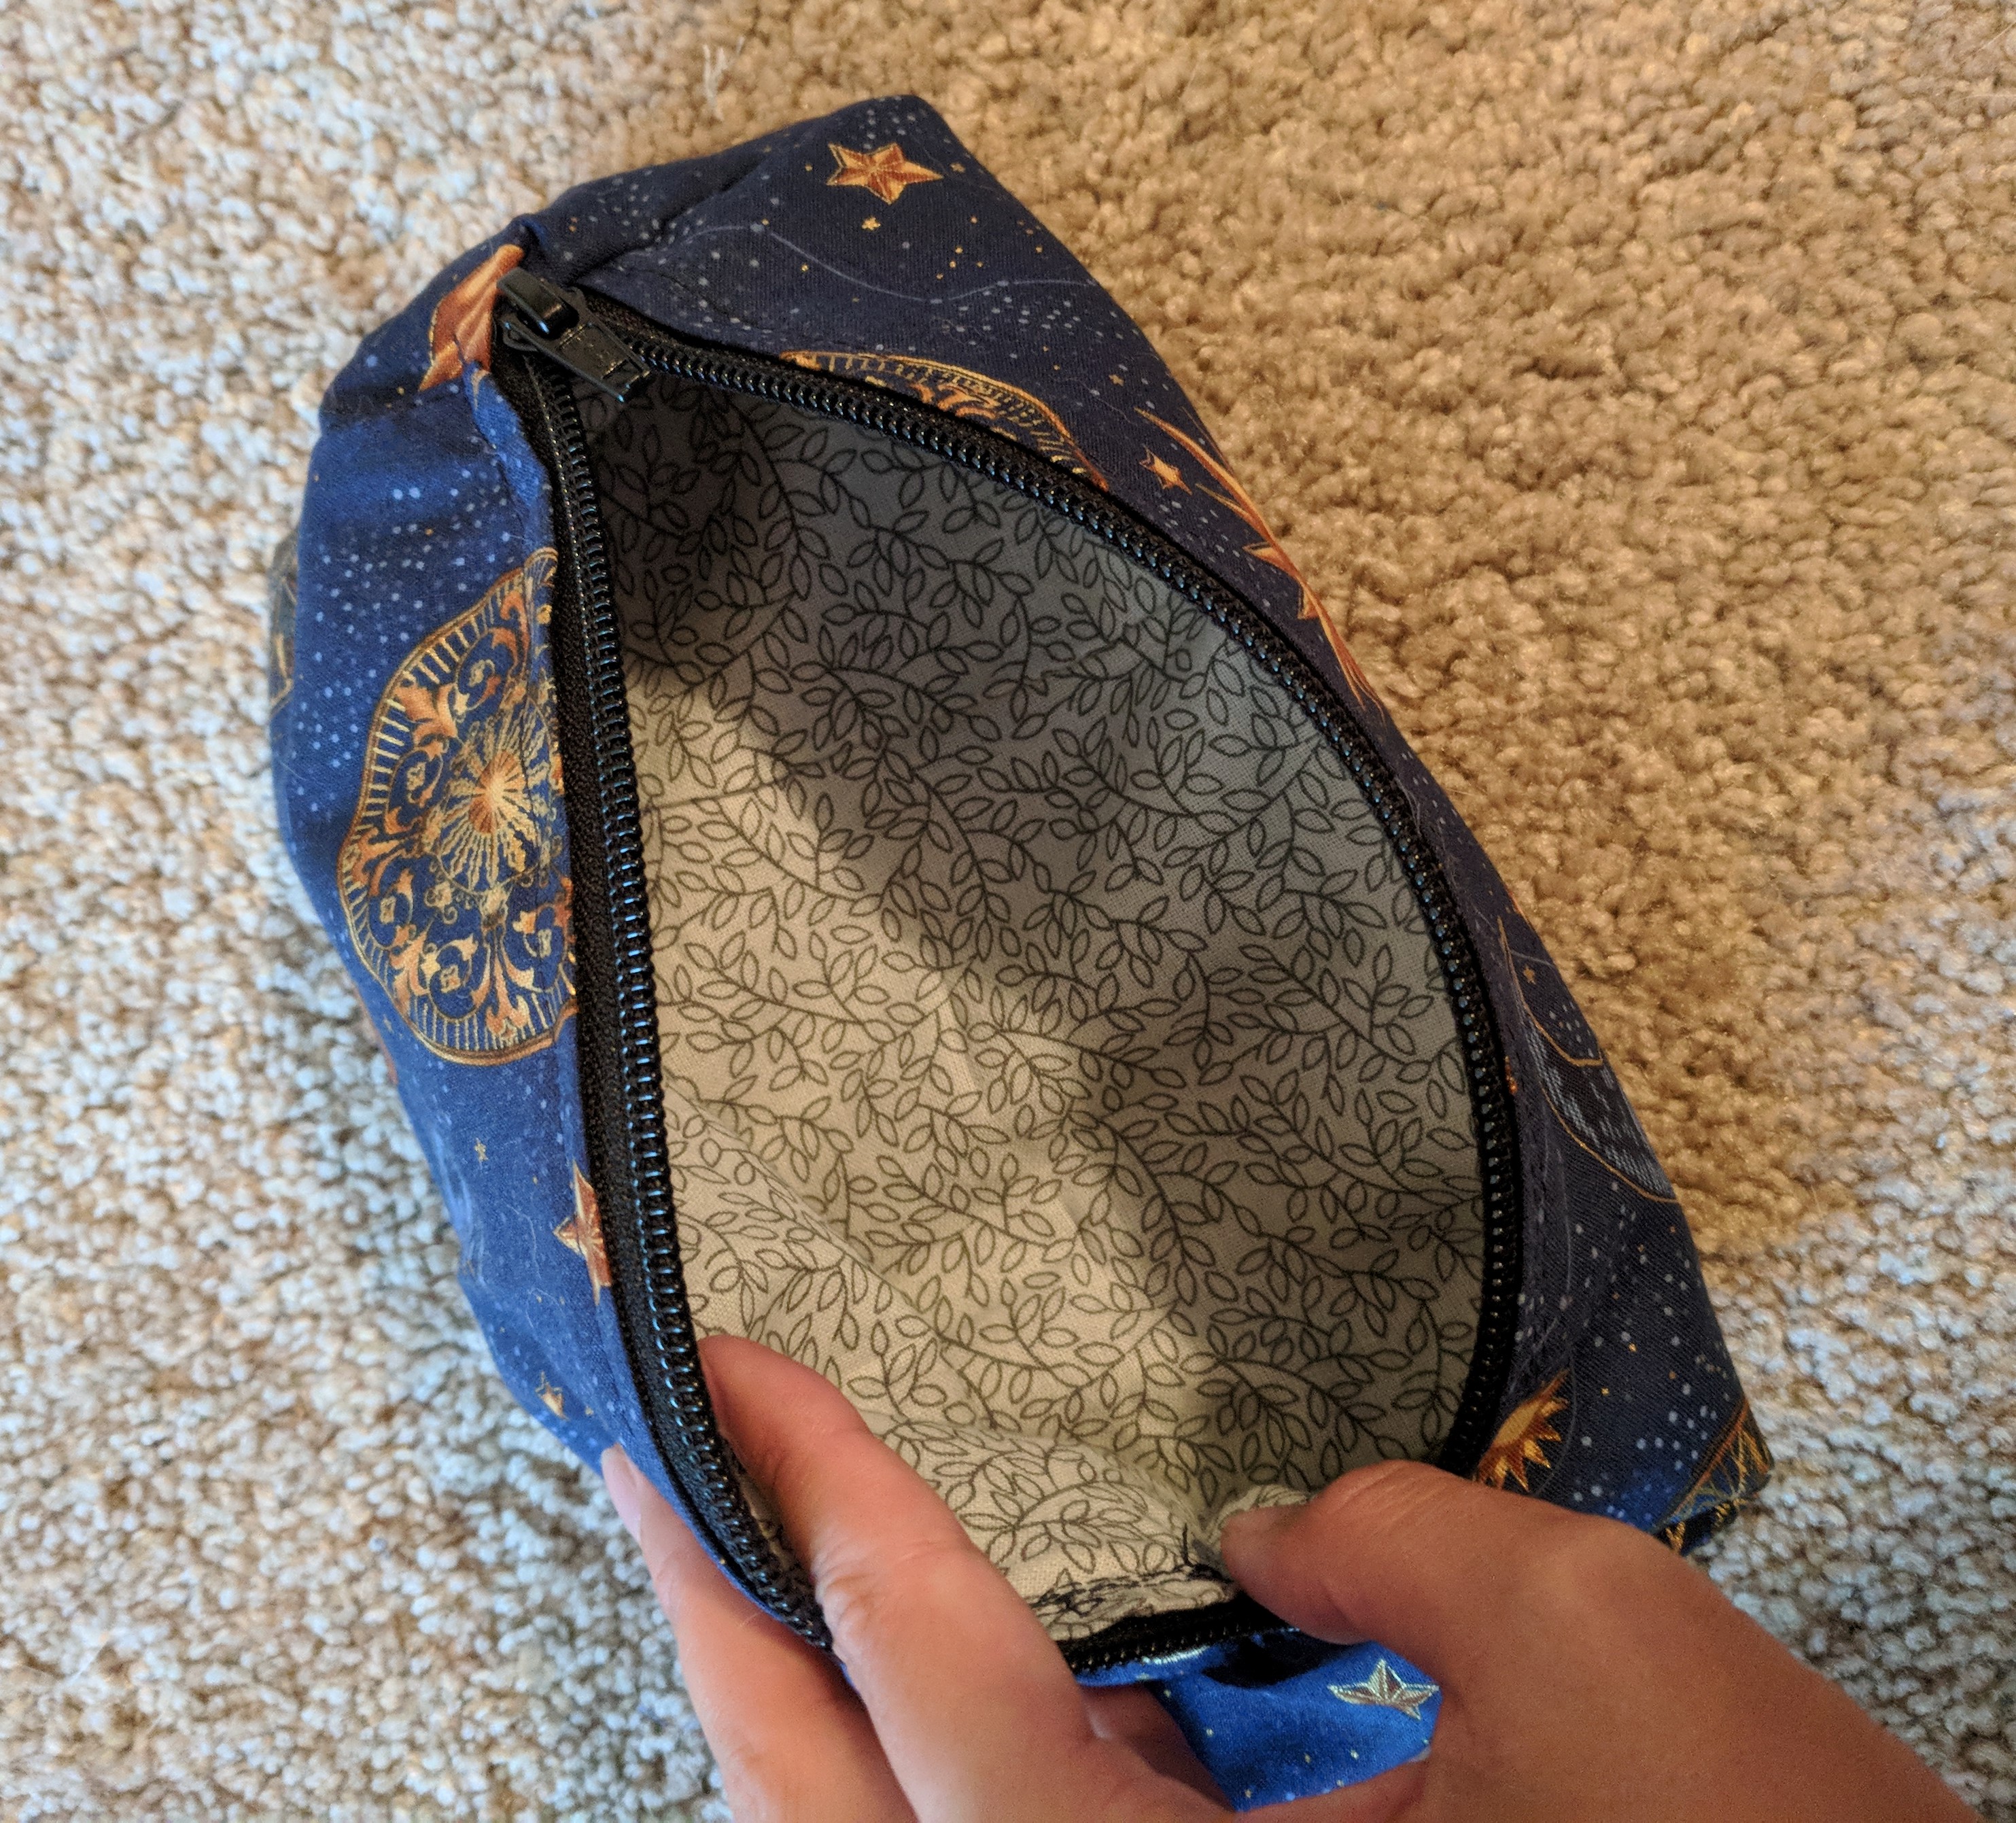
I self-drafted this little zipper bag for a friend for her D&D dice 🙂 It’s a triangular prism, and fully lined. She’s super into space stuff so the outer fabric is suns and stars. Project completed July 4, 2018.
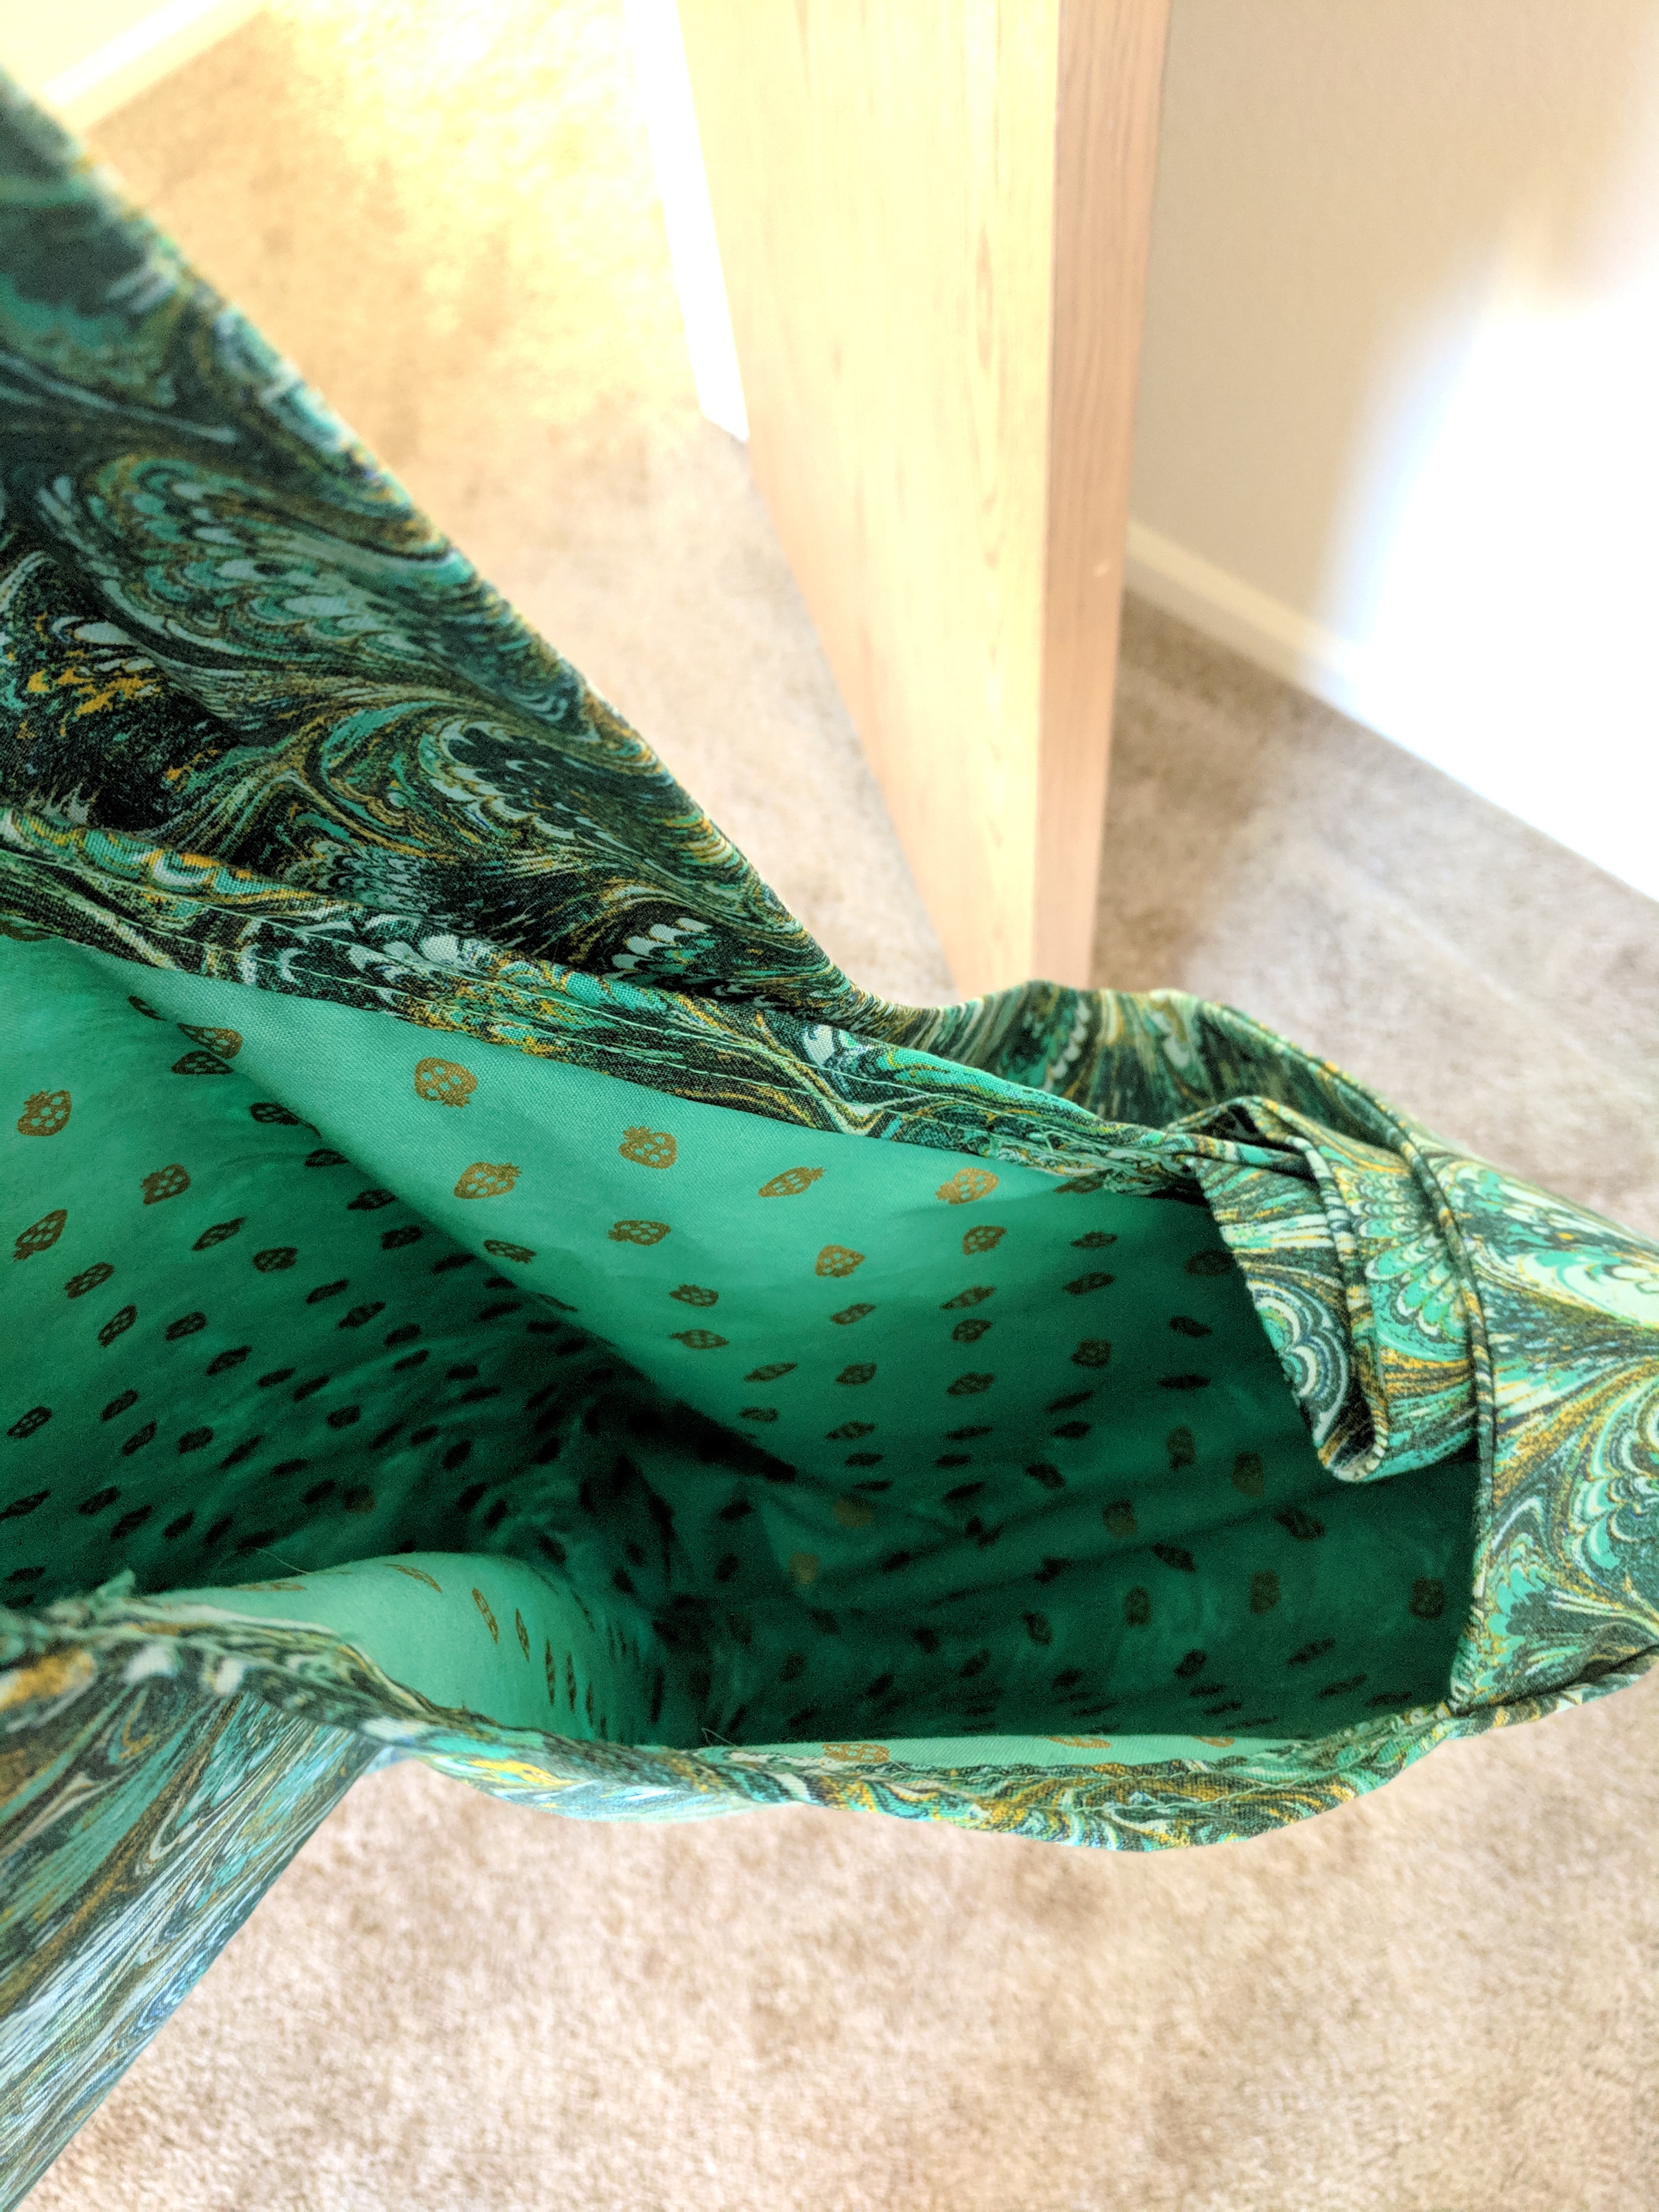
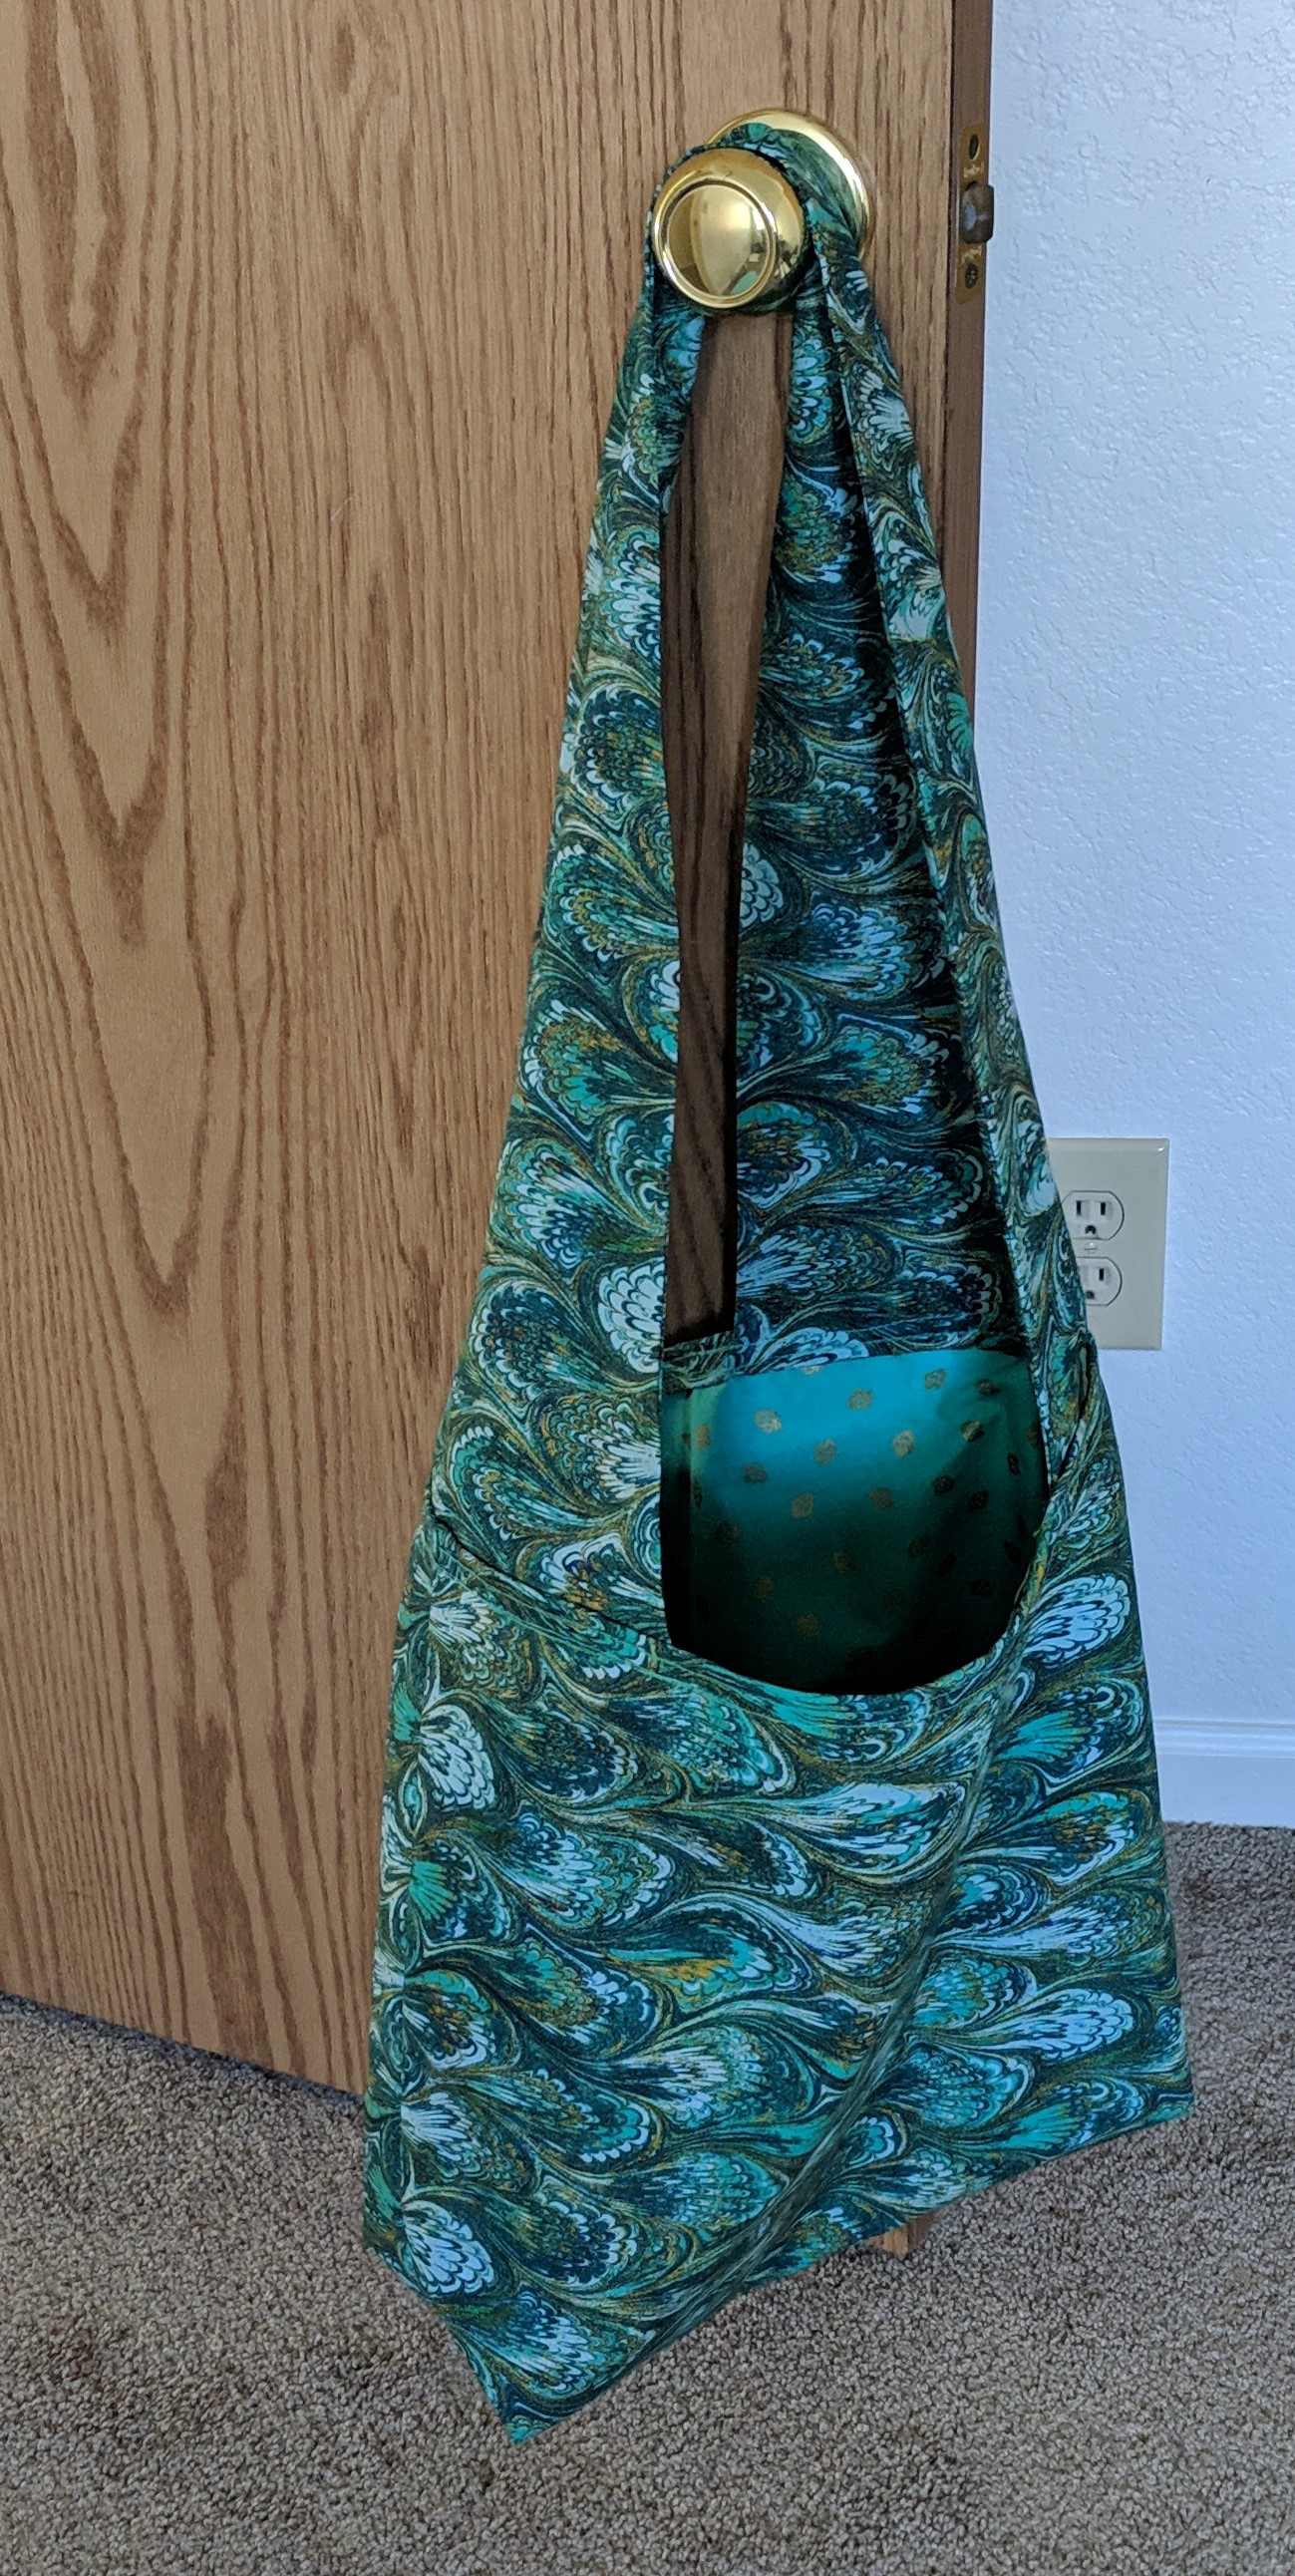
I made this tote bag for my cousin for Christmas – partially inspired by another tote bag she likes to use. I used the 4girlsdesigns shoulder bag pattern with a fun marbled outer fabric inspired by a paper marbling experiment we did together, and cute strawberries for the inner lining. Project completed November 18, 2018.
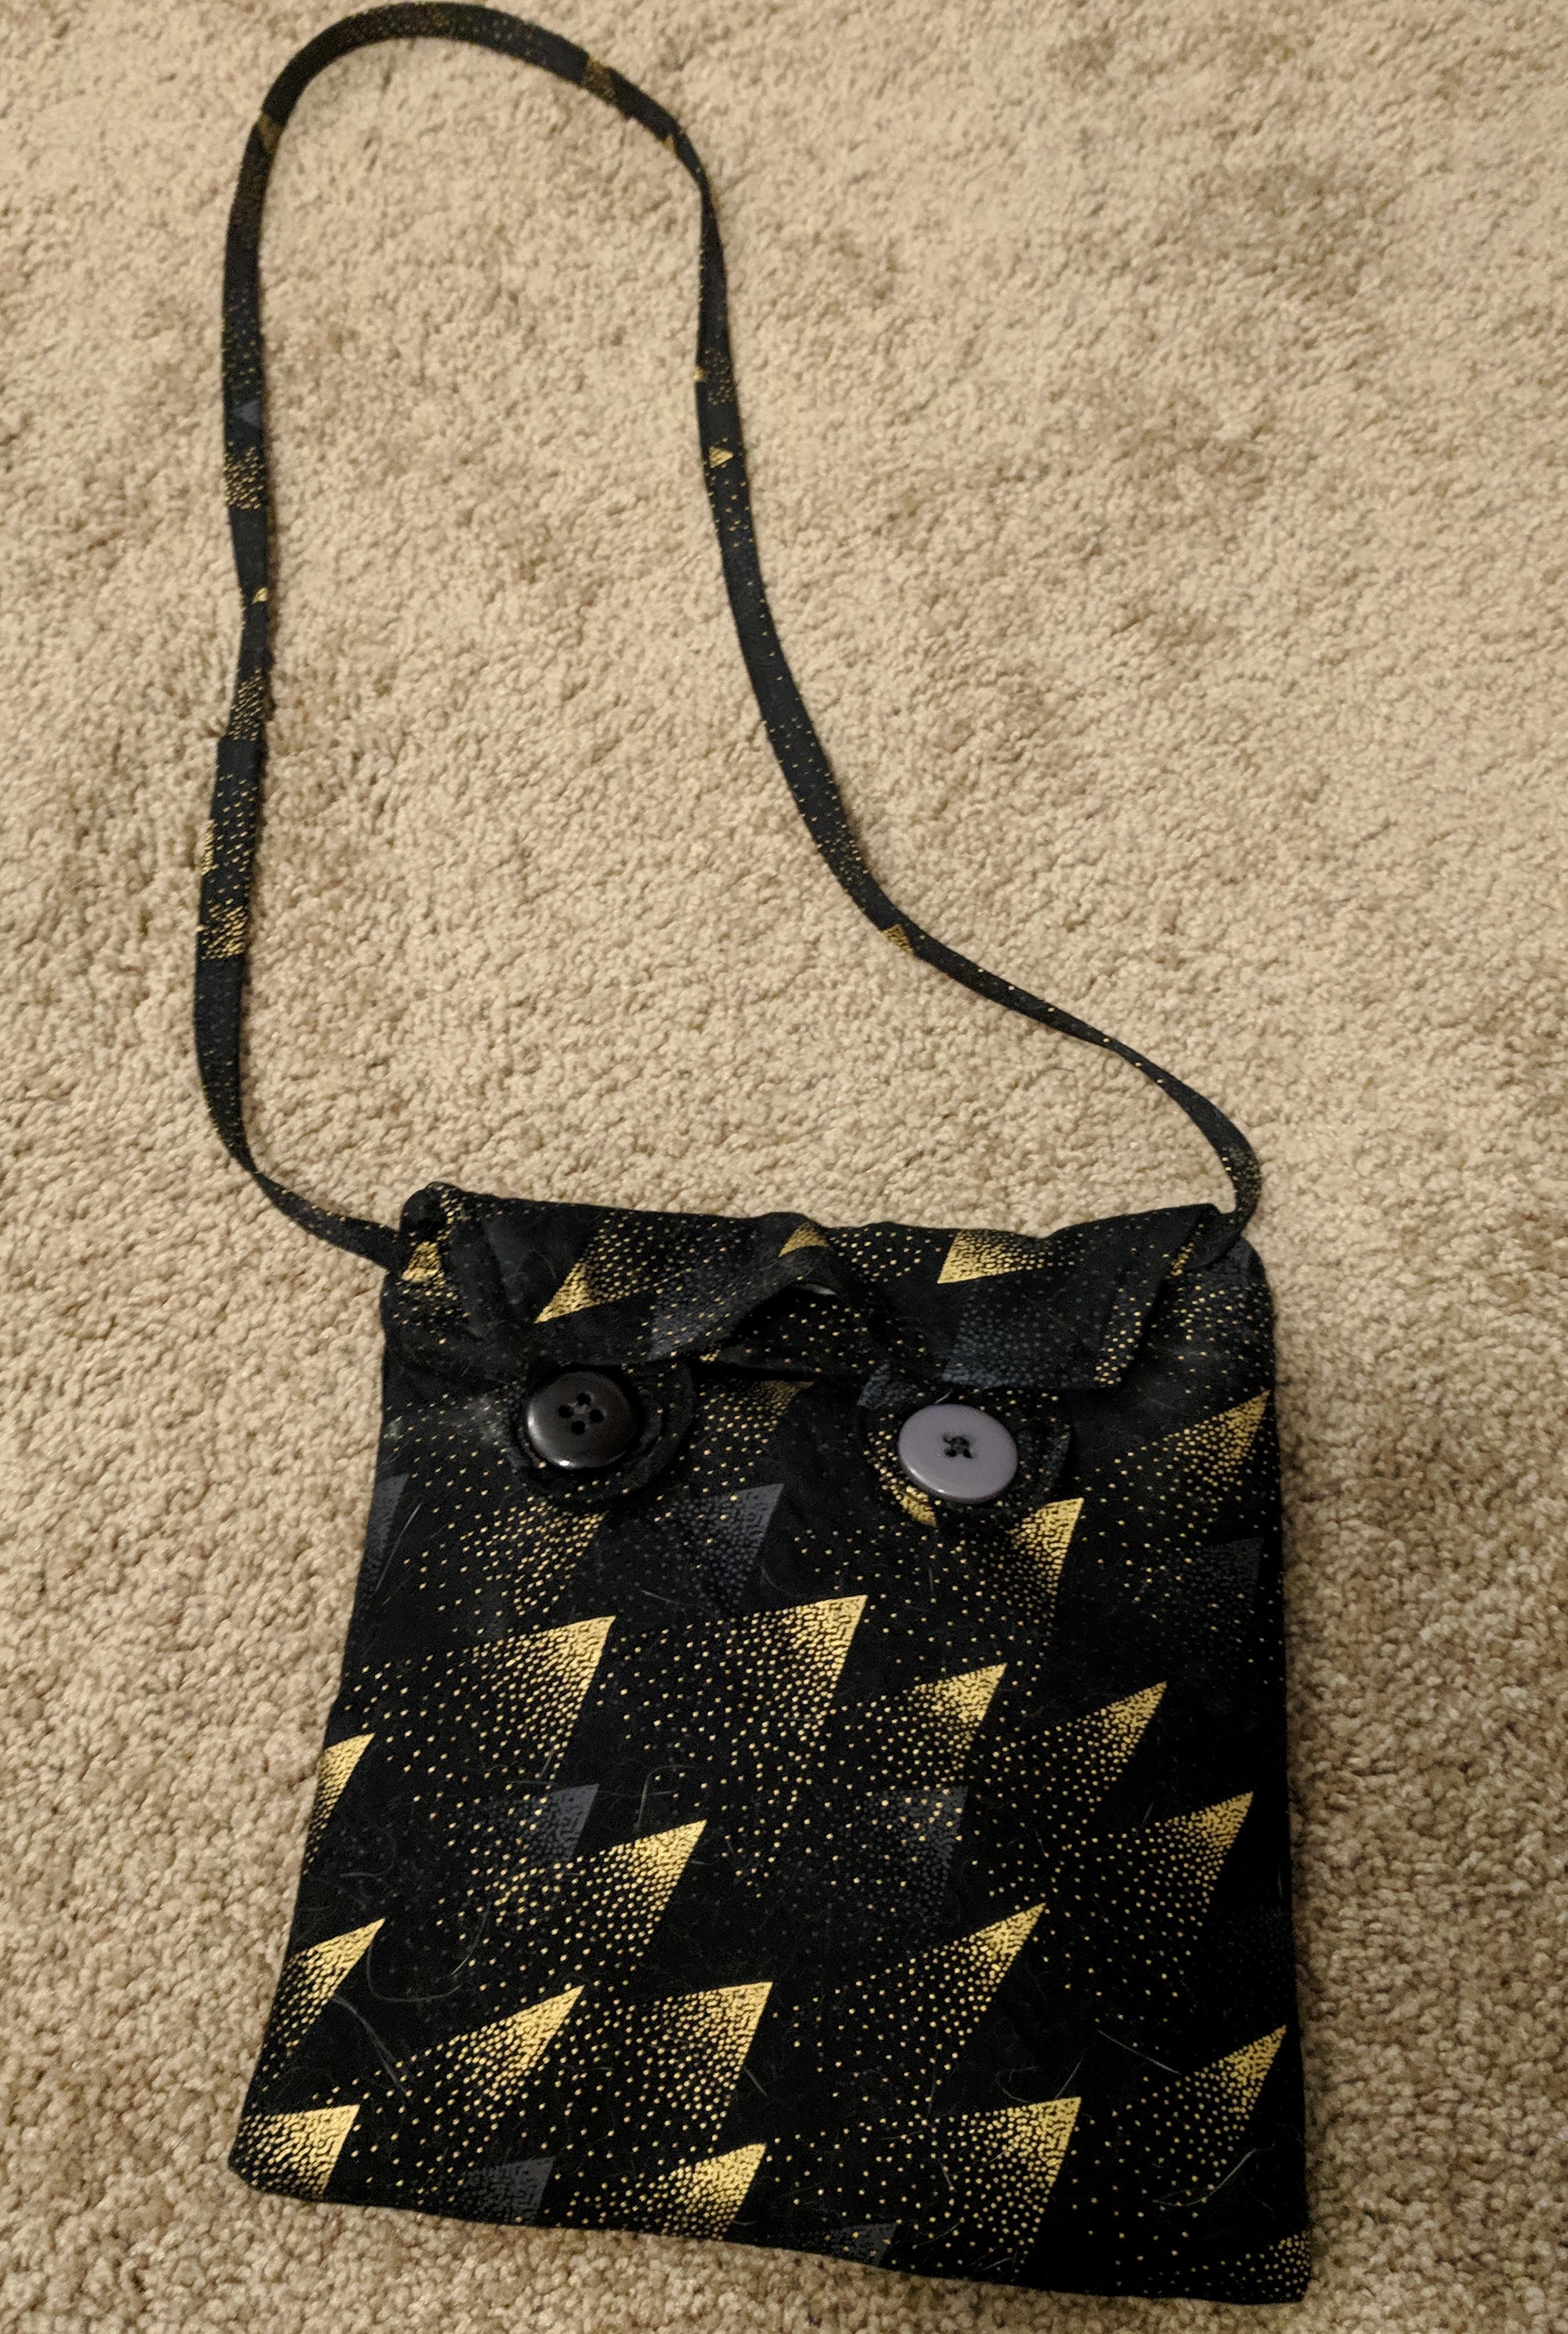
I self-drafted this little black and gold purse using some scrap fabric since I needed a purse that was in between casual and fancy. The top is closed with two buttons and fabric wrapped around little elastic strips. I made it the perfect size to keep all my things inside, and the only thing I’d do differently in the future is have a thicker strap. Project completed March 5, 2019.
One Block Wonders were defined by Maxine Rosenthal in her book, which details every step of assembly and tips and advice on choosing fabric and deciding on layouts. Below are a few other resources I used along the way:
One Block Wonder “Design Helper” shows possible combinations of hexagons based on a picture you upload. I encourage you to grab a picture with a pattern (or not!) and try it out – it’s quite fun.
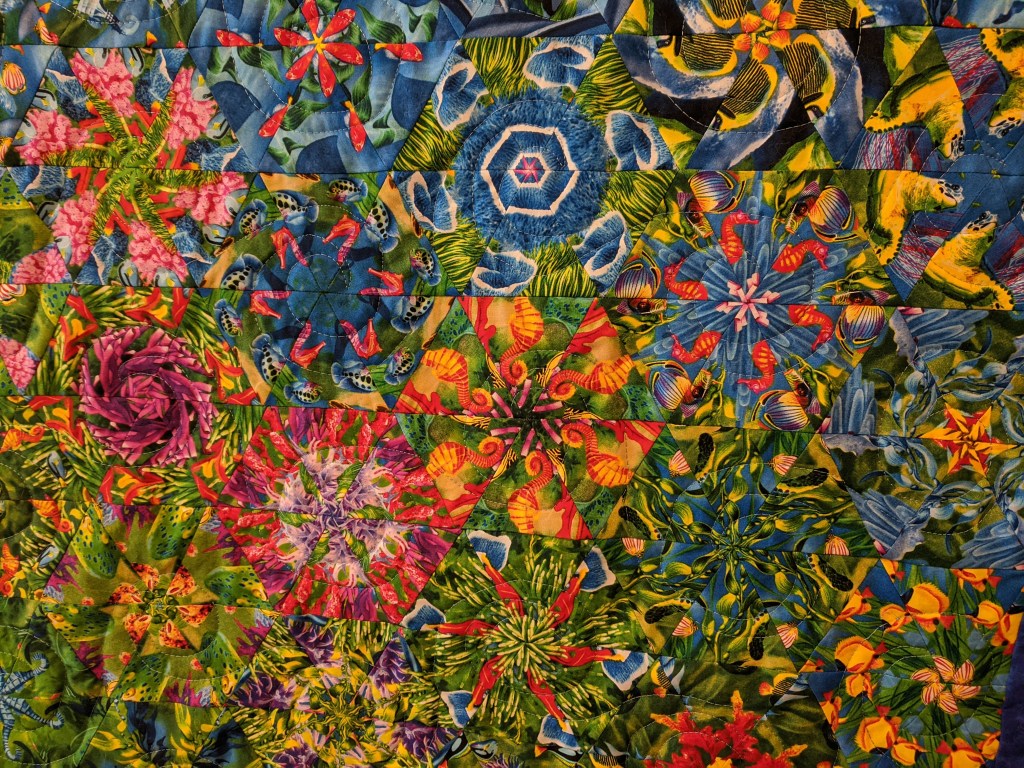
OBWs are constructed using 6 identical pieces of fabric. This can be done using a fabric that repeats the same pattern over and over (usually every 24″) or with a panel (a single image that spans the width of the fabric). Rosenthal suggests using fabric with 2-3 colors, with big and bold design elements with more curves than straight lines. I used the Reef panel by Michael Searle for Timeless Treasures.
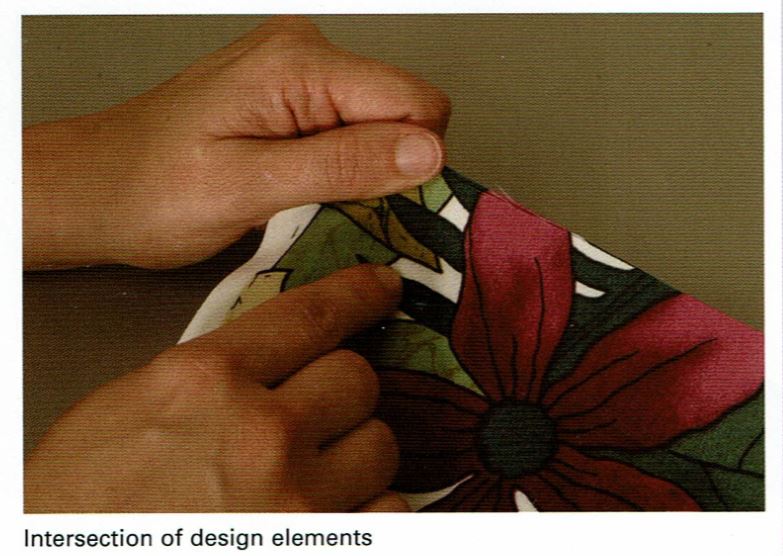
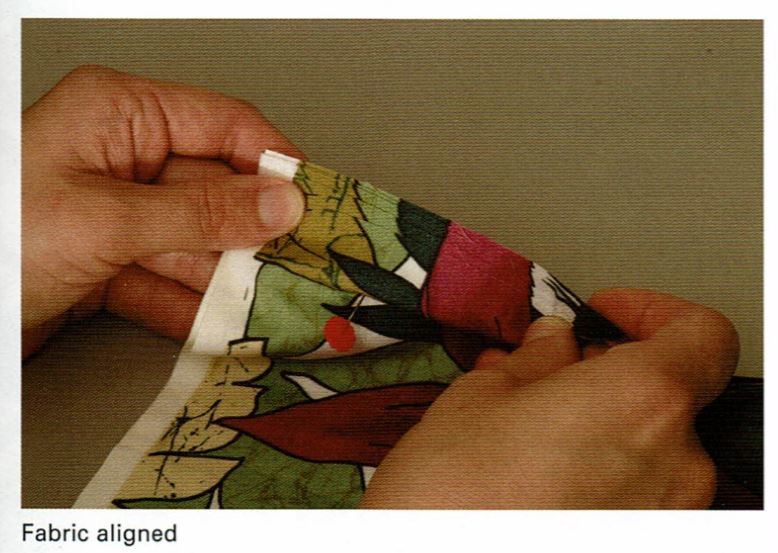
So you cut your 6 identical pieces, and they’re about 44″x24″. Then you stack them up and use pins to pierce the same design element through all 6 layers – so you know that they are aligned vertically (see below for pictures from the book). Rosenthal suggests you do this at 6 different points – each corner and then in the middle on the long sides. Then you shake your fabric by the pins so that the fabric between the pins is also aligned (watch Jackie’s video on this).
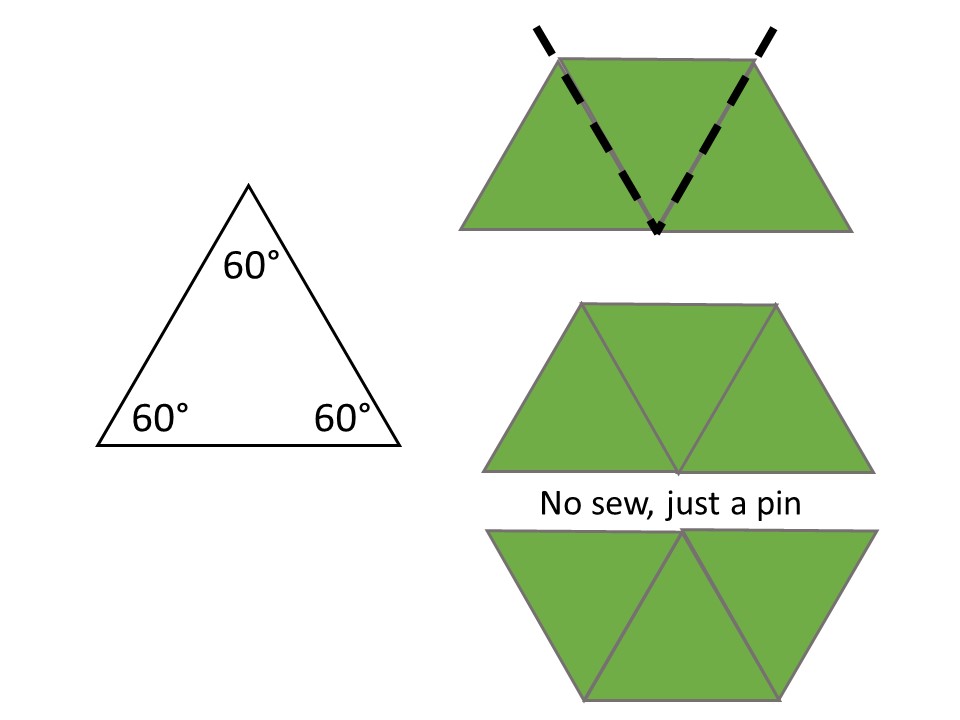
The kaleidoscope effect is created with 6 equilateral triangles arranged in a hexagon shape. Next, you cut your aligned fabric stack into strips, and then into triangles (using a ruler with a 60 ° line). Each triangle is exactly (or… close enough) identical since you aligned your fabric and cut it all at the same time.
Now here’s the genius part, and what makes the OBW so easy to assemble – all straight seams. Each hexagon takes 6 triangles, but you only sew 3 together at first so you have two halves of a hexagon. During the layout stage, you pin these together so they look like a hexagon, which makes it easier to move them around. So – you only sewed straight seams to put 3 equilateral triangles together.
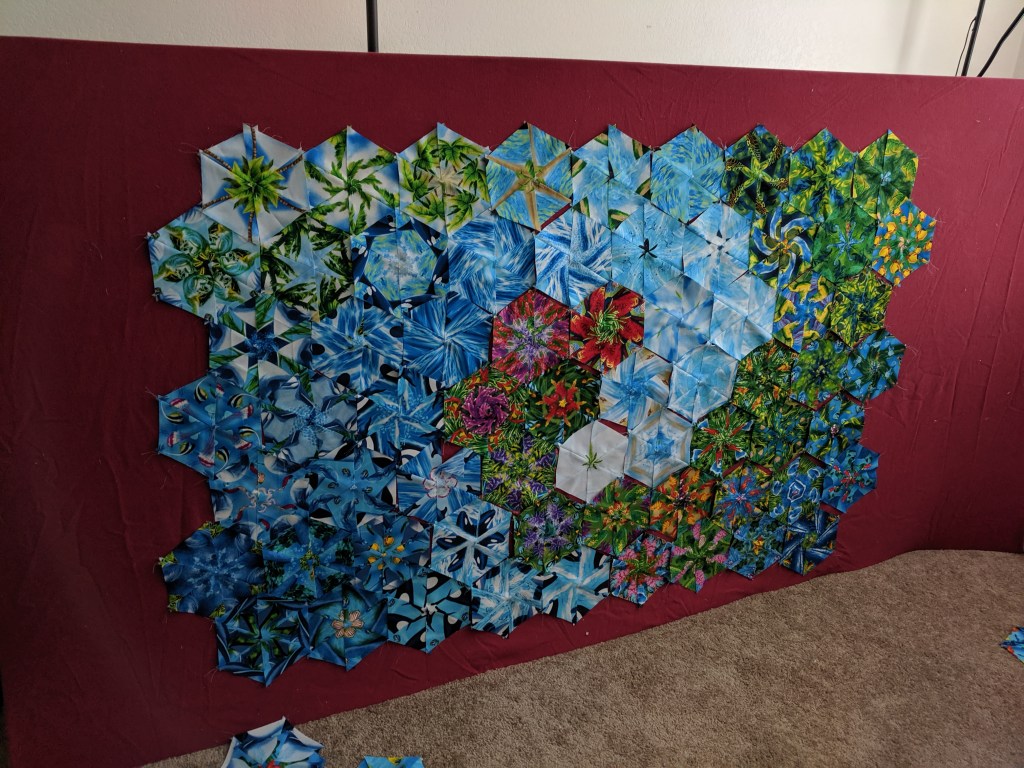
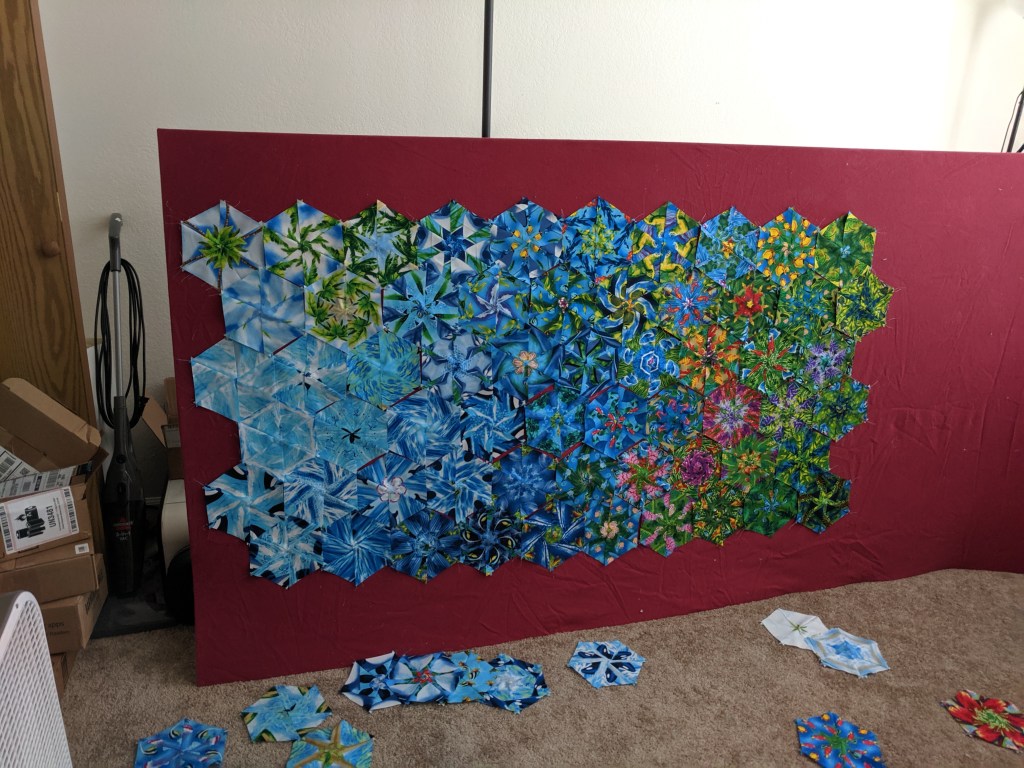
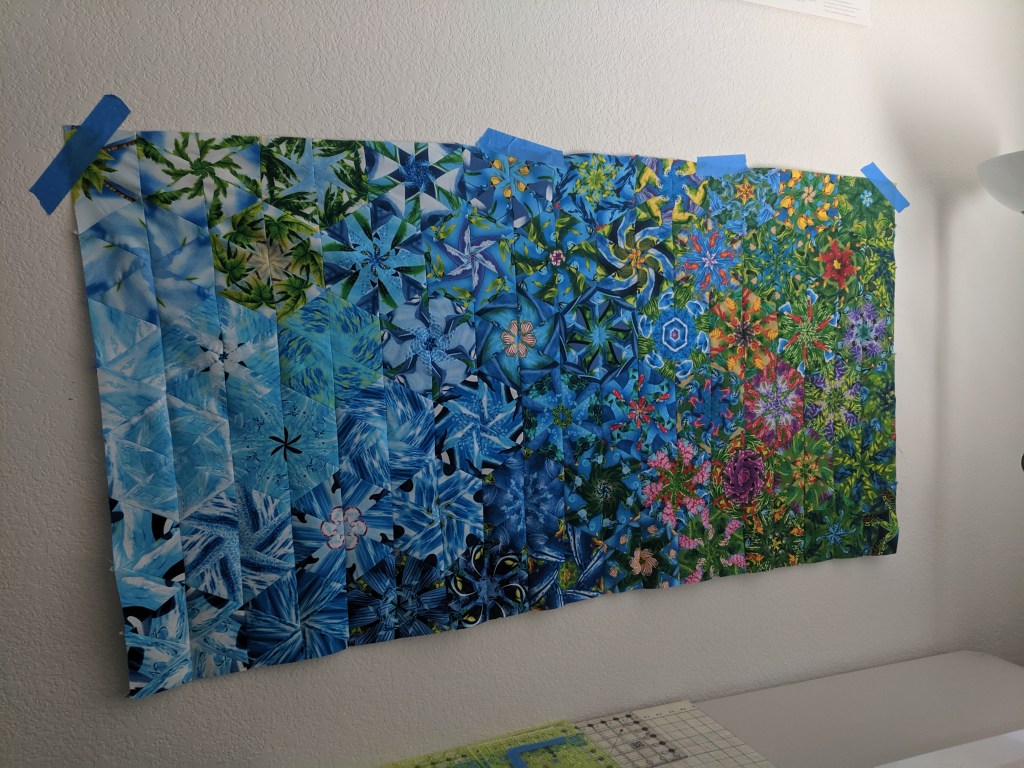
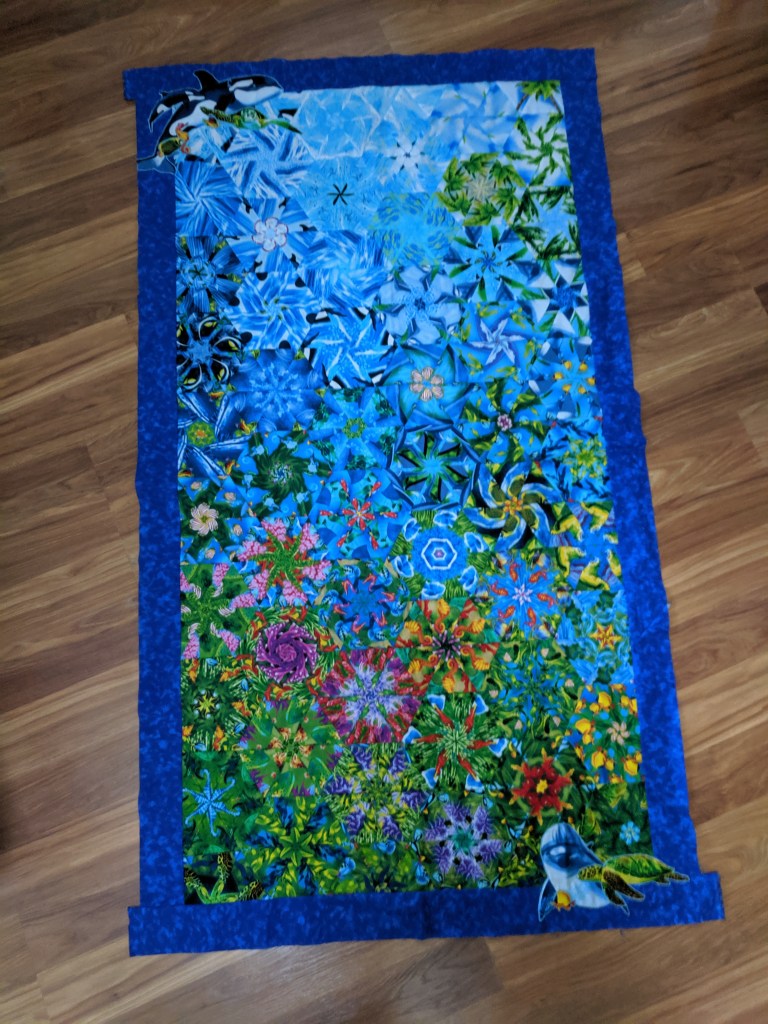
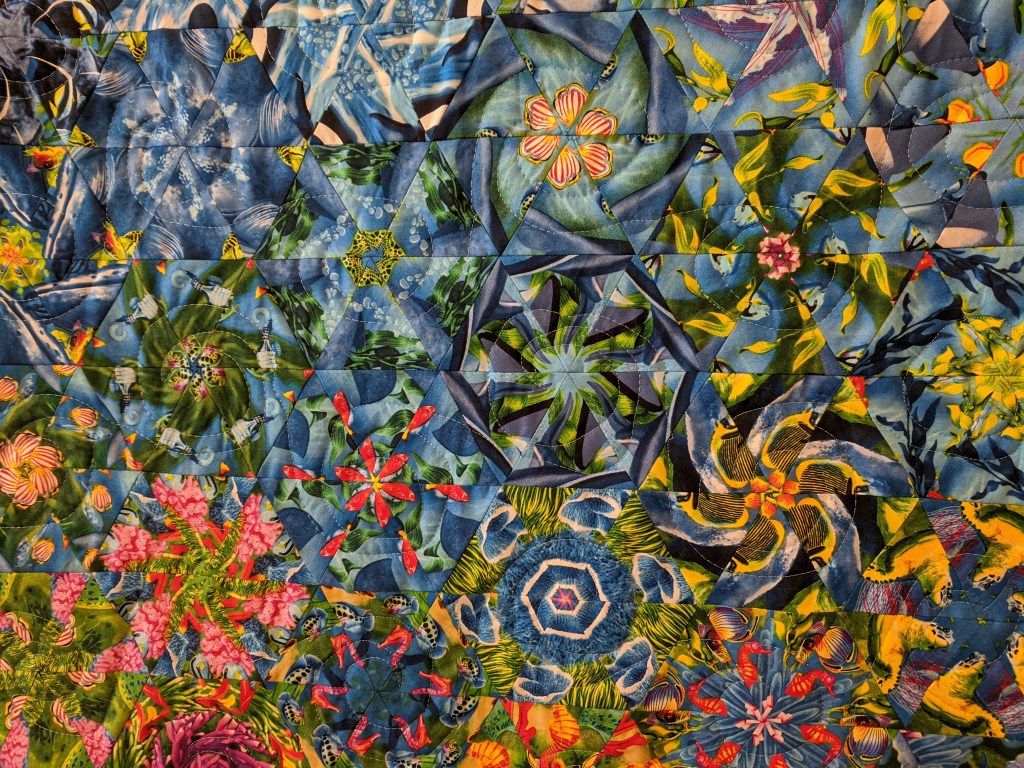
The fun part begins with designing and choosing a layout. This is where my pinterest board (and Polywall from Home Depot) really came in handy. As I laid my hexagons out, I saw that I had: (a) many blue shades, (b) some green shades, (c) some super colorful ones, and (d) hexagons that just did not fit at all. My original idea was to do a blue vs. green type of layout, like a wave or swoosh, to bring in the water theme. I ended up not having enough good hexagons to pull this off, so I went with a gradient design that’s a bit more in line with conventional OBWs.
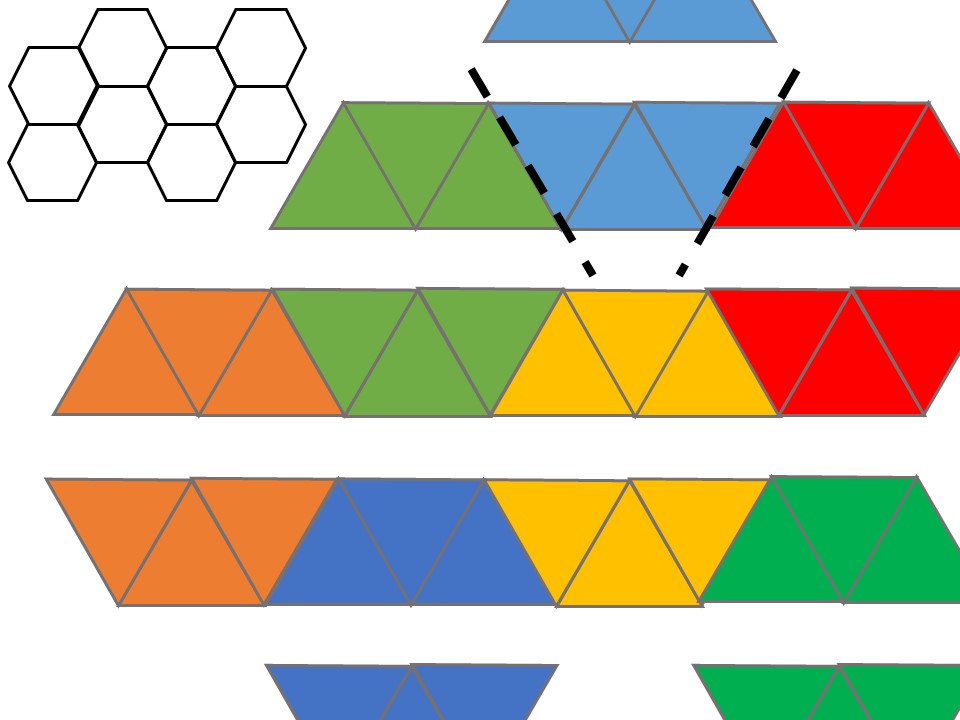
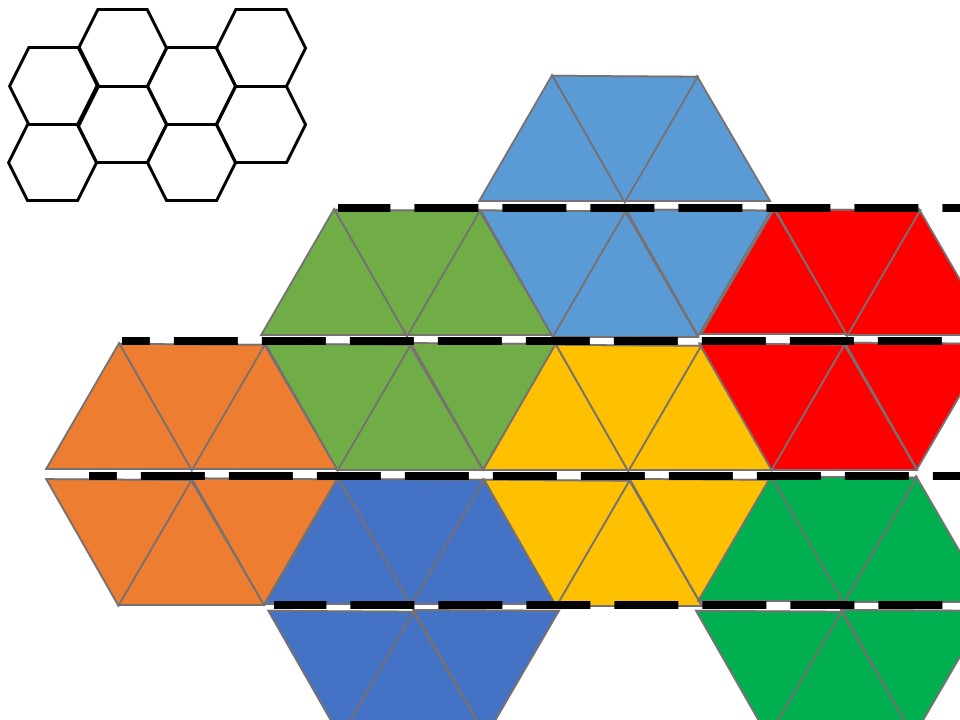
Now remember that we only sewed together halves of hexagons. Due to the grids hexagons create, each half can be sewn to the halves adjacent to it in rows (see below). Then, those rows are sewn together to create the whole grid. The hexagons on the end get cut off a bit so that the finished quilt top ends up rectangular. I used a blue blender from Joann for the border to bring together the ocean theme and give the eye some rest.
Sew into rows
Sew rows together
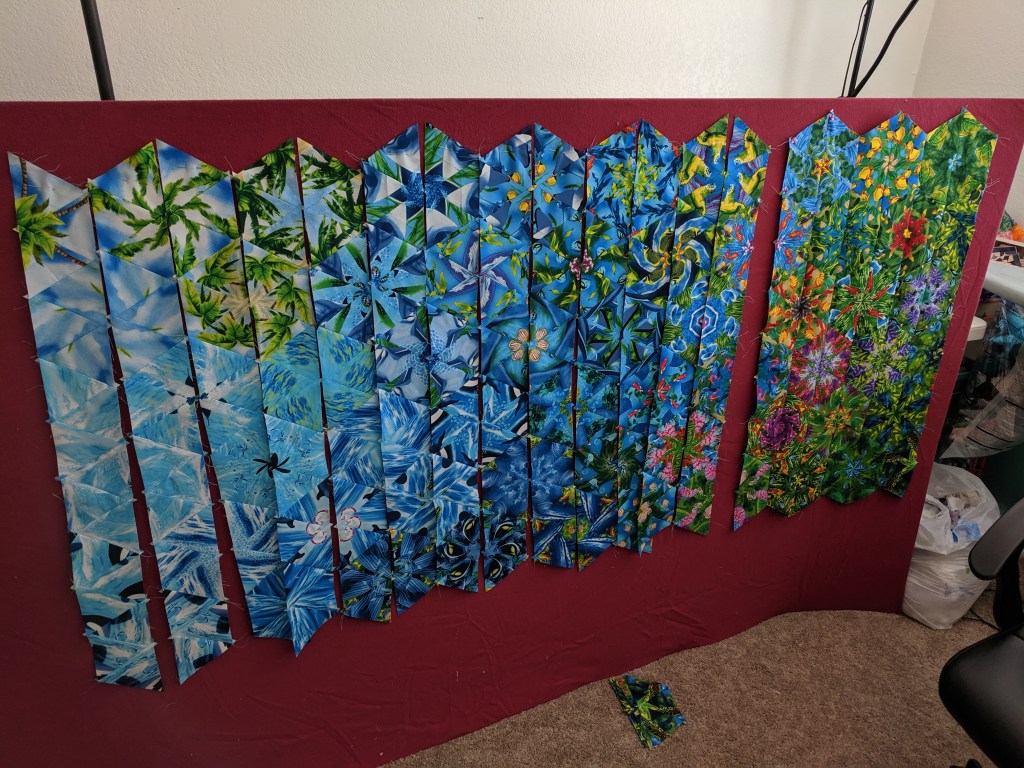
Individual rows on the left, joined rows on the right
All squared up and ready!
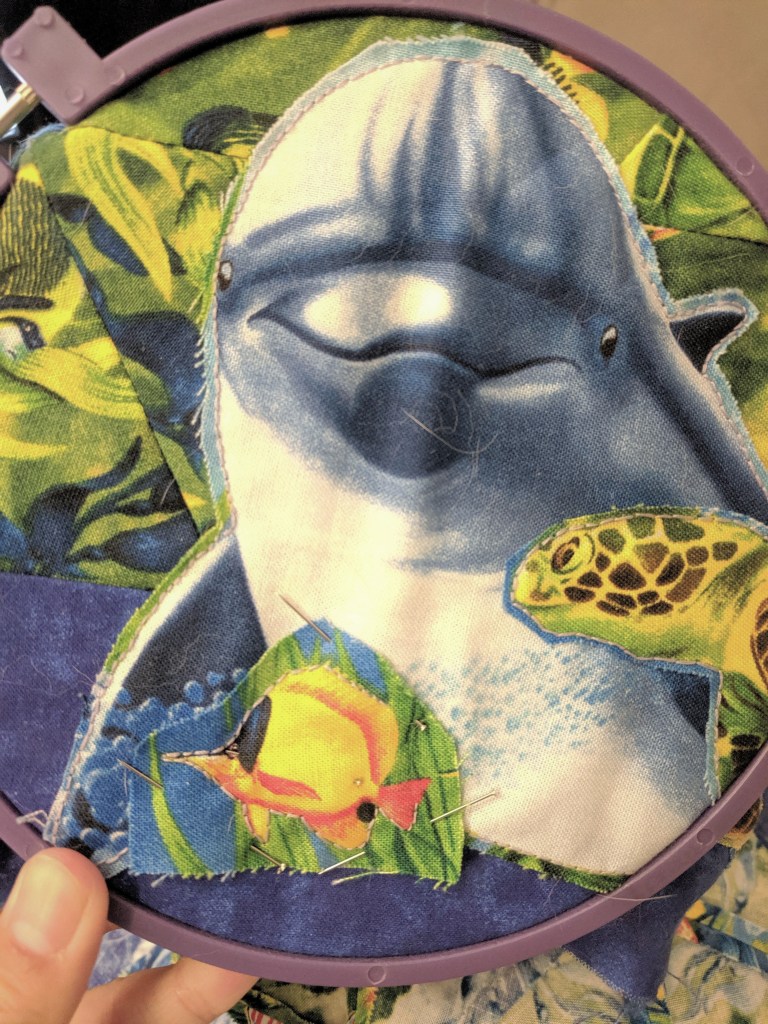
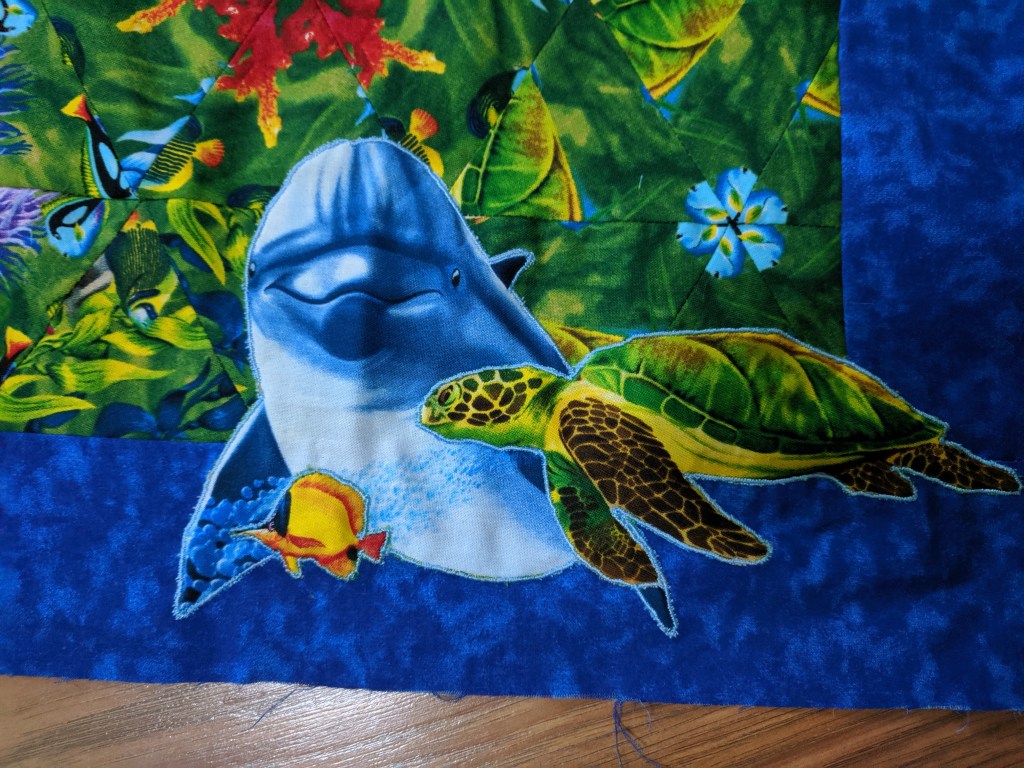
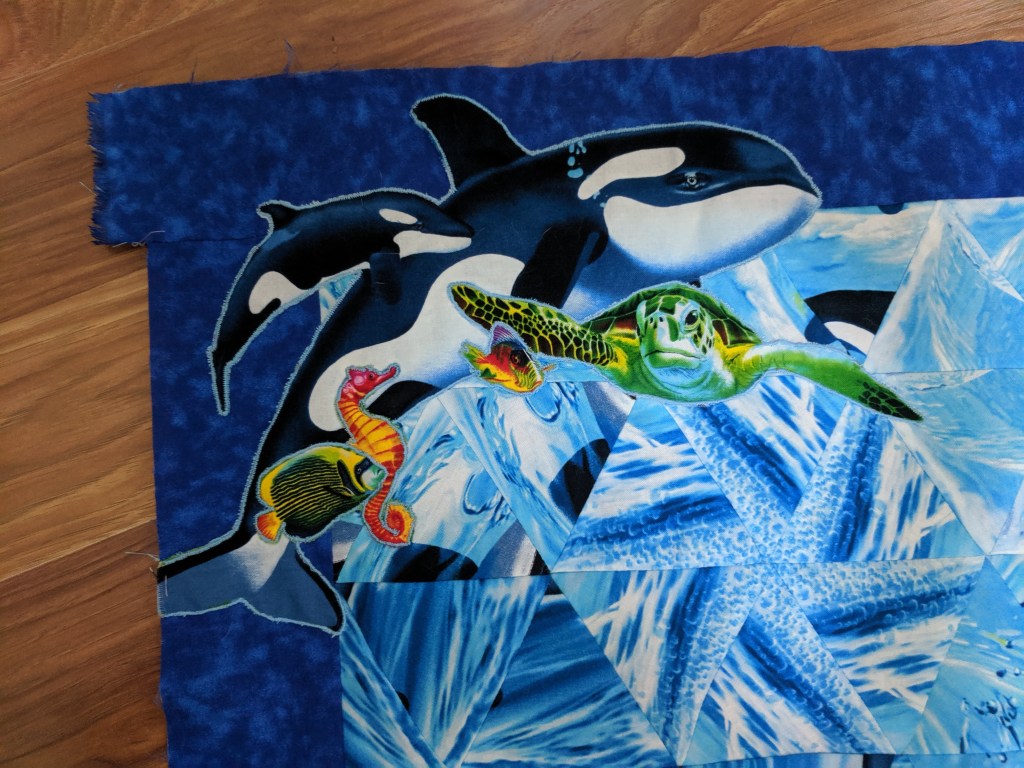
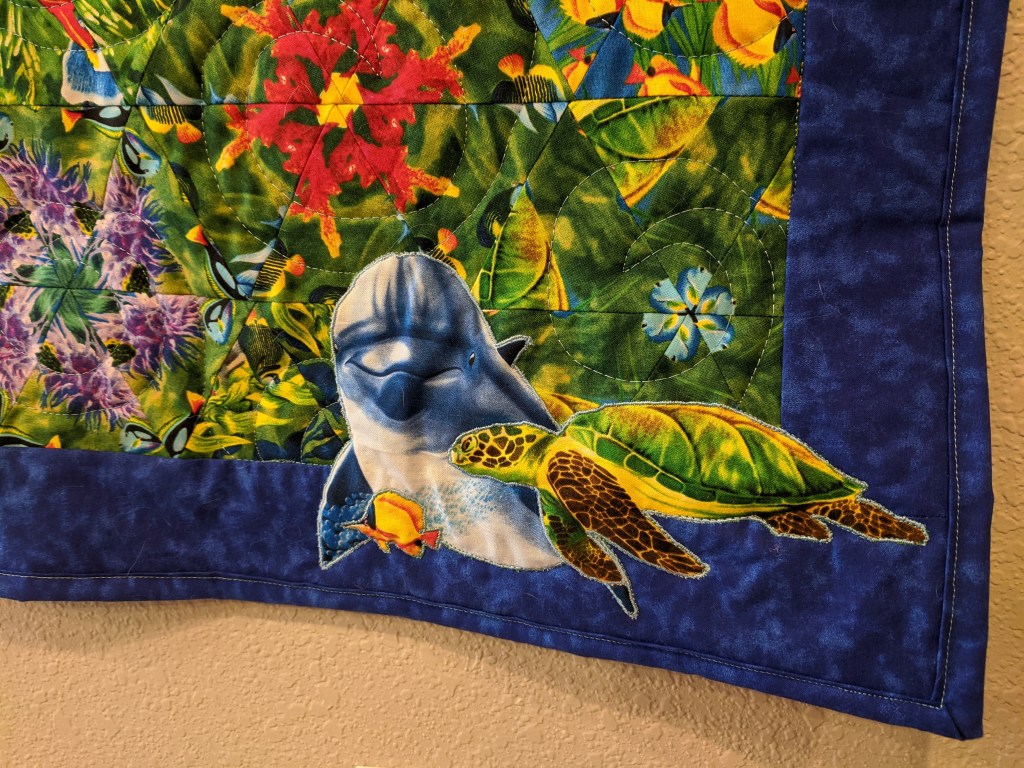
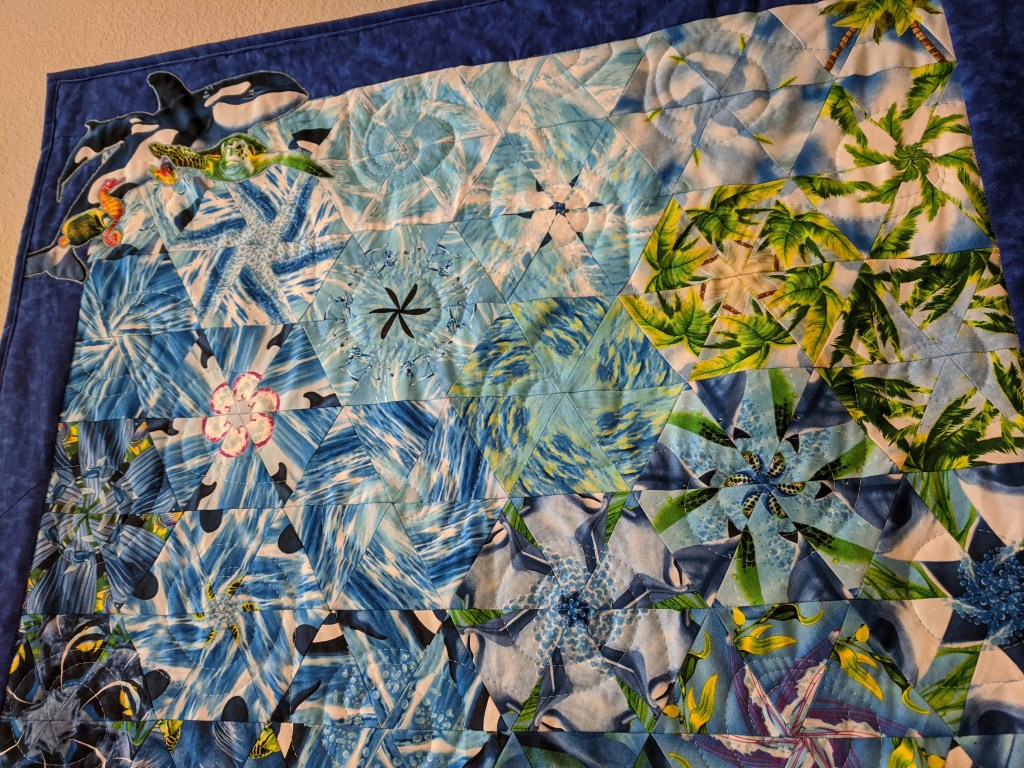
To embellish my OBW, I chose to cut out some of the animals and applique them onto the top. Applique is a technique to sew a patch onto a bigger piece of fabric, and can be done in a ton of ways. I chose to hand baste my animals on and then go over the hand stitches with the machine to clean up the edges. I liked the idea of including some non-kaleidoscope-d bits to help the eye, and plus I love sea creatures so I wanted to feature them, whole, on the front.
Hand basting in the embroidery hoop
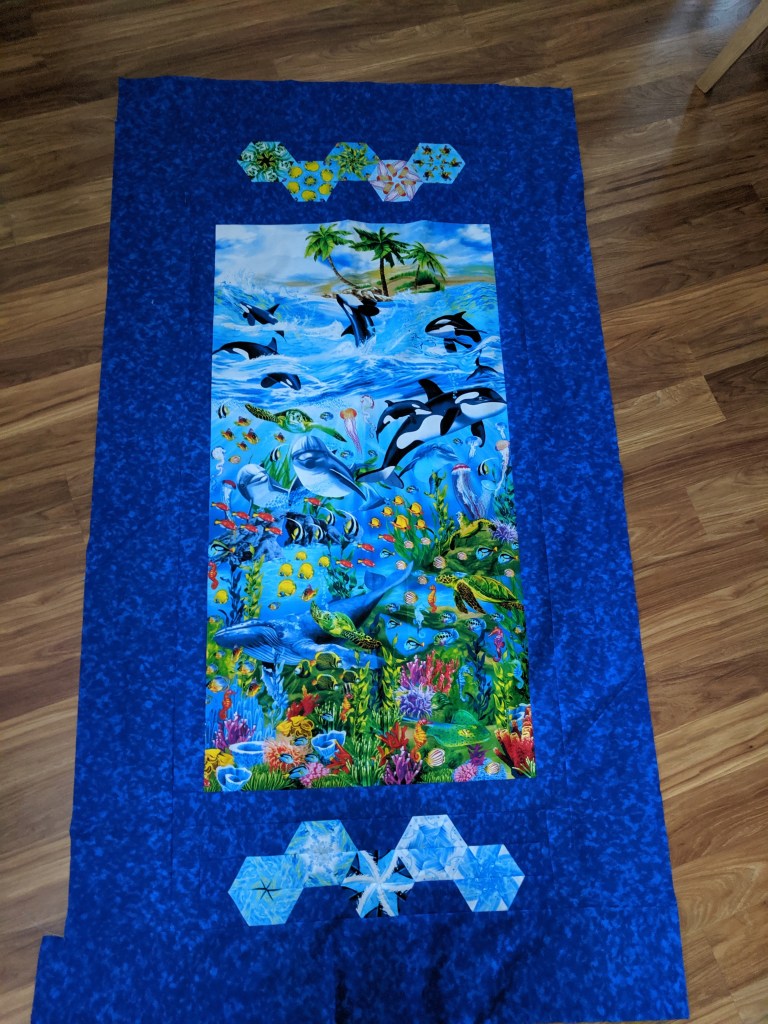
I wanted the backing to be the original panel, so I could flip it over and show people the uncut panel. And I added some of hexagons I liked that didn’t fit in the top 🙂
Finished top
Finished backing
In total, making the half-hexagons took a couple days, deciding on the layout took a week, assembling the top took a couple days, applique-ing my animals took a couple weeks, the backing took a couple days, and then I let it sit… and sit…
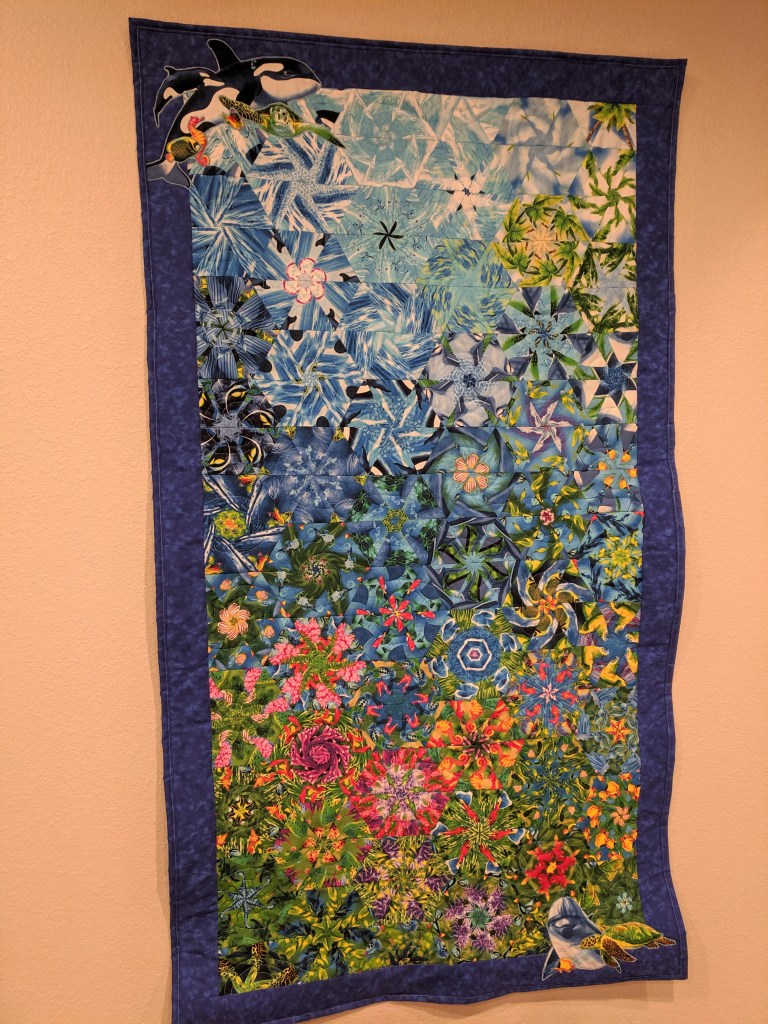
And finally, I decided on a quilting design and quilted it up. 🙂 I added a little tube on the back to help me hang it up, bought a little dowel at Home Depot, and hung it up. I’m so happy to have this done and finally hanging up in my kitchen where I imagined it.
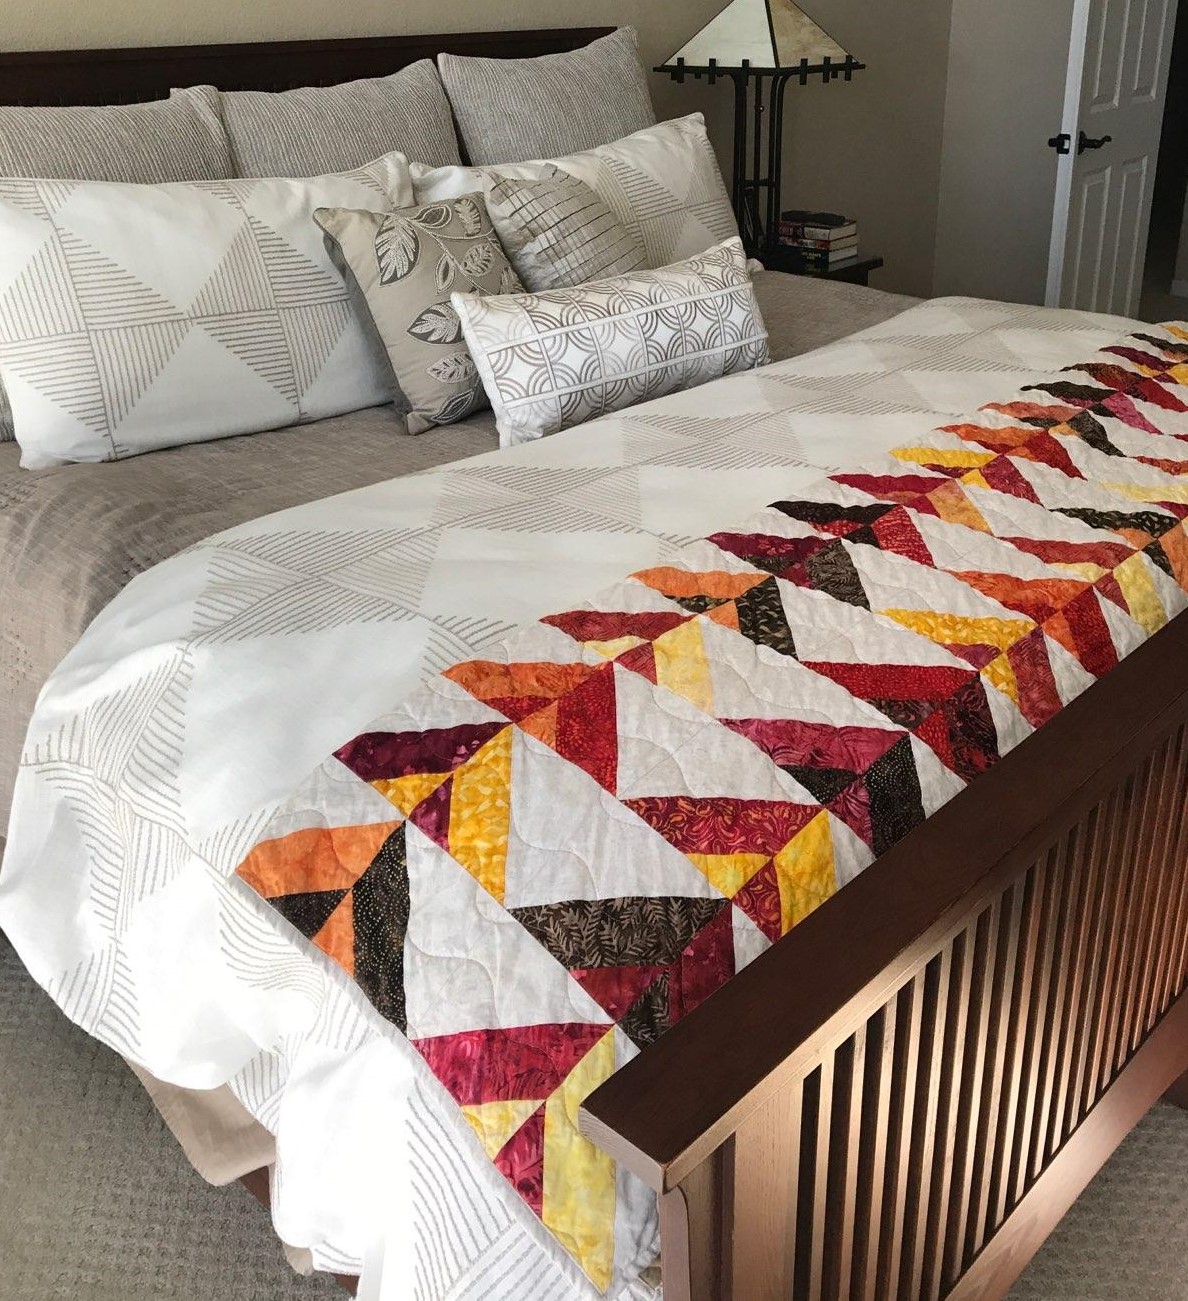
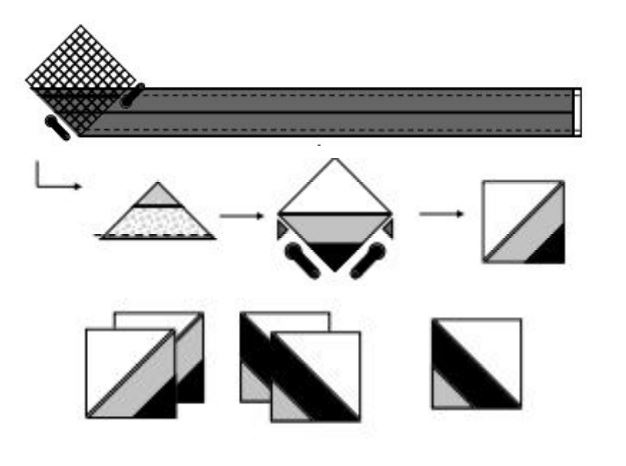
I made this bed runner for my parents! It’s from the On Point pattern from Bluprint/Midnight Quilt Show. It’s another HST type of design, but with a twist. I used the Boundless Batiks Fireside jelly roll to bring in some autumnal/southwestern colors. I sewed pairs of strips together down the long end to create 20 strip pairs, which were then sewn to my background fabric. Now here’s the magical and efficient part: the strip pairs and background fabric is now a tube, right sides in. I used a square ruler to cut out triangles from the fabric, lining up the 5.5″ marks with the sew line. Then you iron them open and it’s a HST!
Actual diagram from the pattern about cutting the tubes to make HSTs
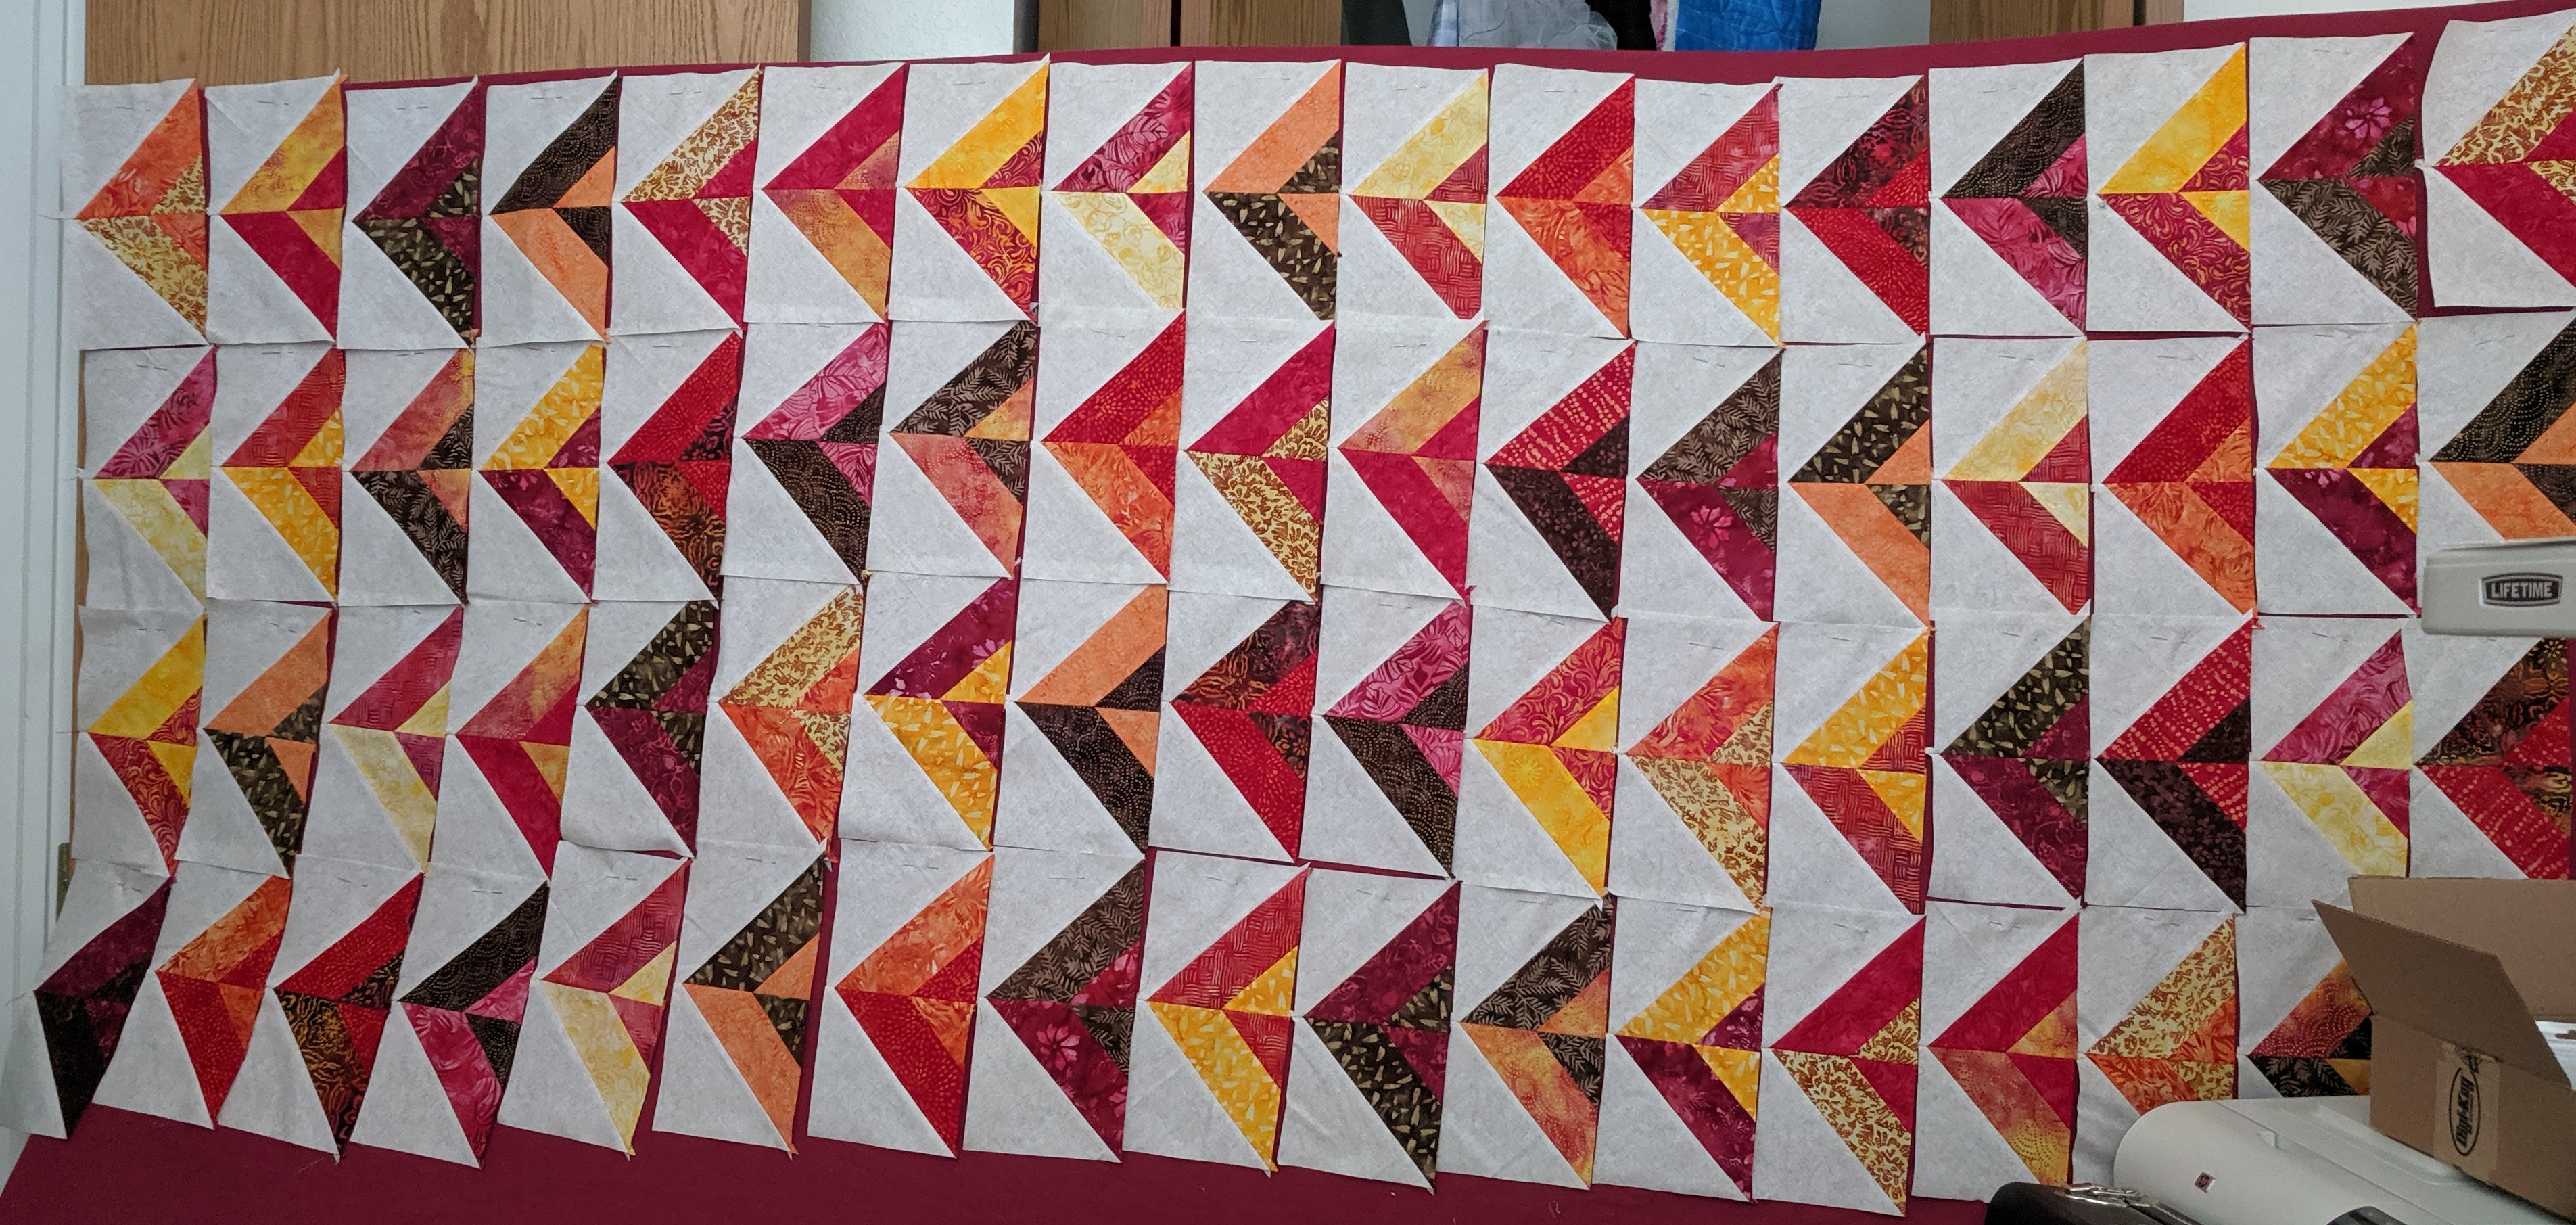
The pattern calls for matching the strips to create triangles inside of triangles, but my mom liked the mismatched strip layout, which I think brings a lot of movement and visual interest to the quilt. I assembled all my HSTs and paired them together to make the mismatched rectangular units. Then I laid them out on my new design wall (a piece of Polywall from Home Depot covered in an old flannel sheet) so that no fabric was touching the same fabric in any direction.
Designing took a bit of fiddling, and my wall fell down at one point – this isn’t even close to the final layout, haha
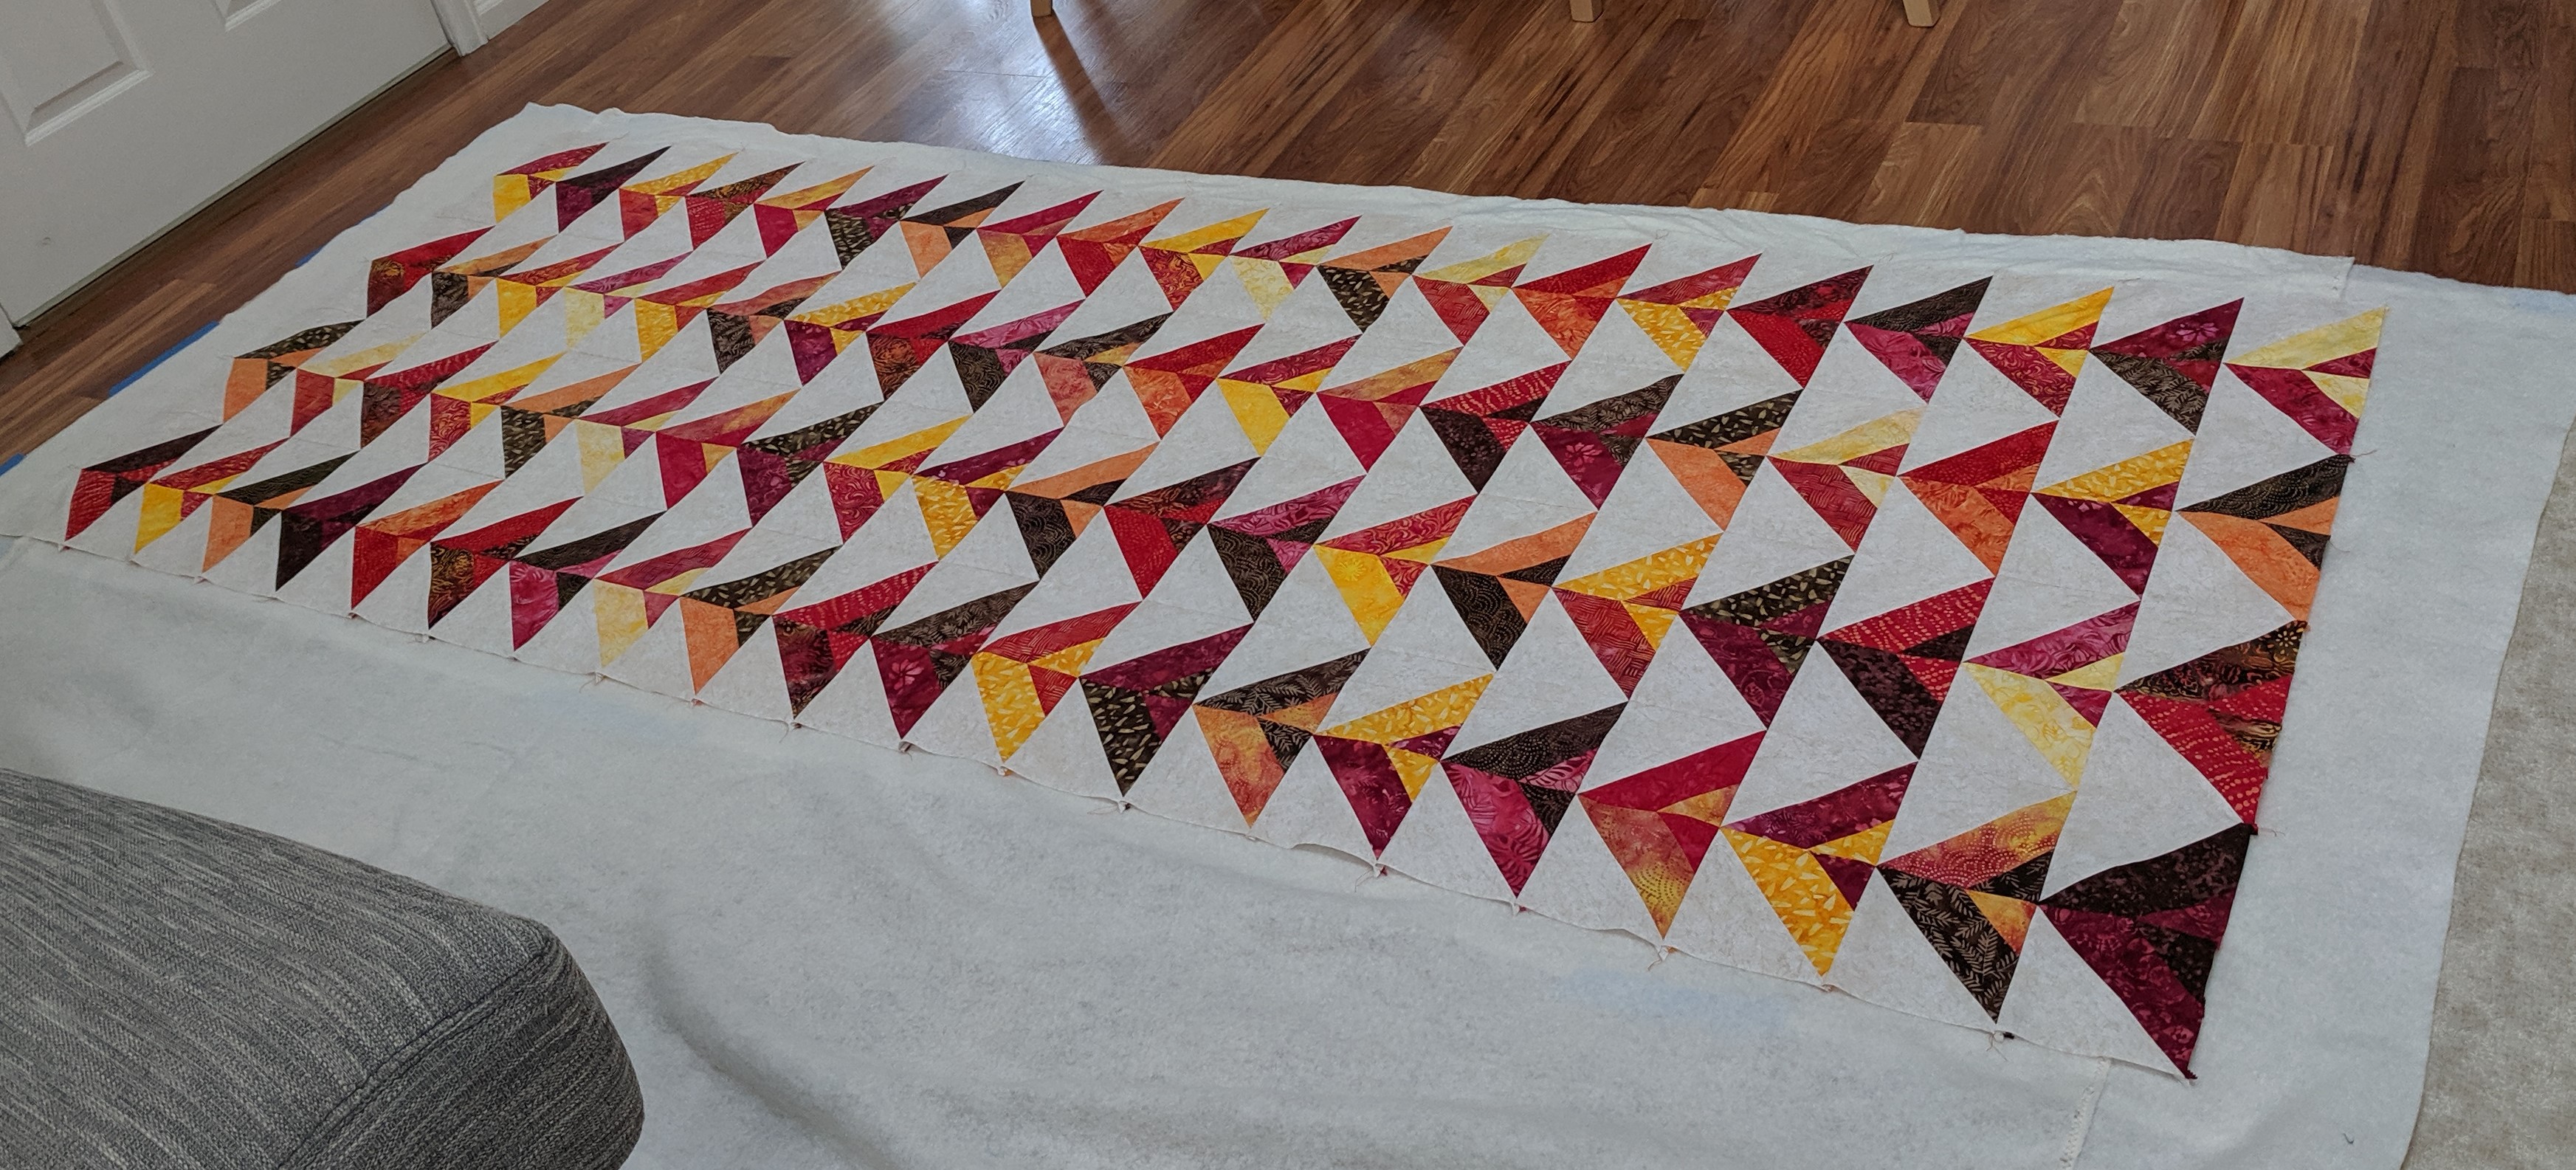
I wanted to quilt it in a way that minimized the harsh geometry, and since I’d had previous success with wavy lines, I decided to go for it. I chose a tan-ish thread to quilt with that ended up having a bit of sheen to it which makes it look almost gold.
Ready to be basted
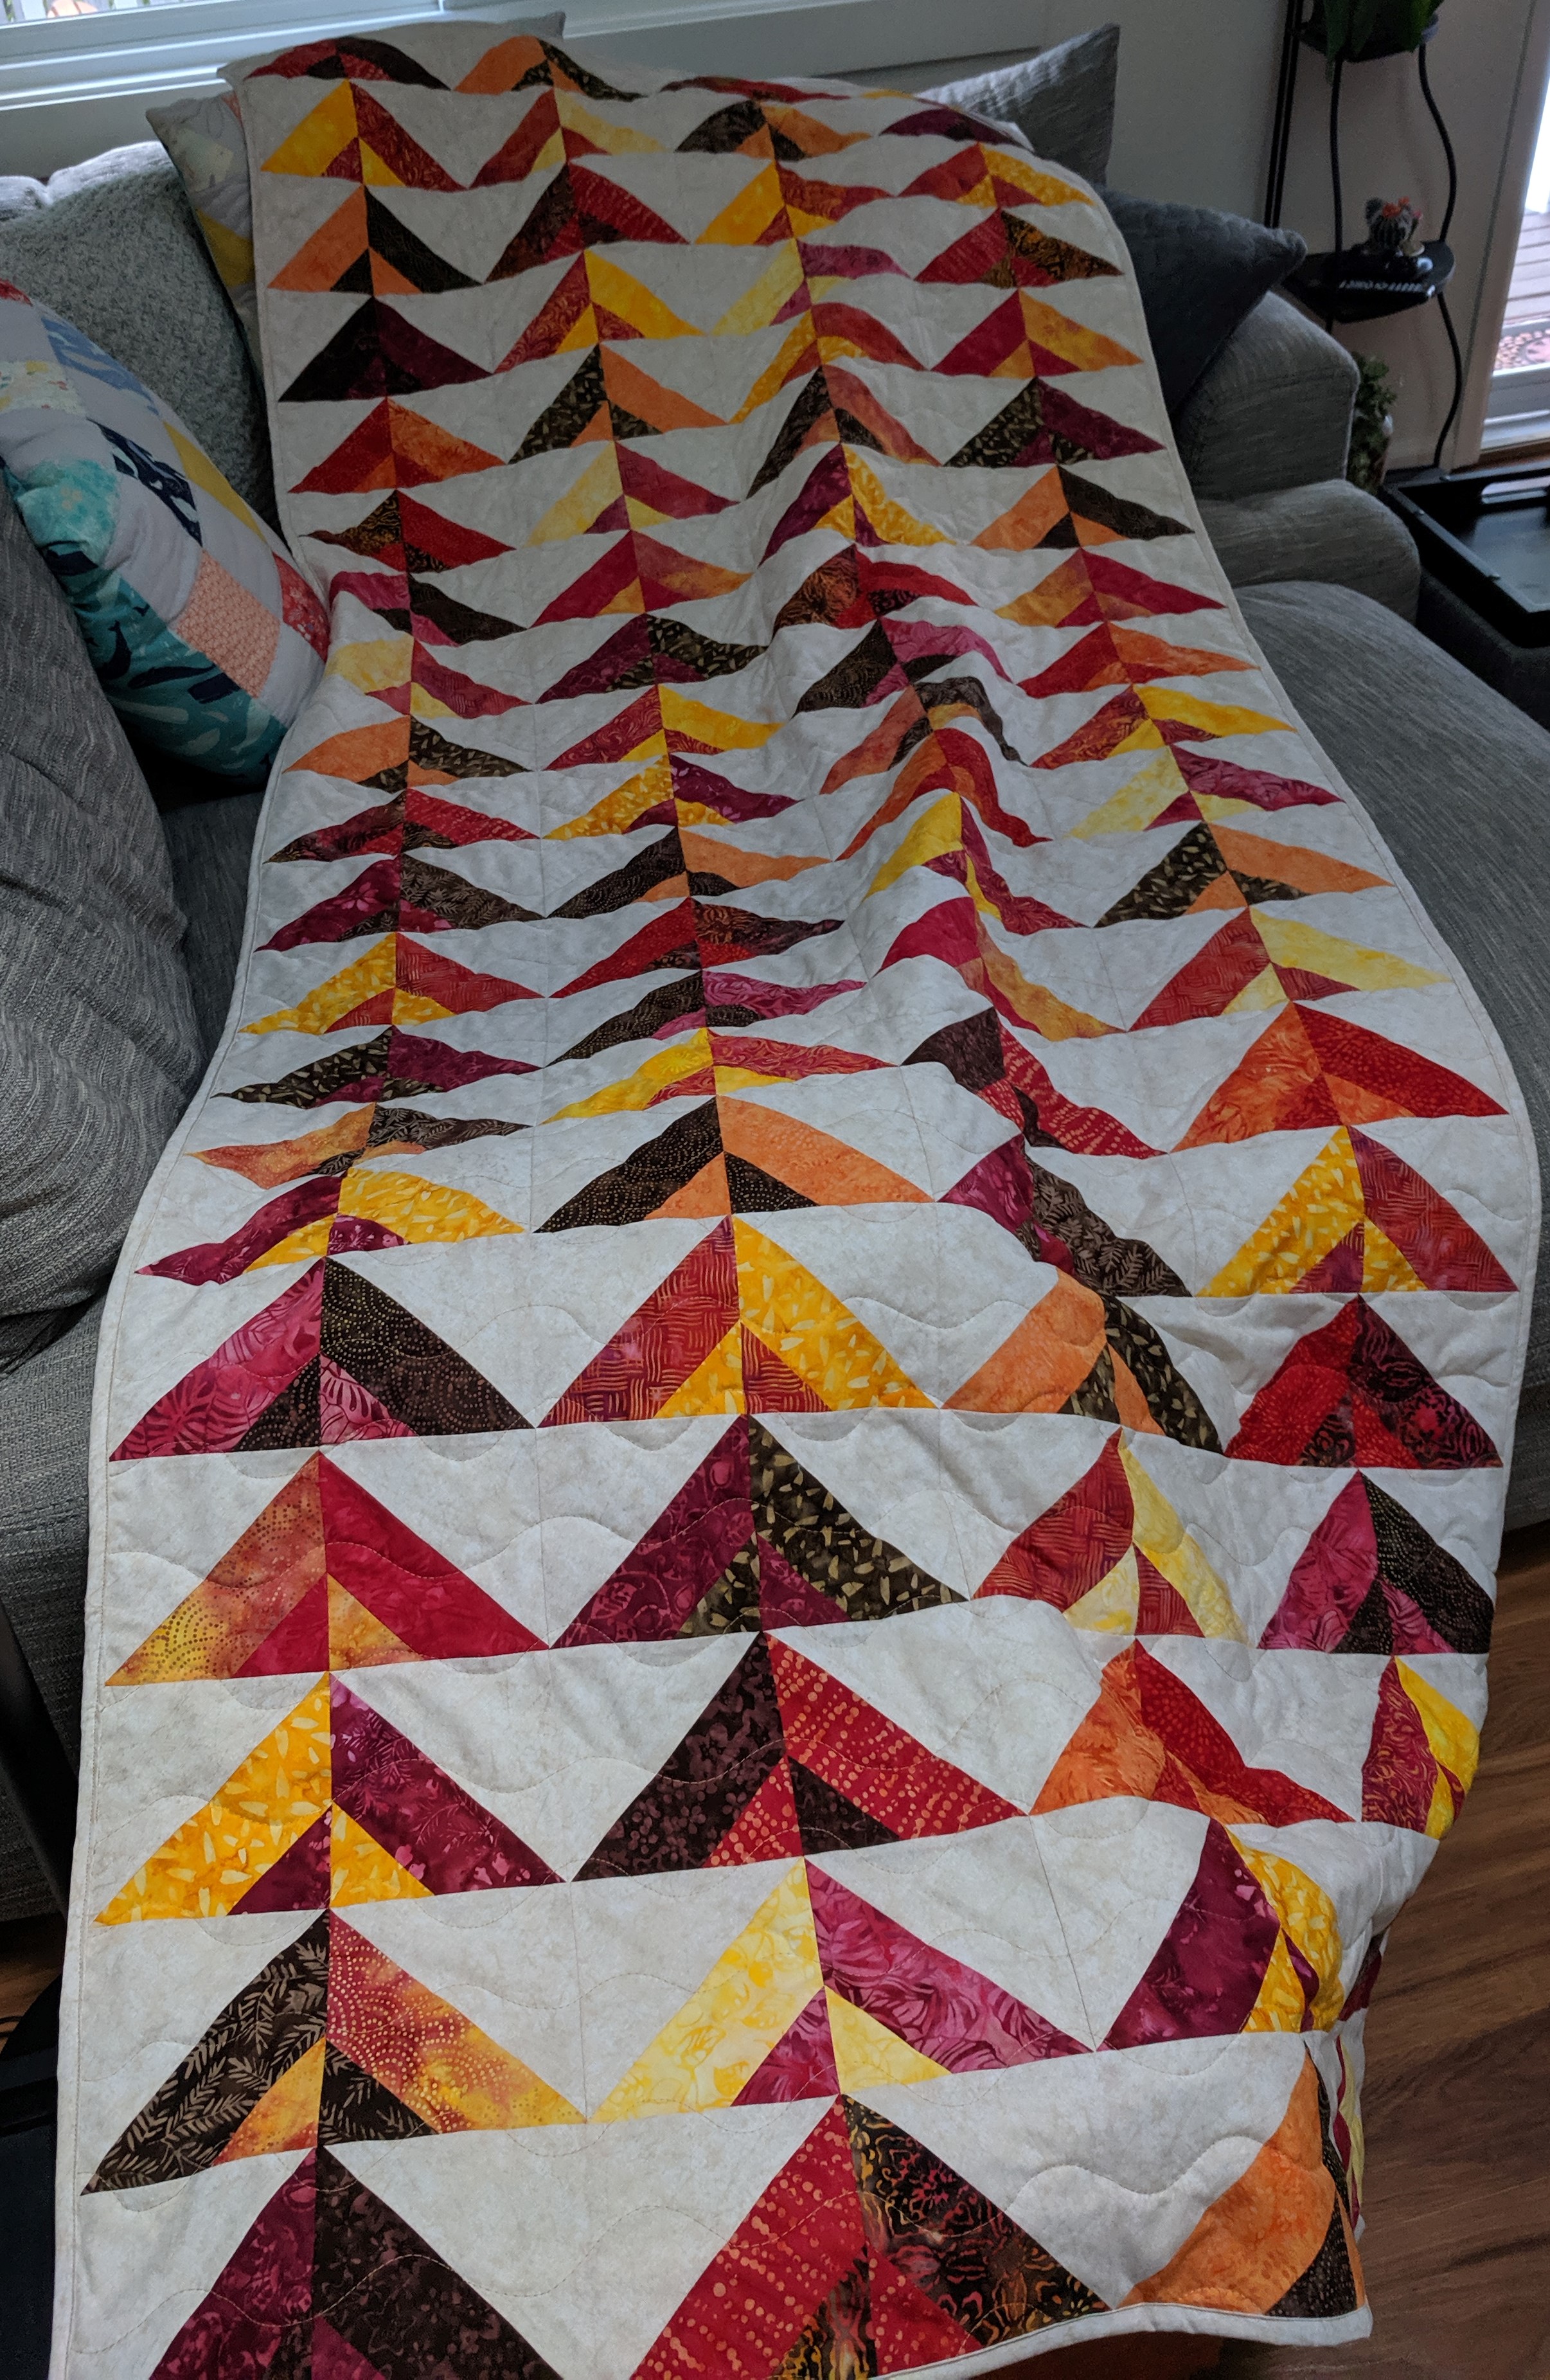
Maybe one day I’ll take pictures in a better place than my couch, but it works
It’s impossible to buy exactly the amount of fabric you need for a project. There will always be scraps, unless you’re making a perfectly rectangular item that uses up all the fabric straight off the bolt. For every other project though, there are bits and pieces of various sizes that aren’t used in the item itself. Or just leftovers because I bought more fabric than necessary.
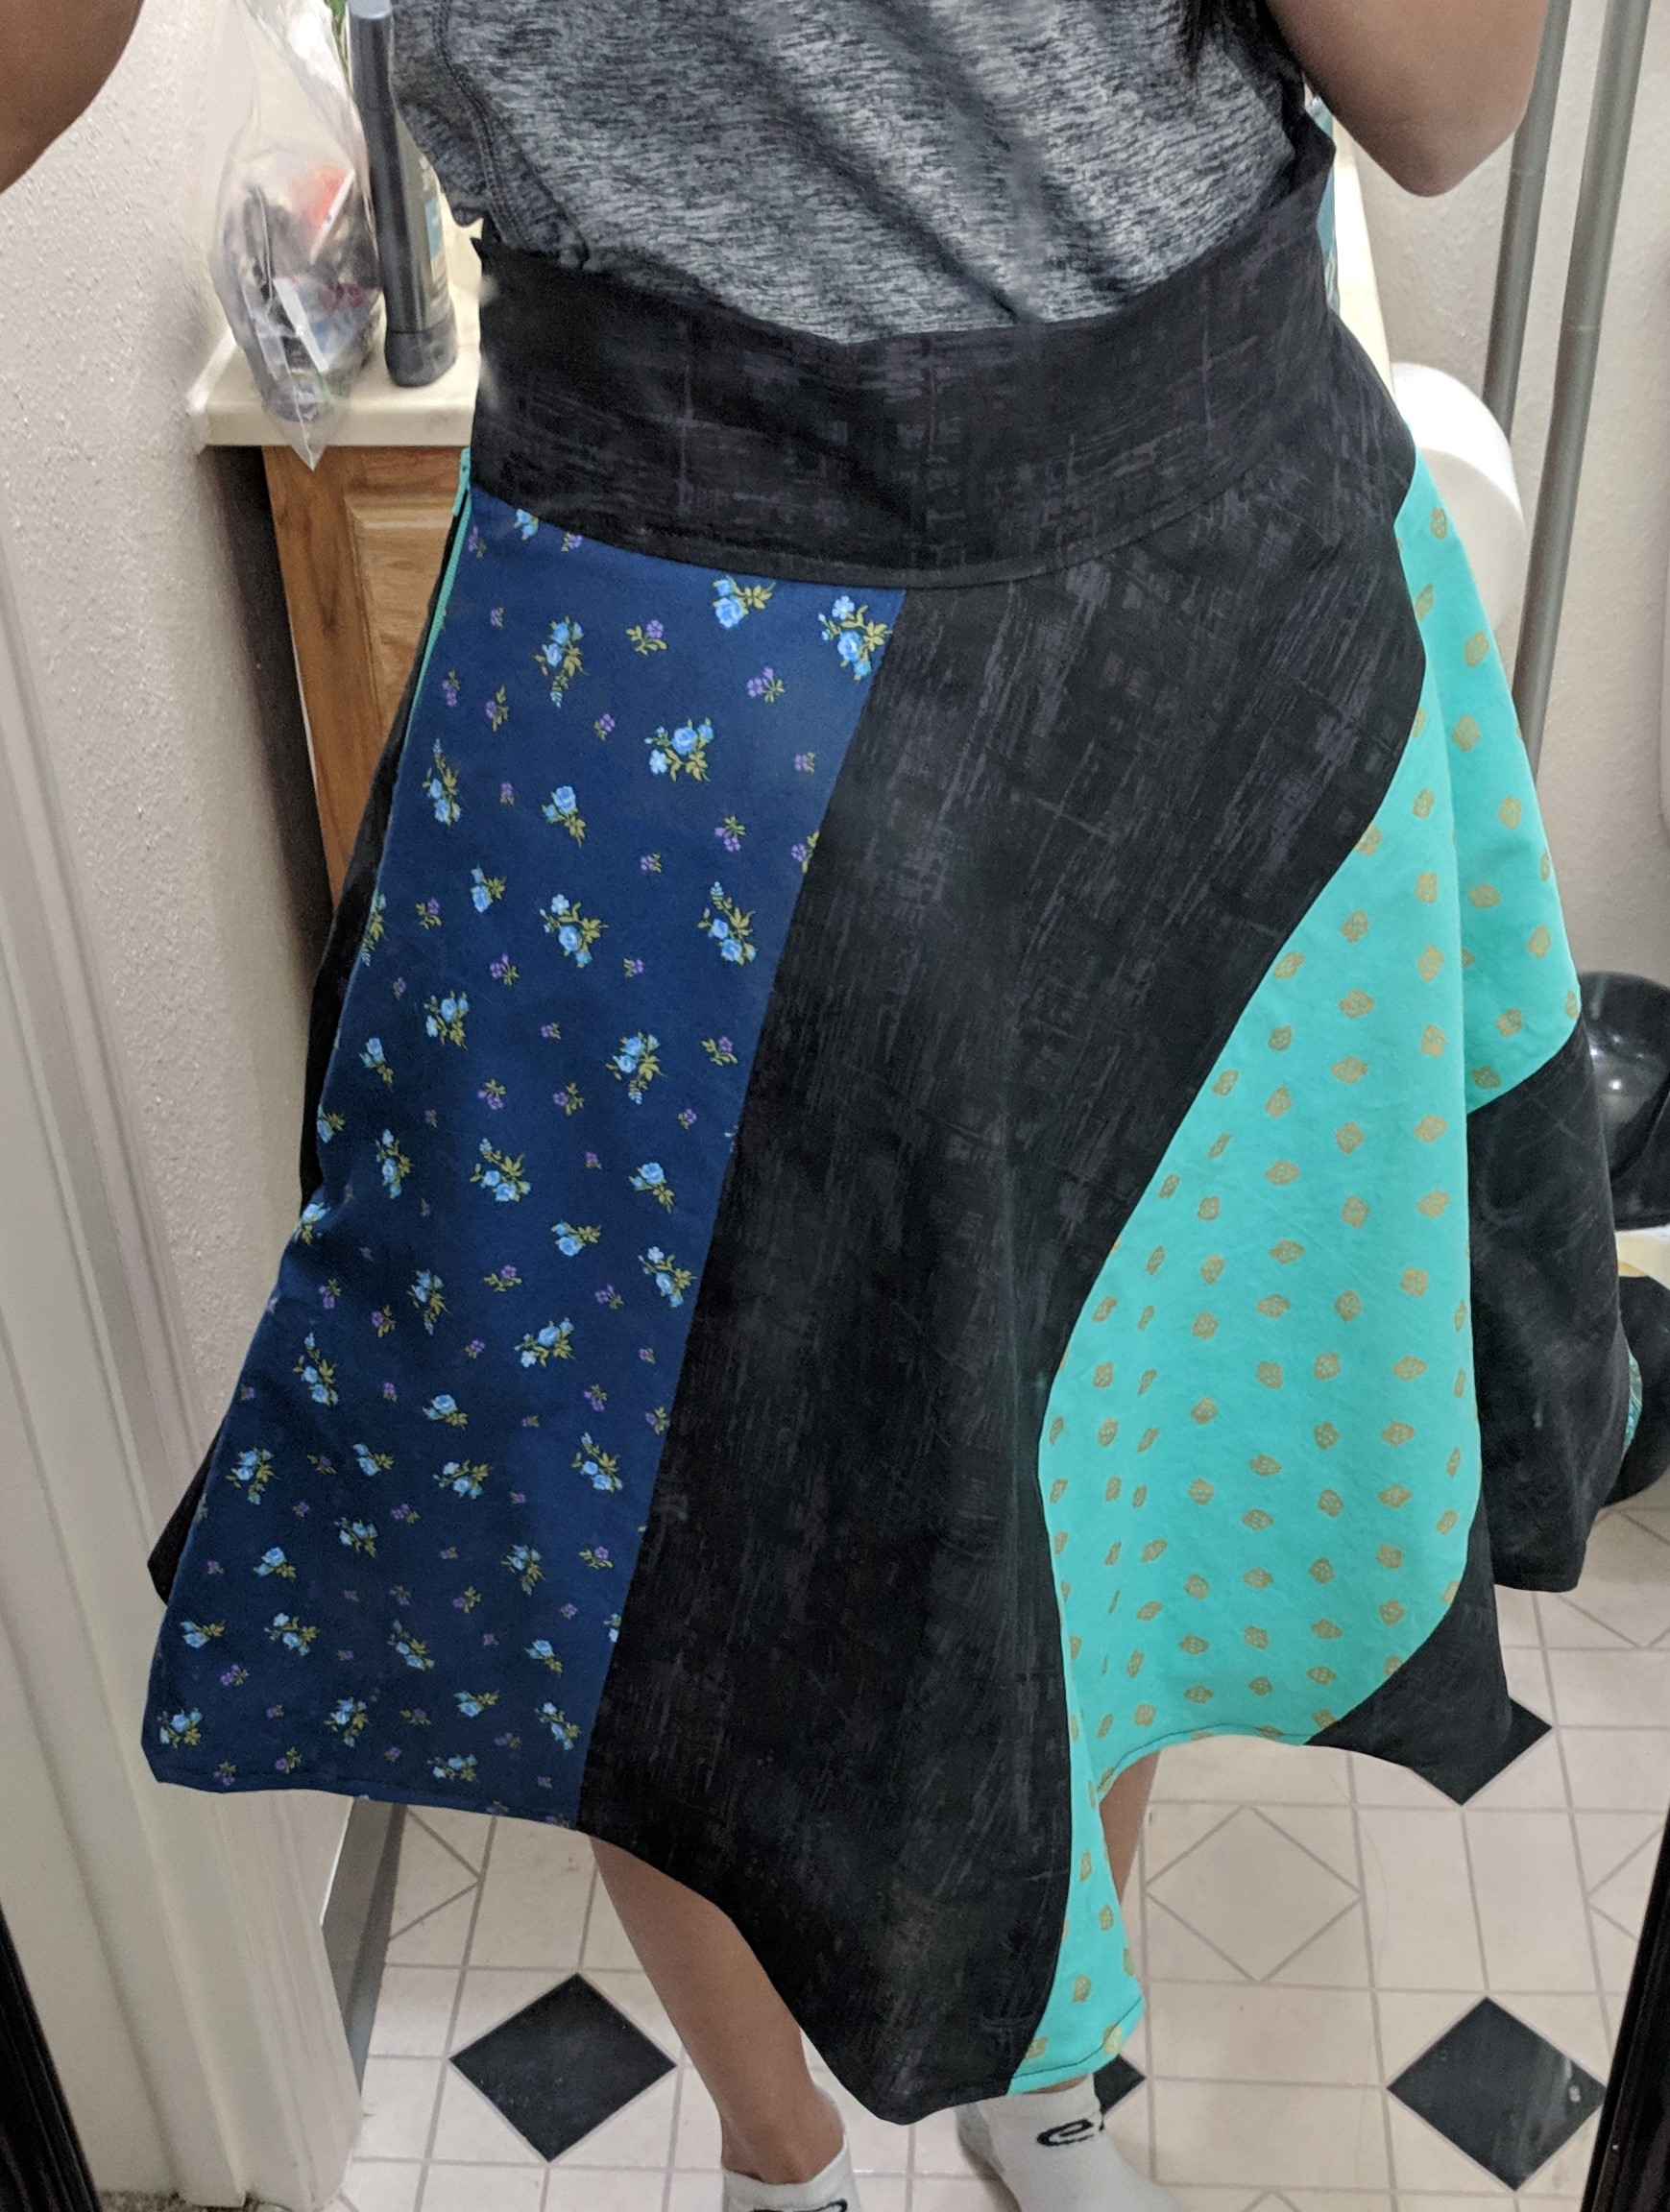
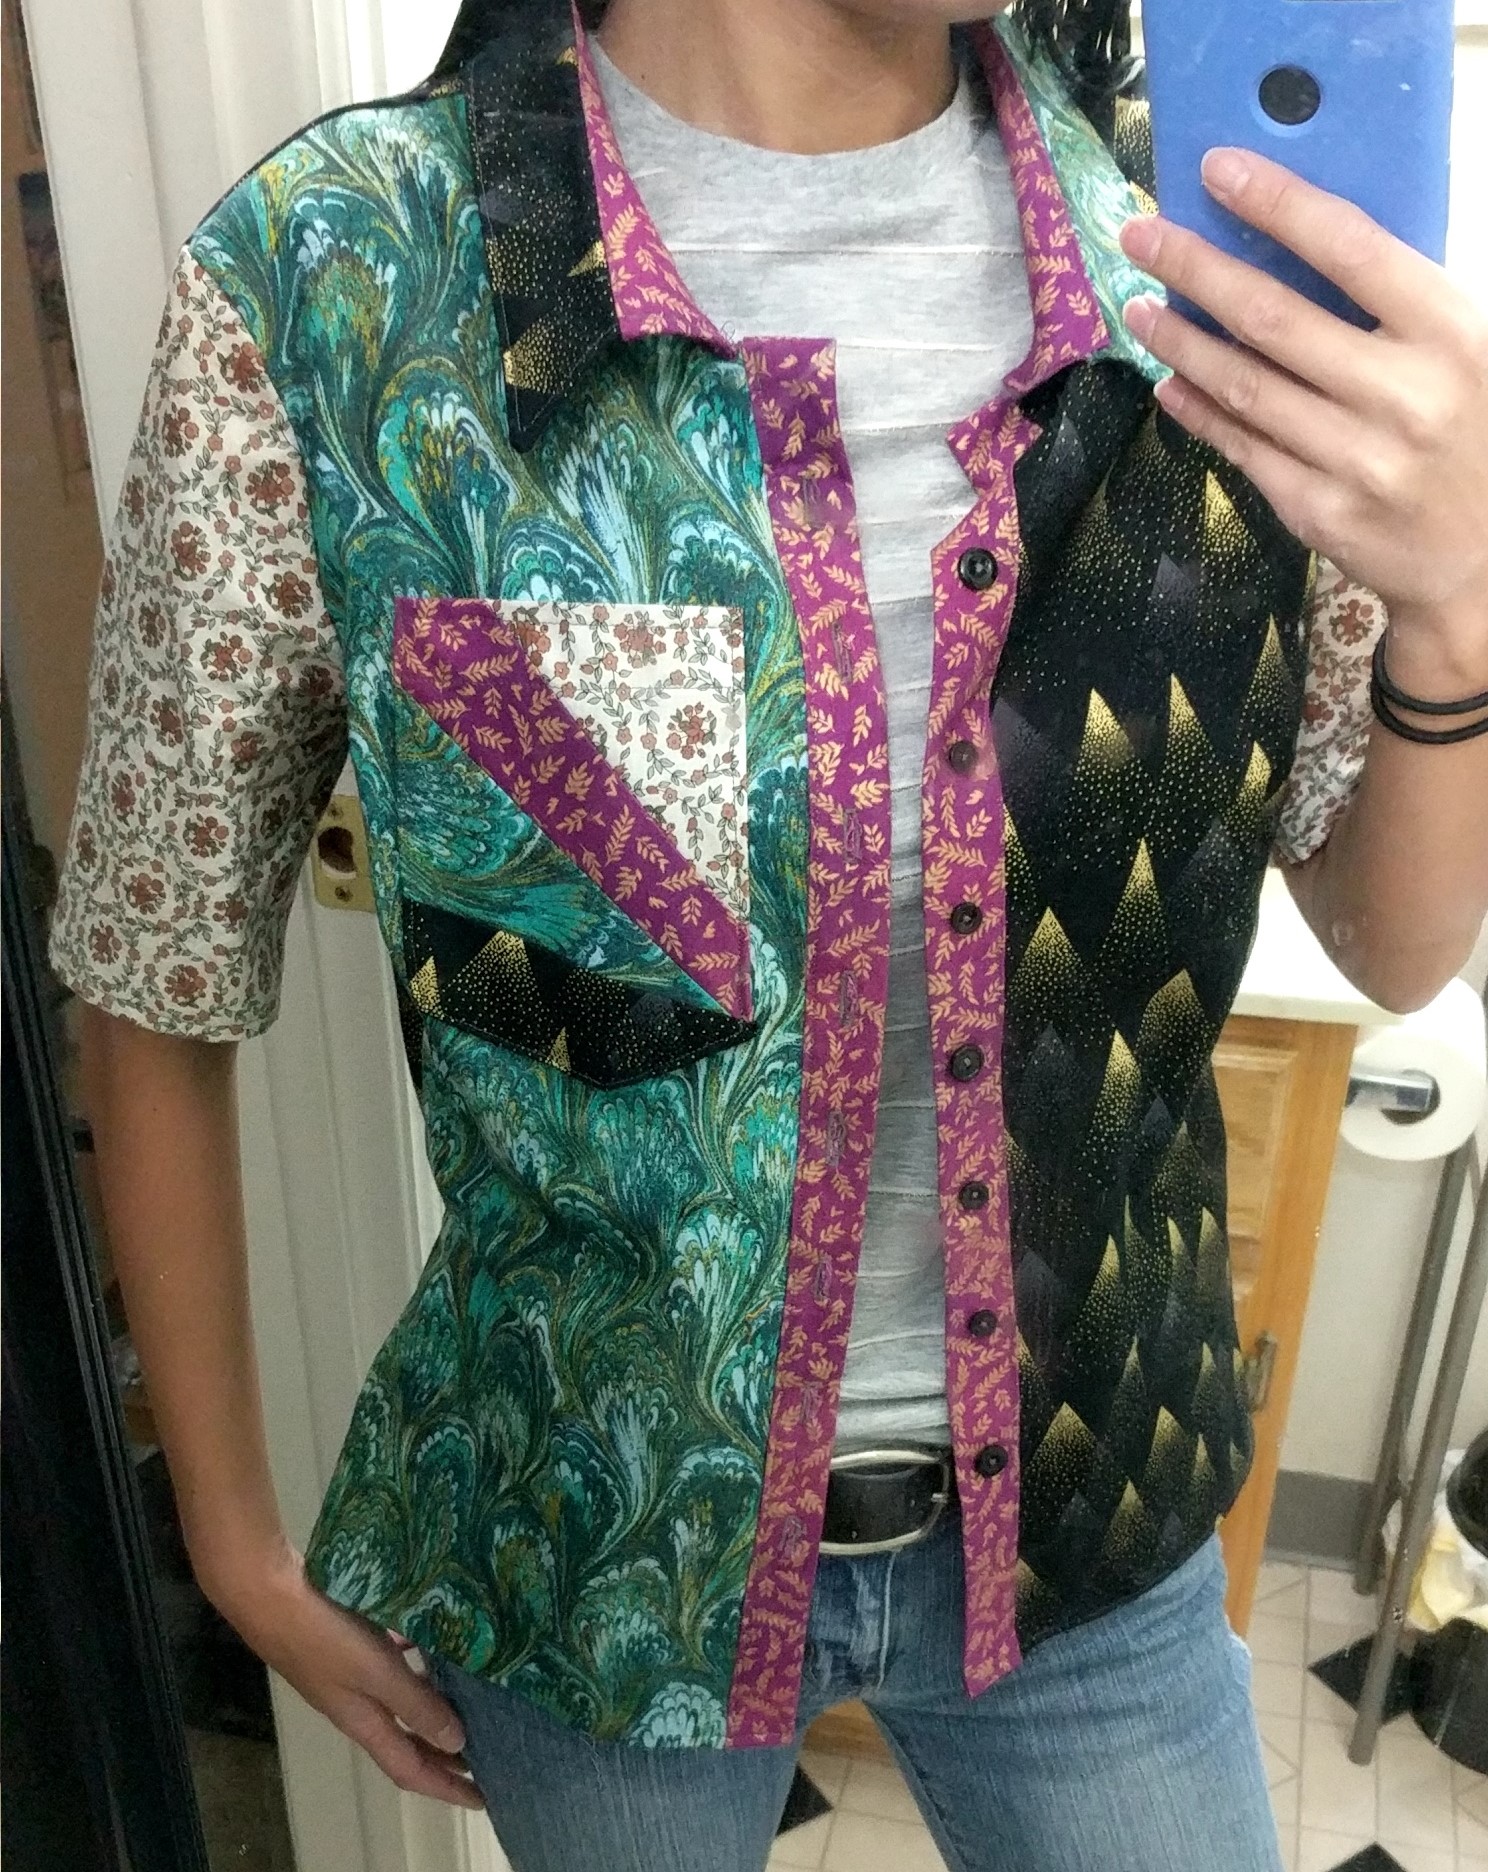
I decided to use some of these old scraps to make two different projects – the Skirt of Projects Past and the Shirt of Projects Past.
I liked (a) not buying new fabric and just recycling and (b) making something super colorful with weird, wonderful patterns. Most of this fabric I bought a year ago to make ties and neck warmers, and they generally have the same size print. And it was all cotton from Joann, so I wasn’t worried about weird shrinkage or anything.
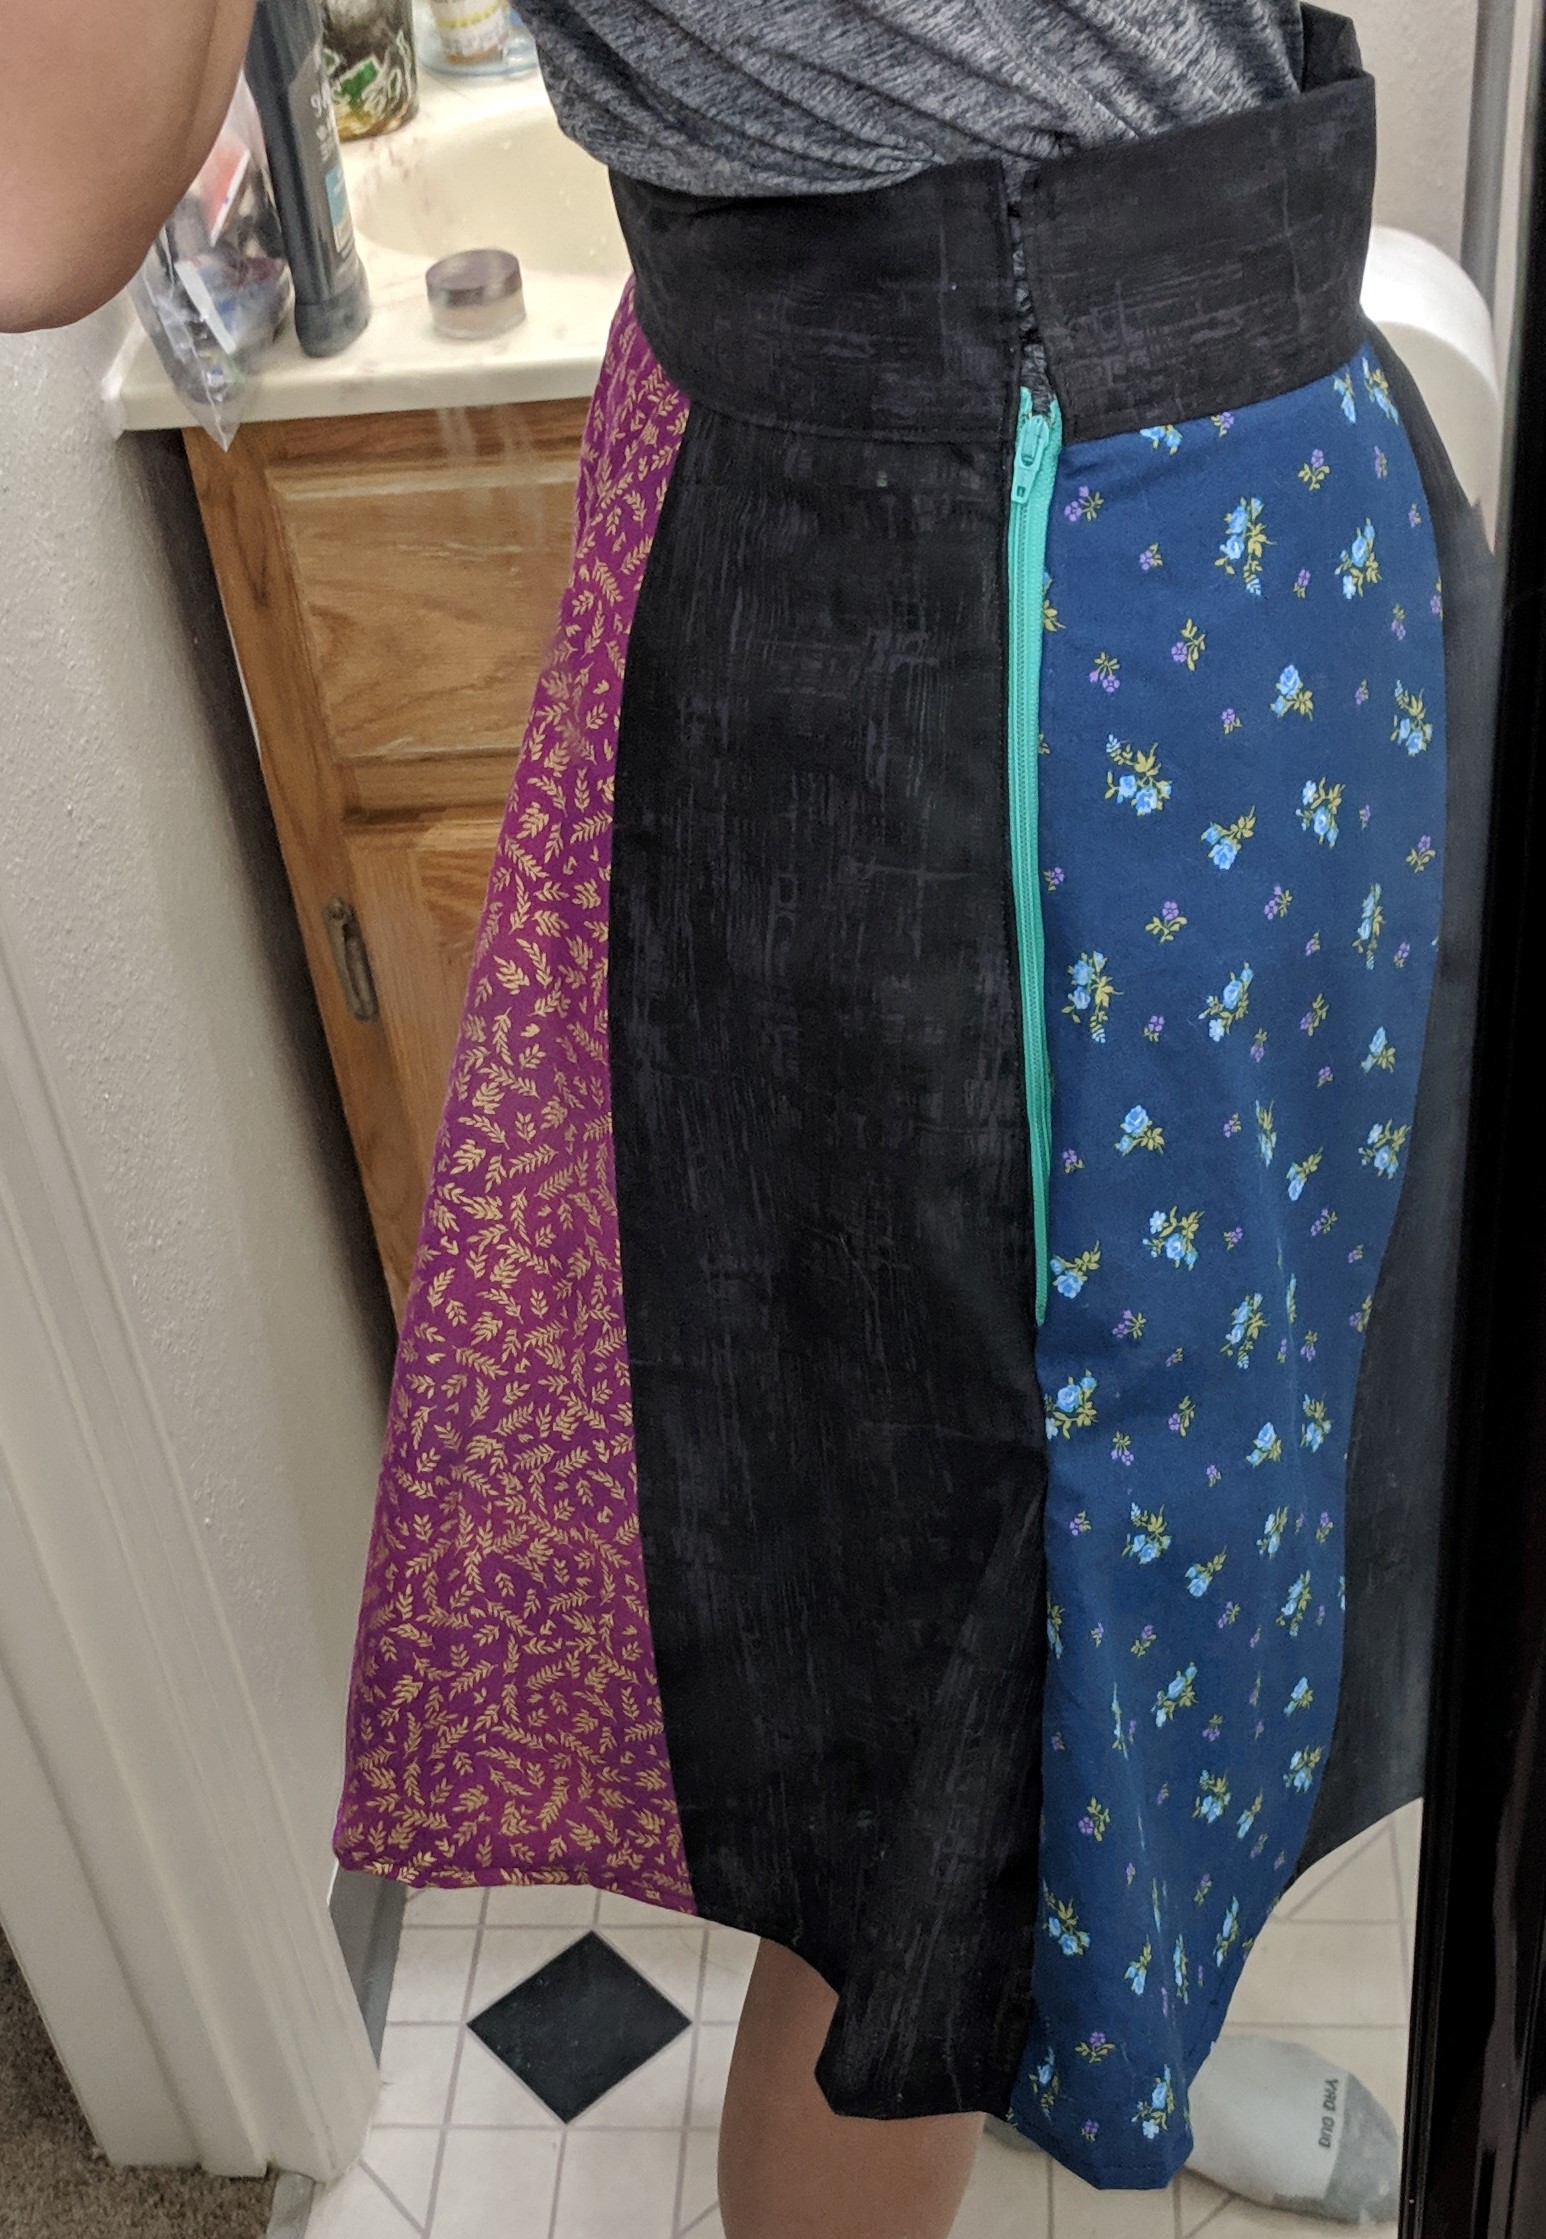
The skirt is made with strips sewn together, alternating print and black (from the Trapper Keeper). Then I cut out approximate semicircles, which created a front and back. I sewed one side together and installed a zipper on the other side. The waistband isn’t as sturdy as I’d like, in projects after this I used elastic inside the waistband just to hold it closer to the body.
I used a modified Lekala #5446 Classical Blouse pattern for the top. I added a pocket using foundation piecing, adding layer after layer to get a pocket sized piece of fabric. I love the overall look of this top, but the collar opening leaves something to be desired, it’s a bit stiff and falls open strangely when buttoned.
Shirt completed March 30, 2019. Skirt completed Jan 10, 2019.
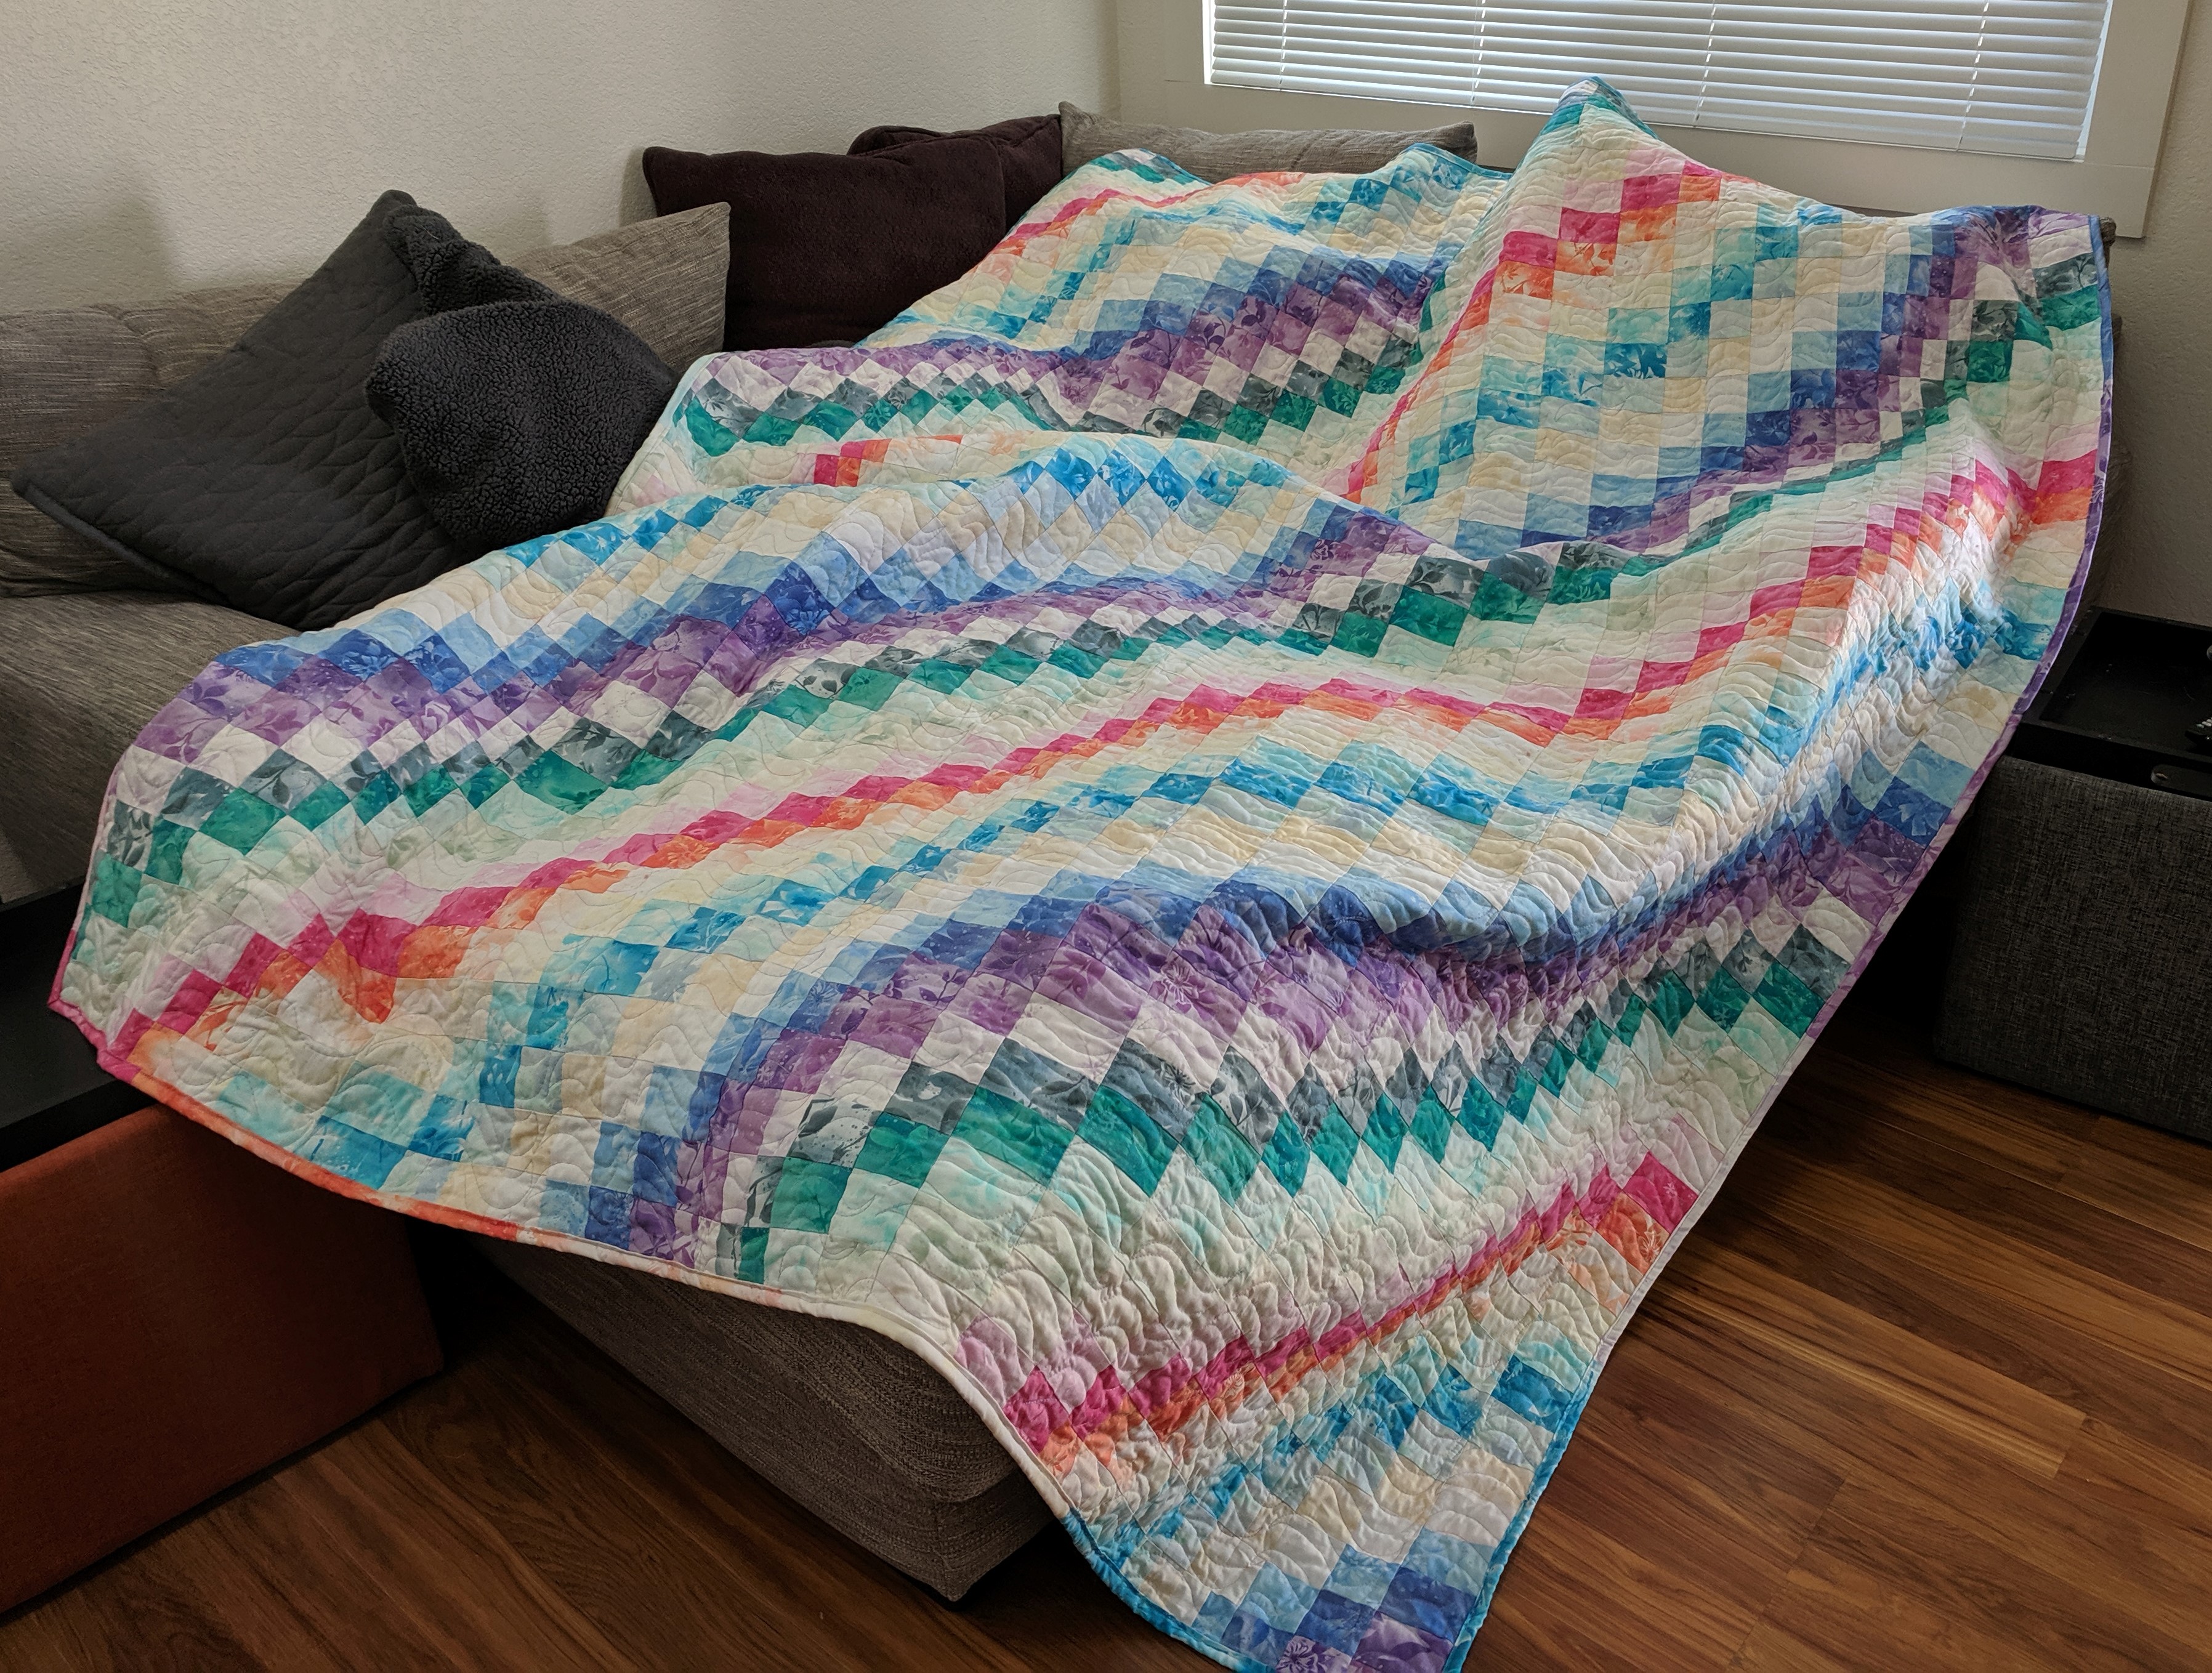
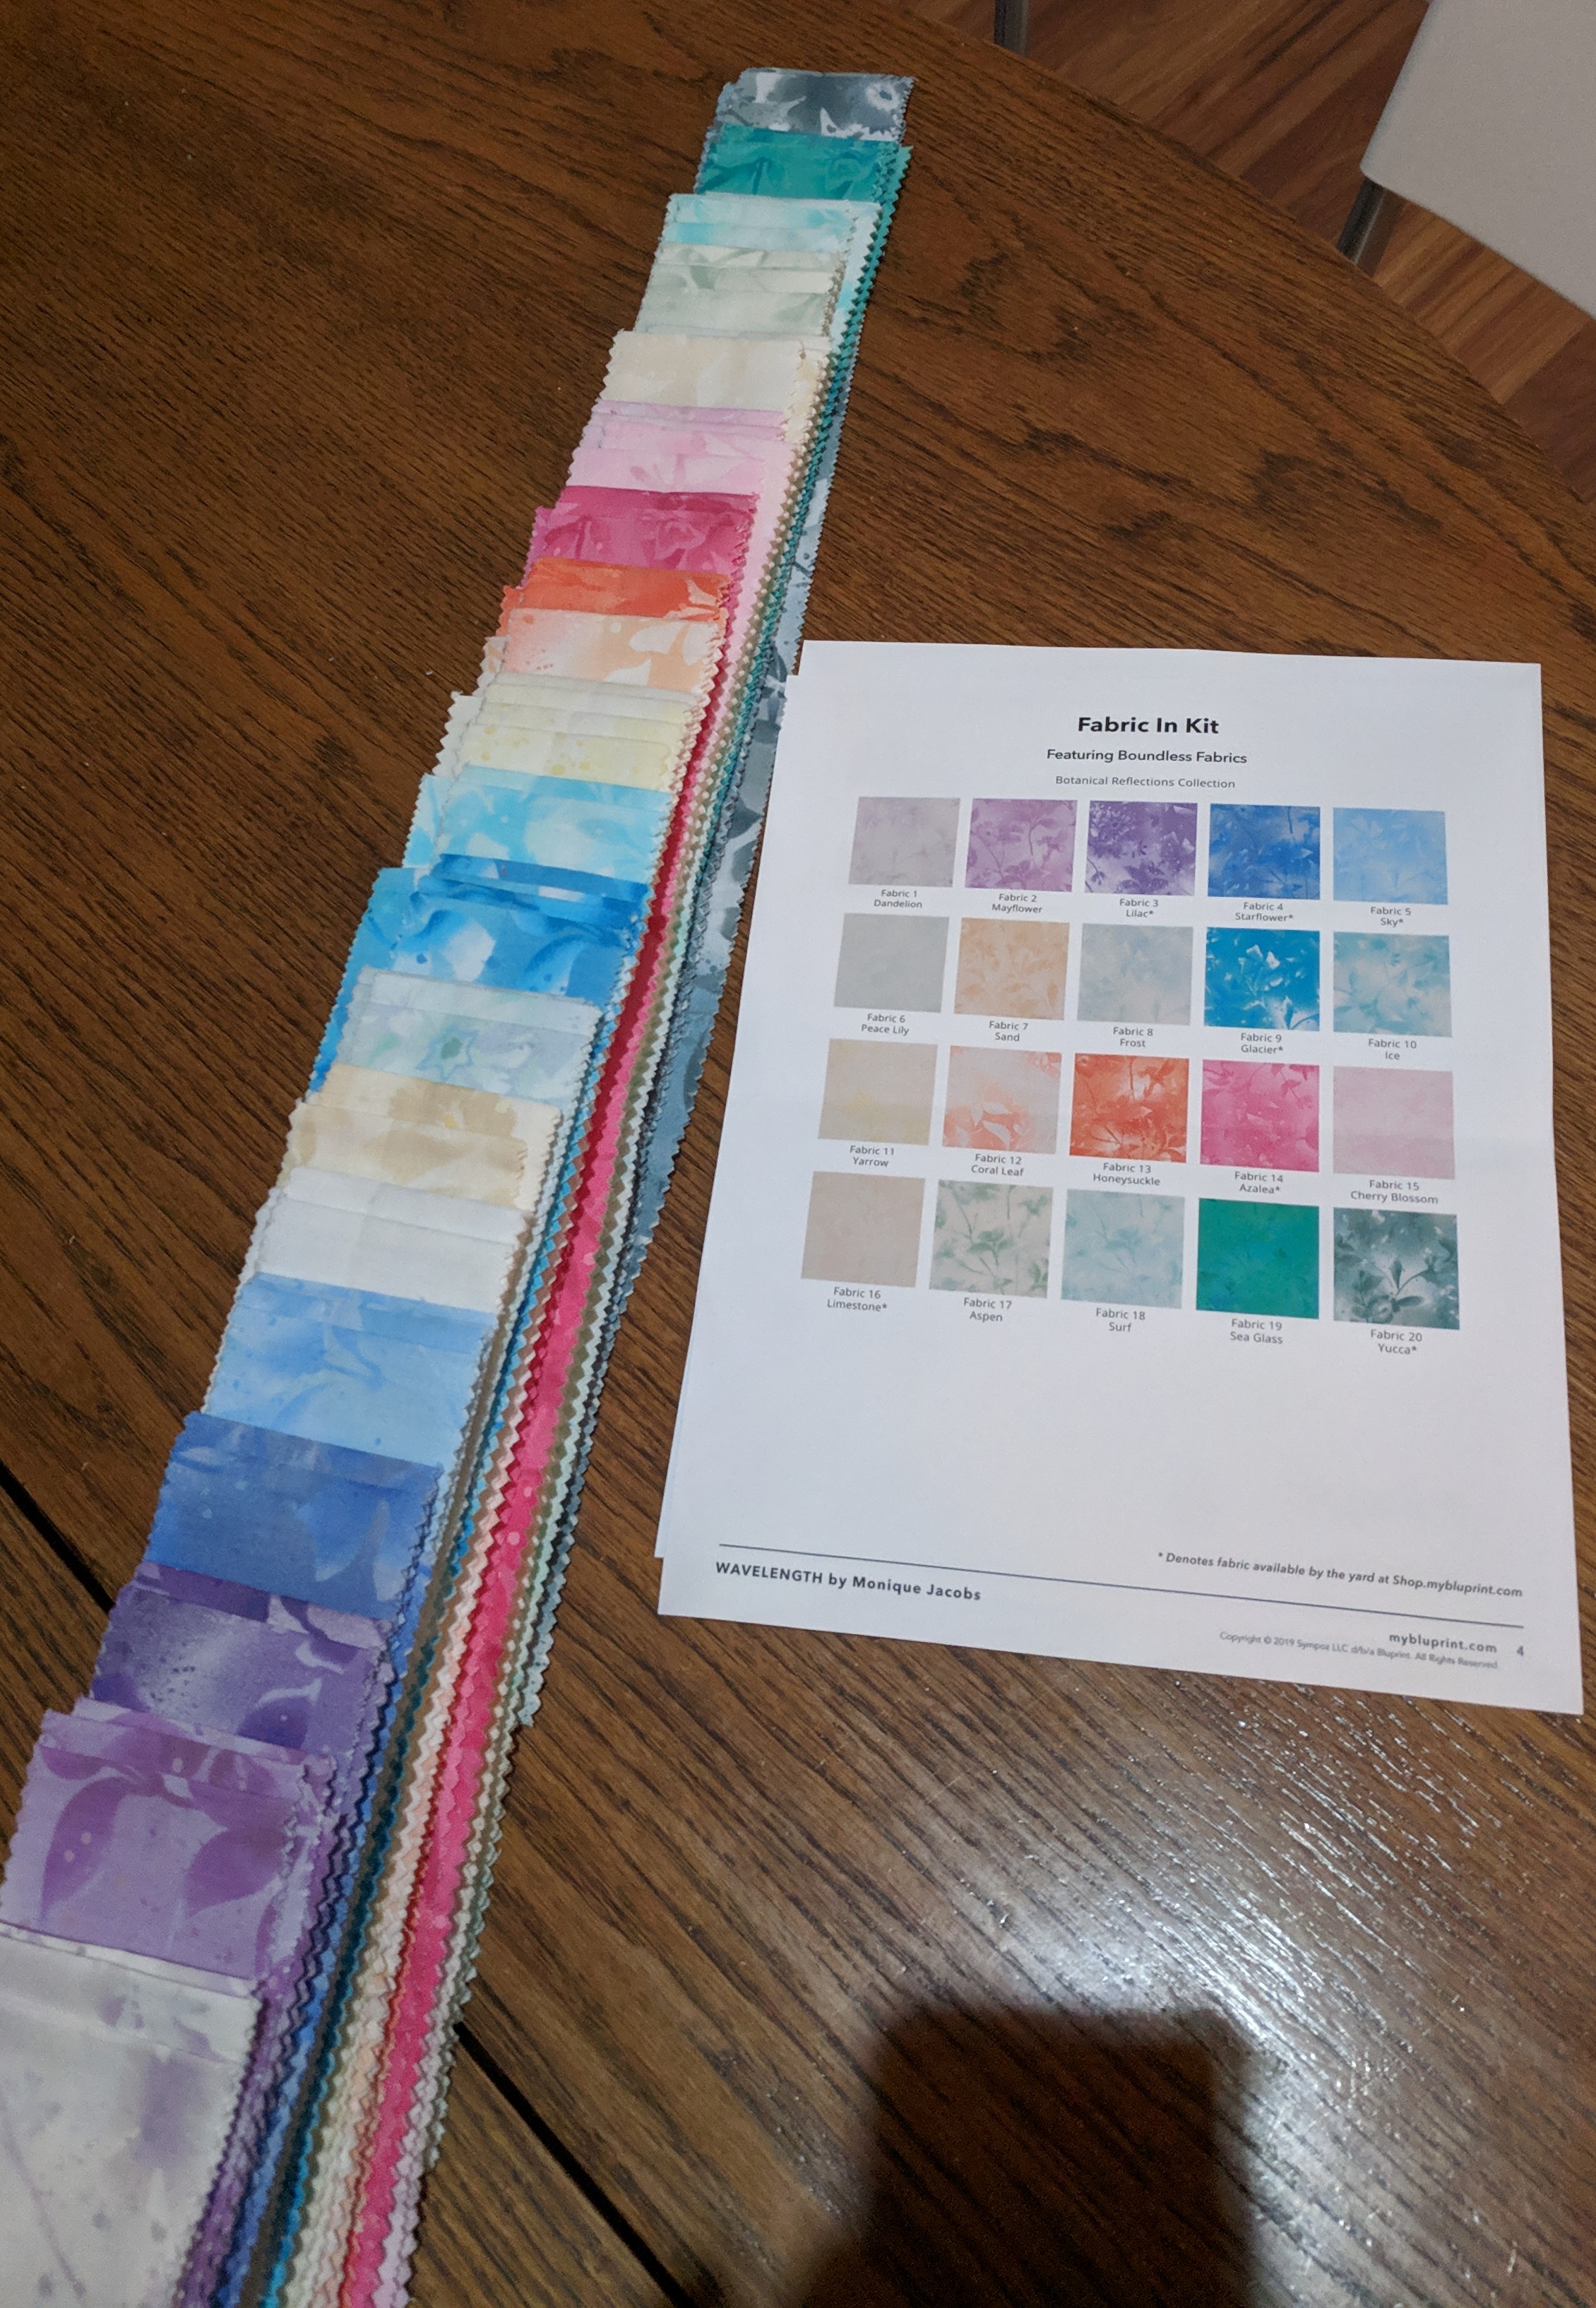
My second quilt! I loved making this quilt. It’s a kit from Bluprint that came with everything I needed to make the quilt top (and I bought yardage of one of the fabrics for the backing, and some 80% cotton/20% polyester batting). A bargello is a type of quilt that’s made using strip sets. This bargello needed 3 jelly rolls (6 strips of each of the 20 colors) and that made the entire 76″x92″ (technically a twin but fits on my queen bed) quilt top and I had some left over for a pillow.
The pattern tells you the order of the strip set, and in this bargello there’s only one set that you make 5 times (the 6th strip was cut up into baby rectangles to make a small portion of the quilt). Other bargellos can be made with more than one strip set to make ribbons that play together. So you sew all those strips together for five big striped rectangles. Then you cut your rectangles into strips of varying widths, each with all 20 colors in order.
It would be prudent to explain now that some people sew their rectangles into tubes, so the 1st color and 20th color are sewn together. While efficient (see next paragraph), this method didn’t work for me because my strip sets didn’t turn into perfect rectangles and were, in fact, wonky. Very wonky. Like not even close to parallel sides wonky. But! It still worked, I just didn’t sew my rectangles into tubes.
Also, this video about putting bargellos together may be easier to understand than the paragraph you’re about to read. 😉
Okay, so now you have your long strips and the colors are all in the same order. And you know that the 3″ strip goes first, then a 2″ strip, etc. etc. So let’s say the order of the strips is A, B, C, D (to you know, the width of your quilt or section) and the order of the colors is 1, 2, 3 (to 20). Strip A stays with the top color as 1 and the last color as 20. For Strip B, you cut the seam between fabrics 1 and 2, remove fabric 1, and add fabric 1 to the bottom – so your strip goes 2 to 20 and then 1. For Strip C, you seam rip between 2 and 3, and add the top to the bottom – and your strip goes 3 to 20, then 1, then 2. On an on until you get to Strip T (the 20th strip) that goes 20, then 1 to 19.
Strips in order per the pattern – 1 is at the bottom, 20 is the dark gray at the top
Partially constructed block – excuse the furry helper
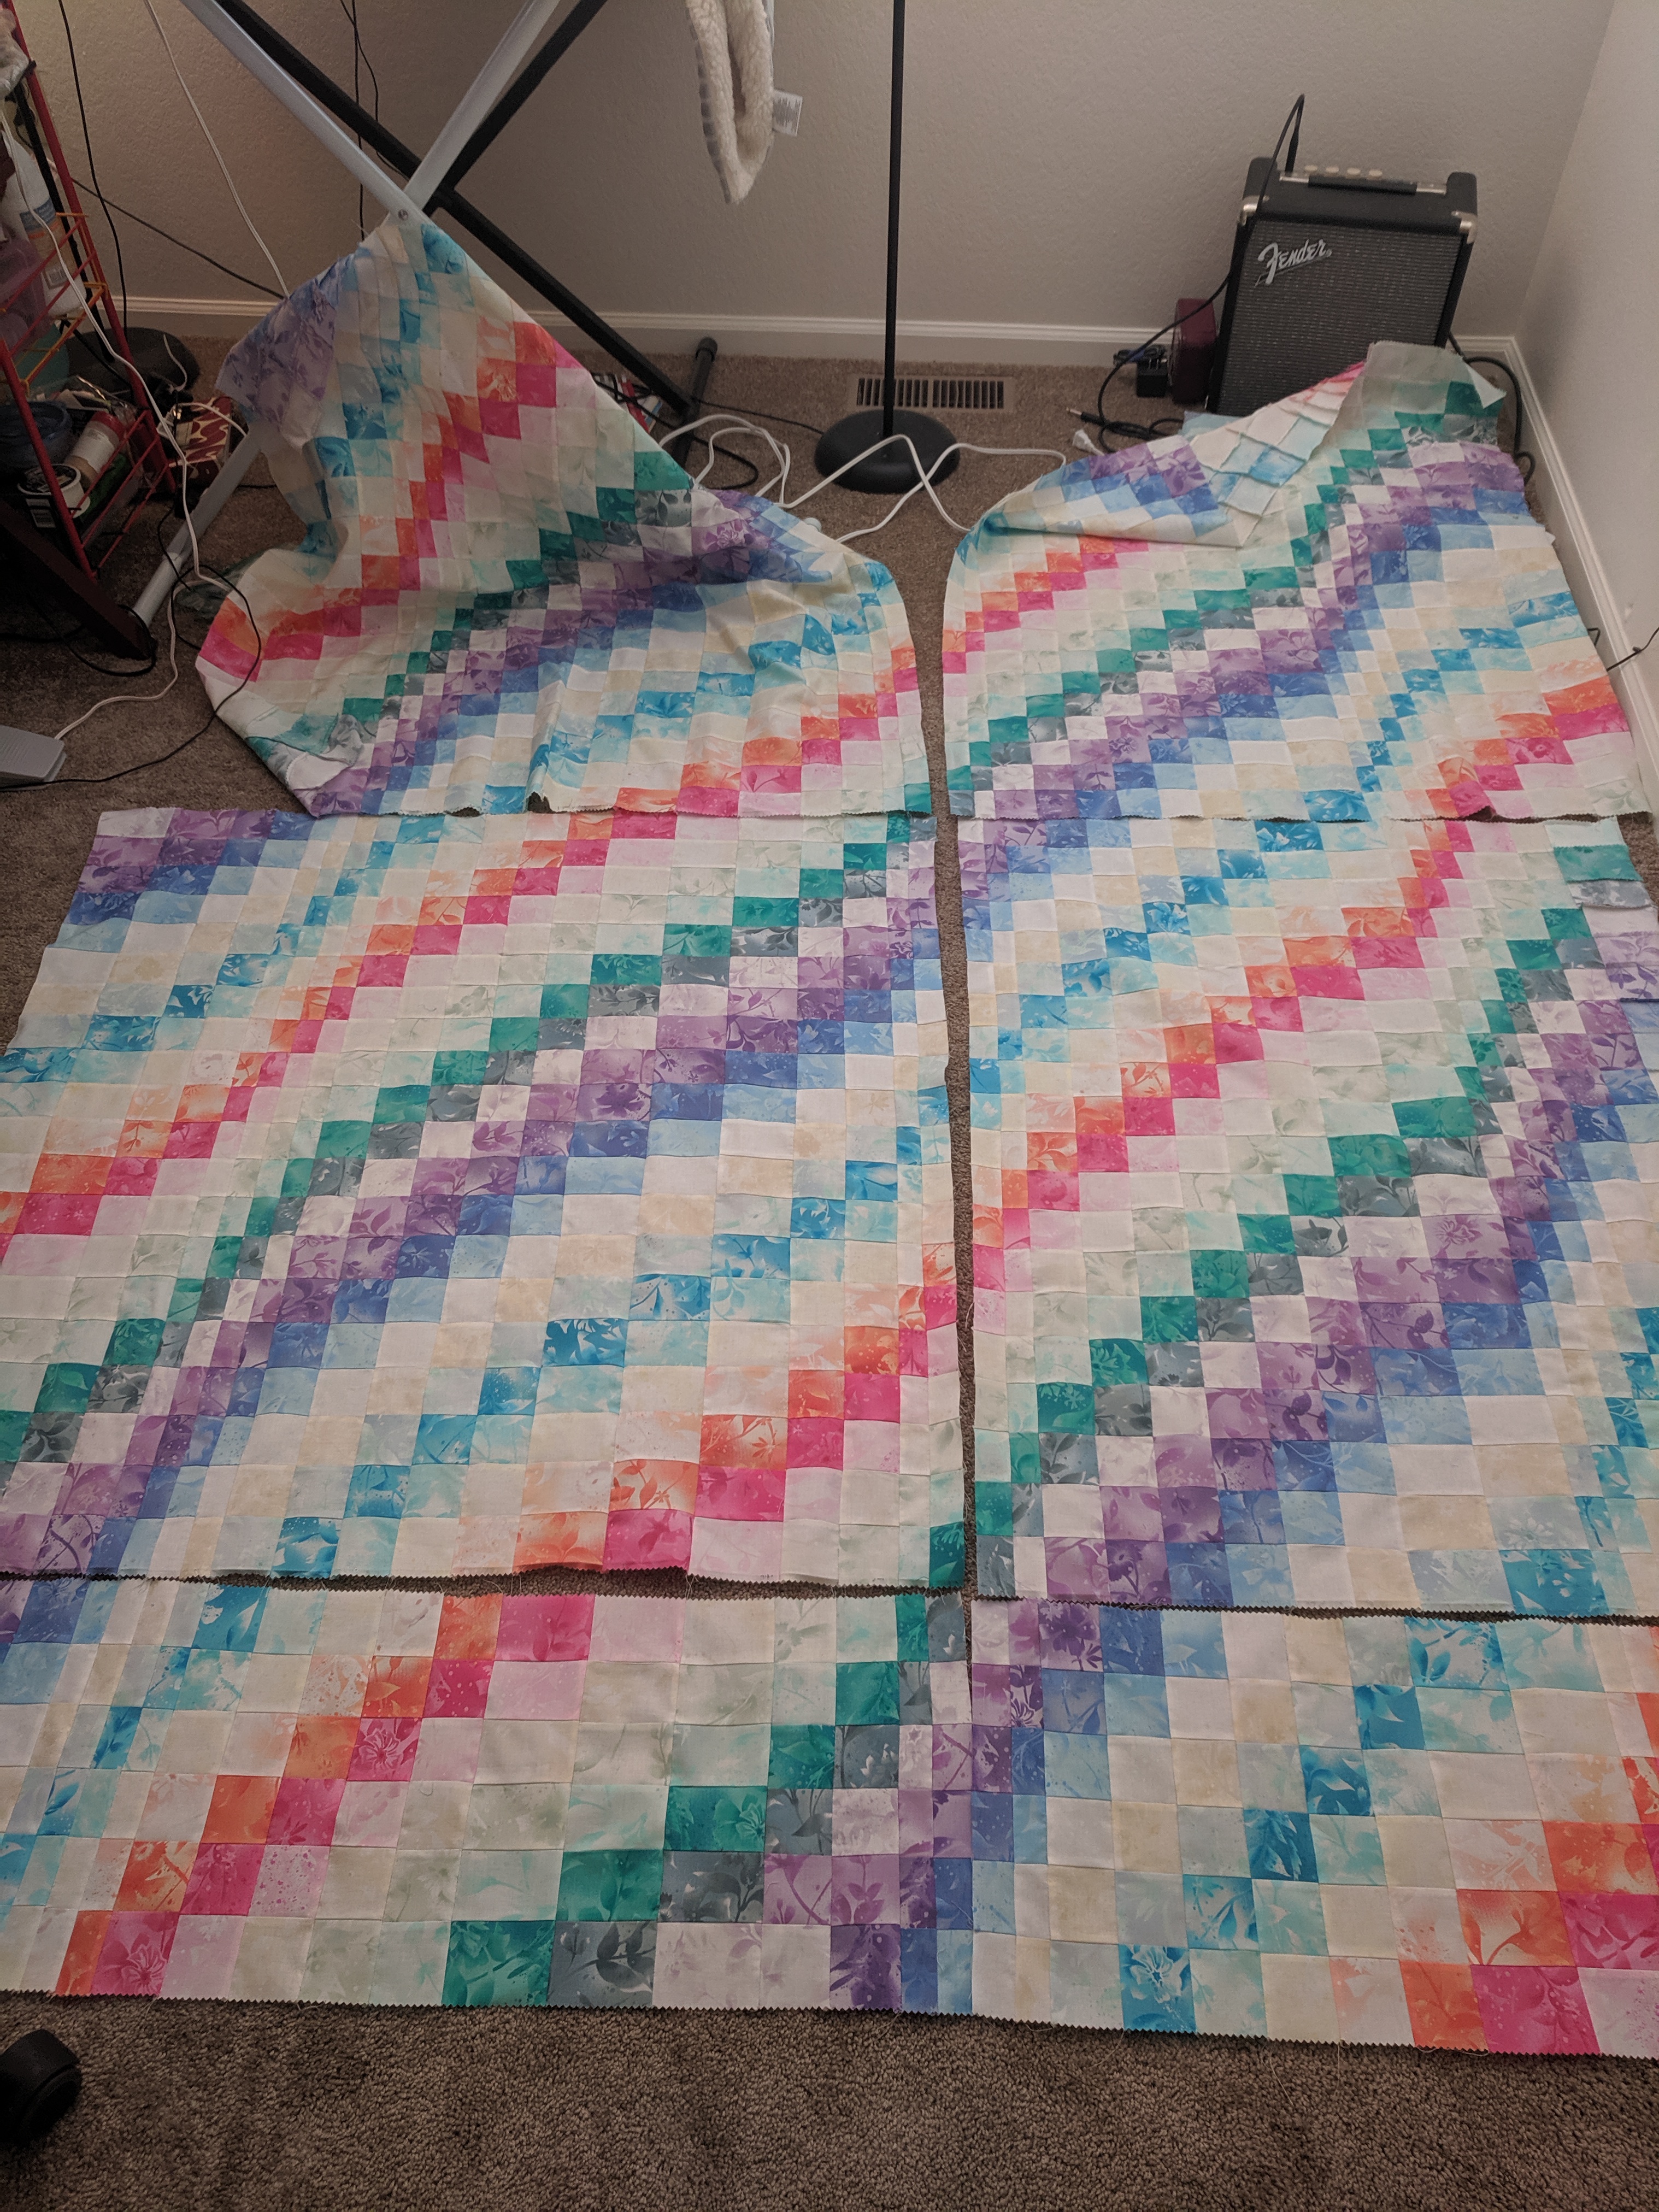
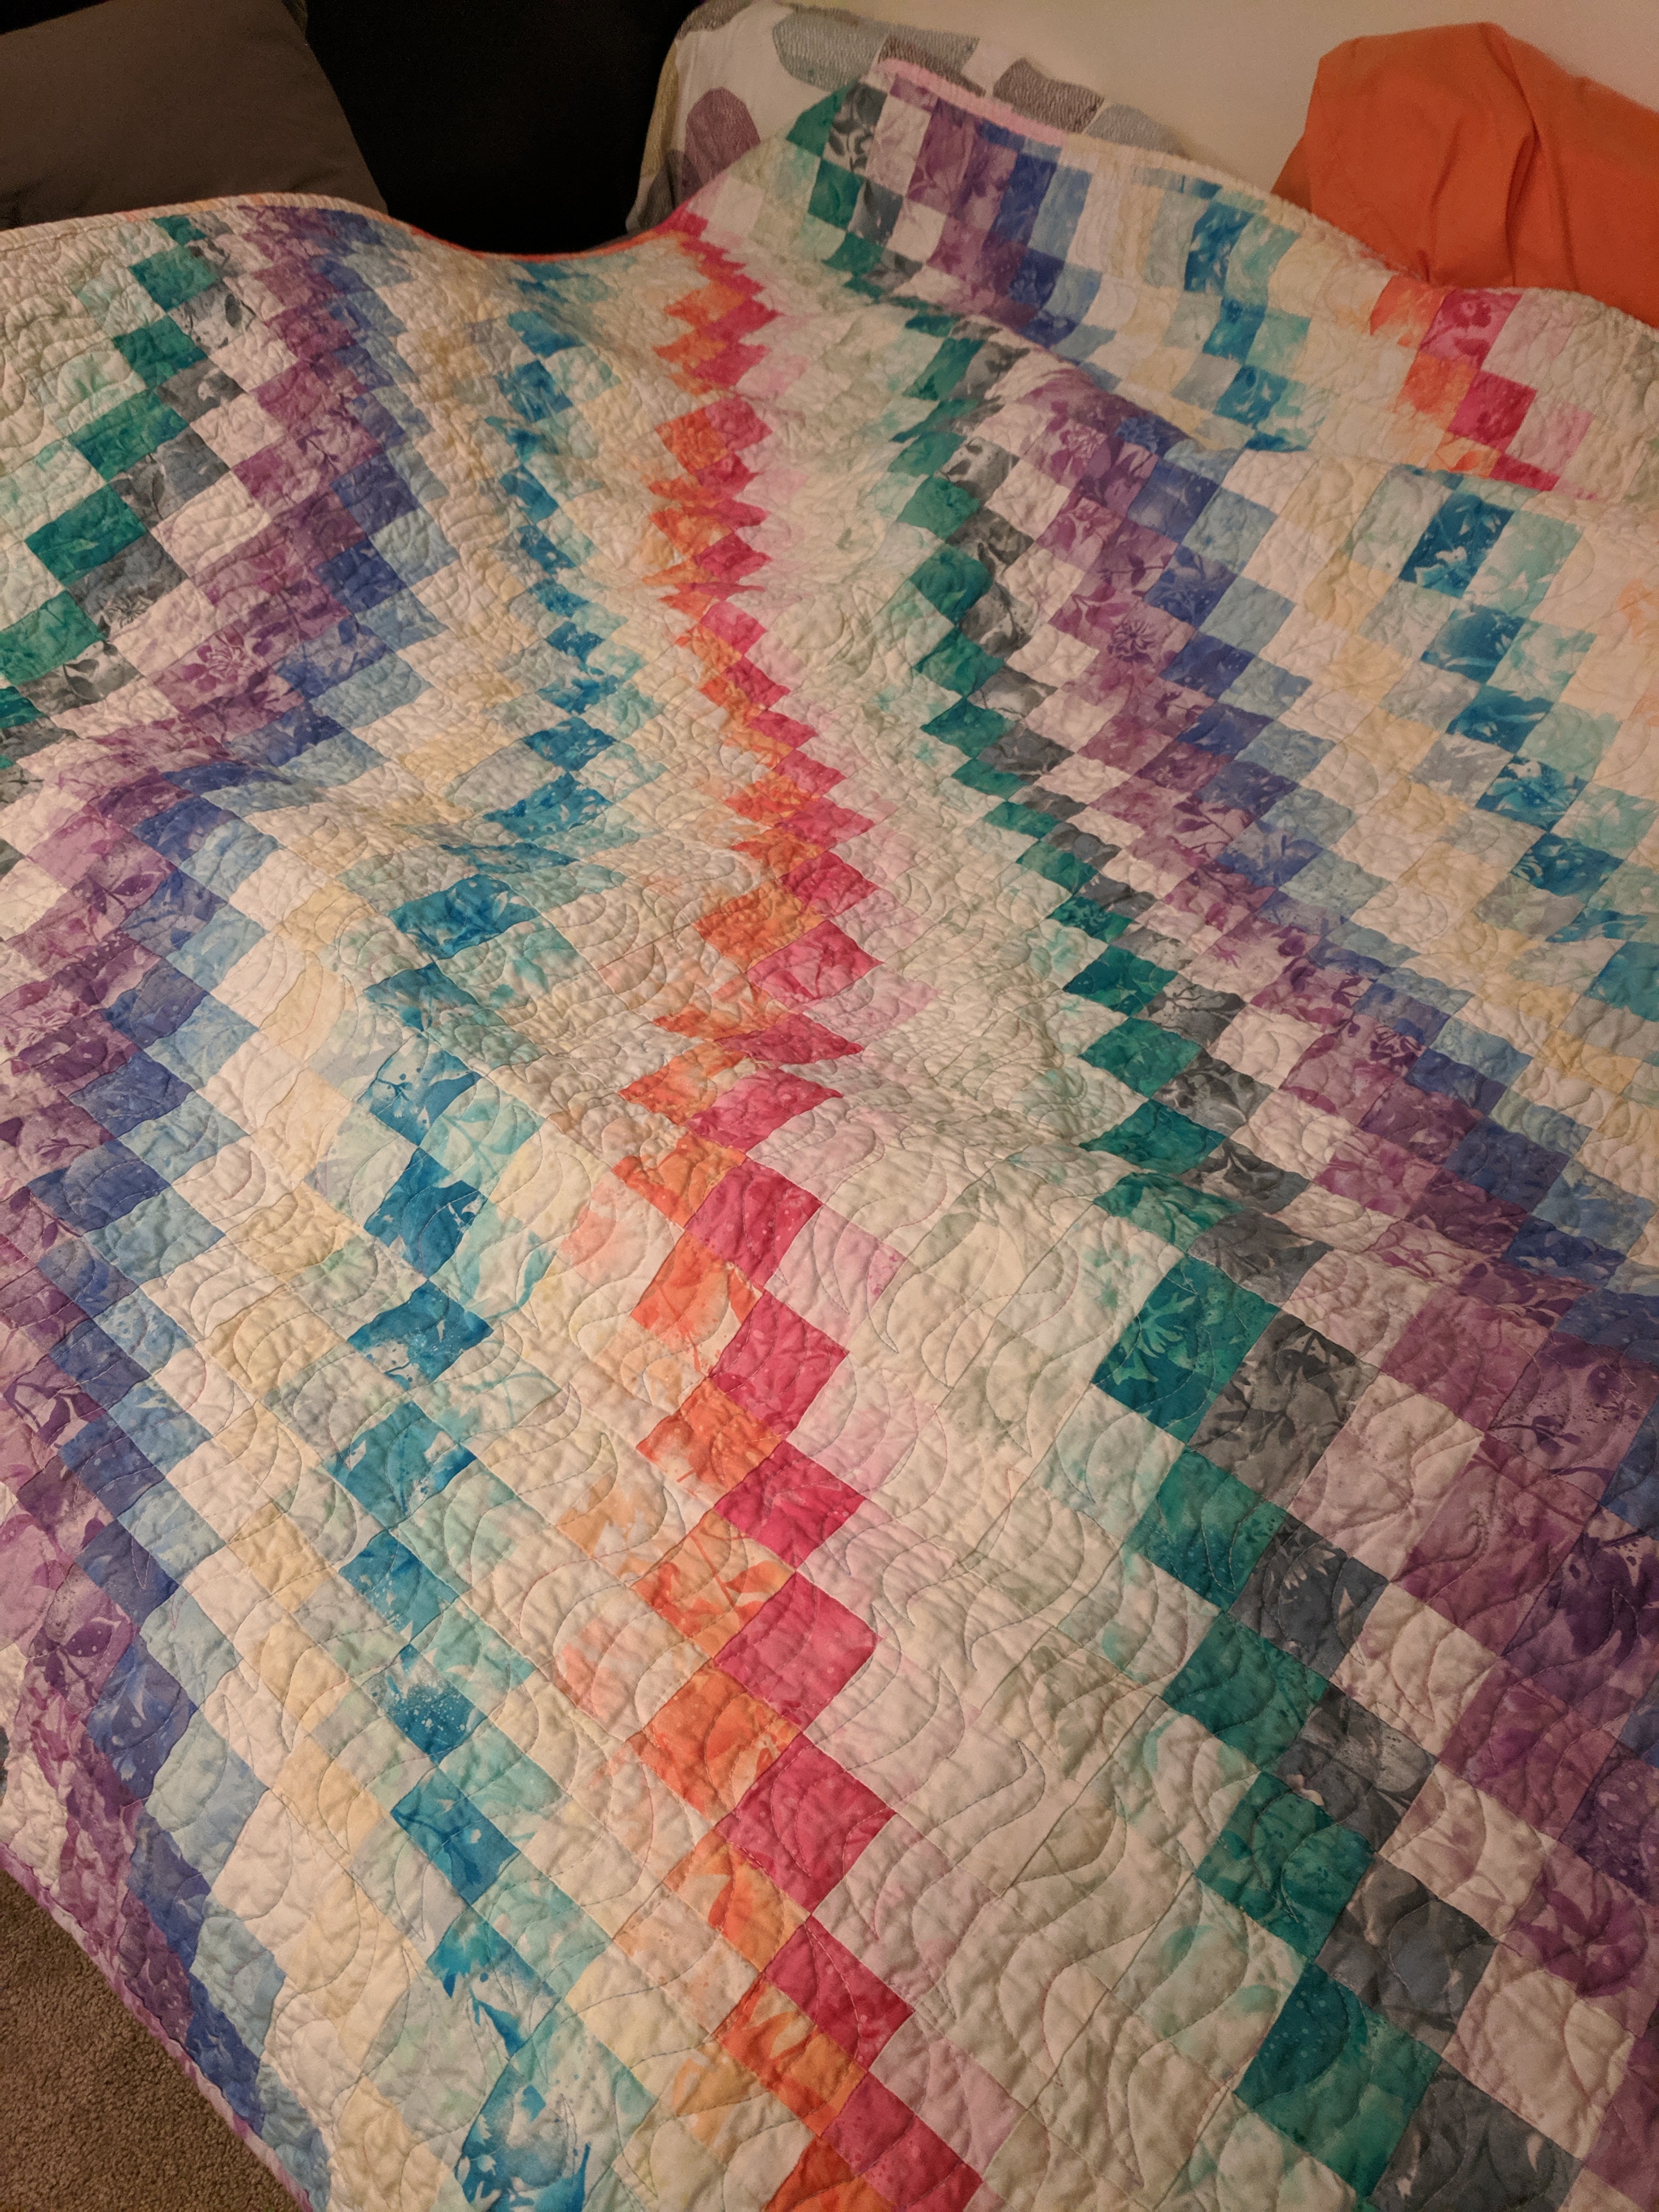
Then you sew your strips together, and it makes the wonderful bargello effect. The key to making it look wavy is to have the strips be different widths – otherwise it would just be diagonal lines like a checkerboard. I really want to design my own bargello (perhaps on a smaller scale) to look like a river or something, with overlapping waves and stuff.
The two blocks at the bottom were made out of individual baby rectangles, the rest is strip sets
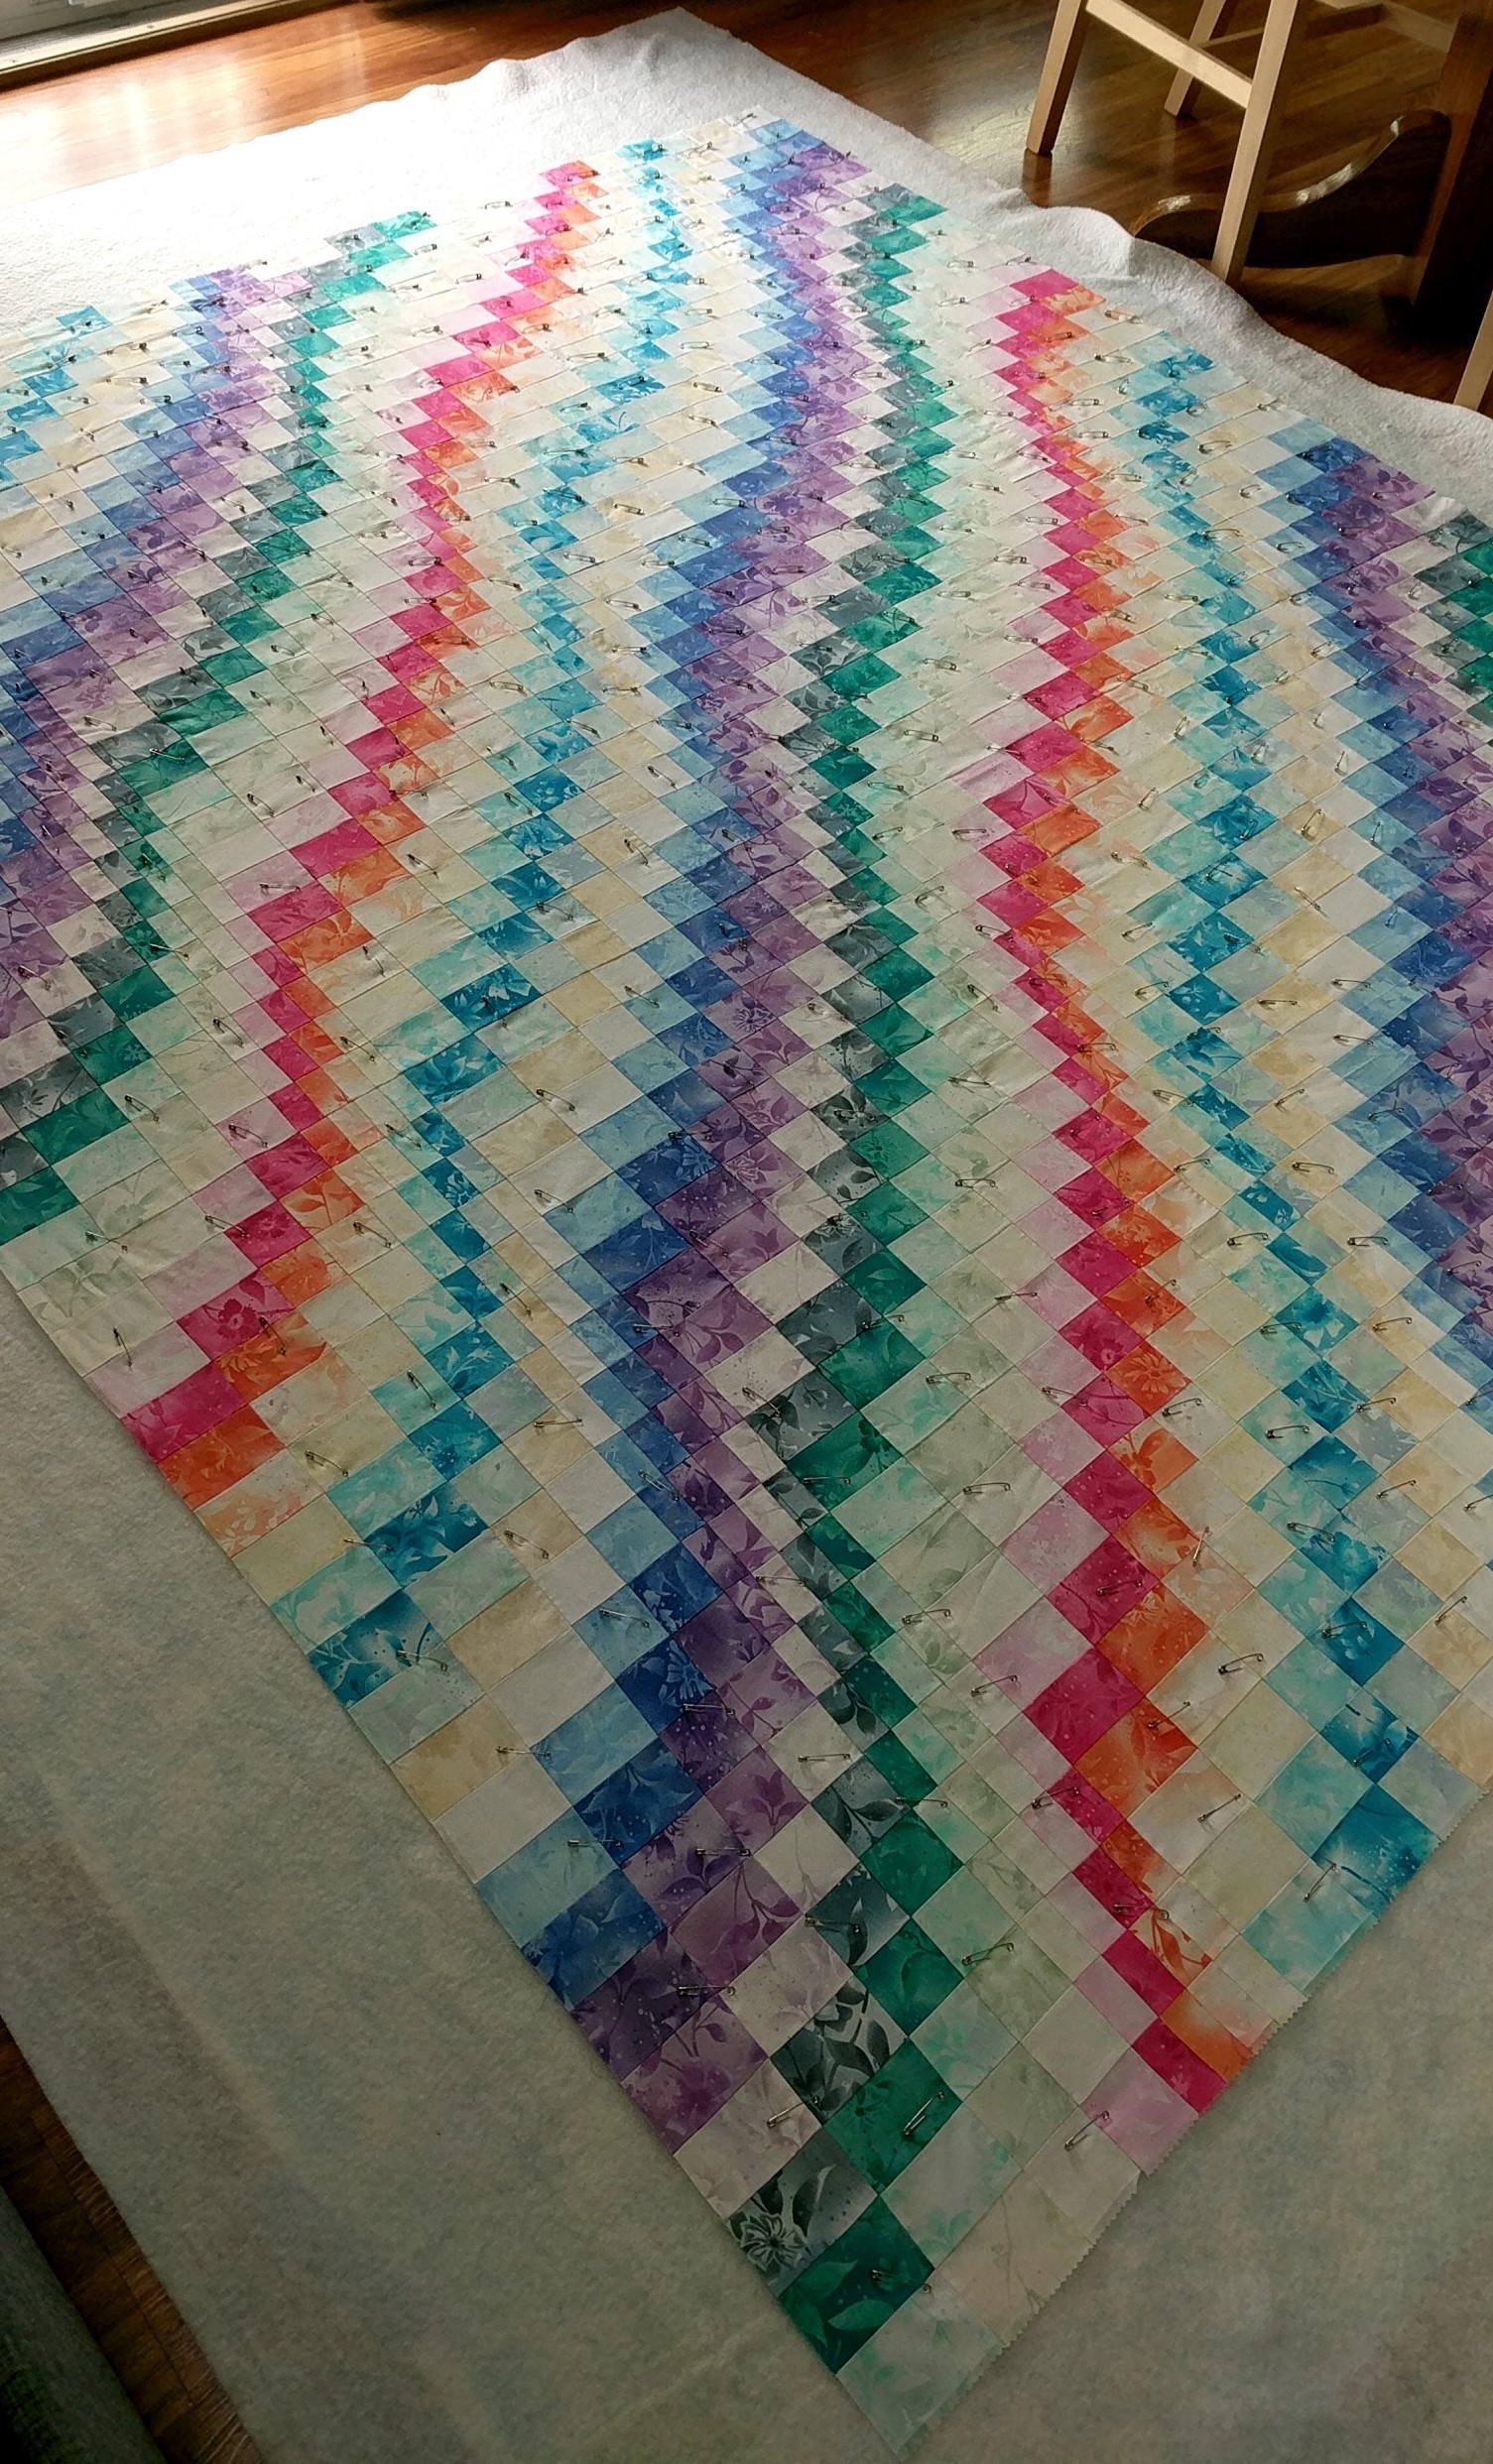
All pinned up in my family/dining room!
Approximately 400 safety pins later…. (a Kwik Klip helps close all the pins)
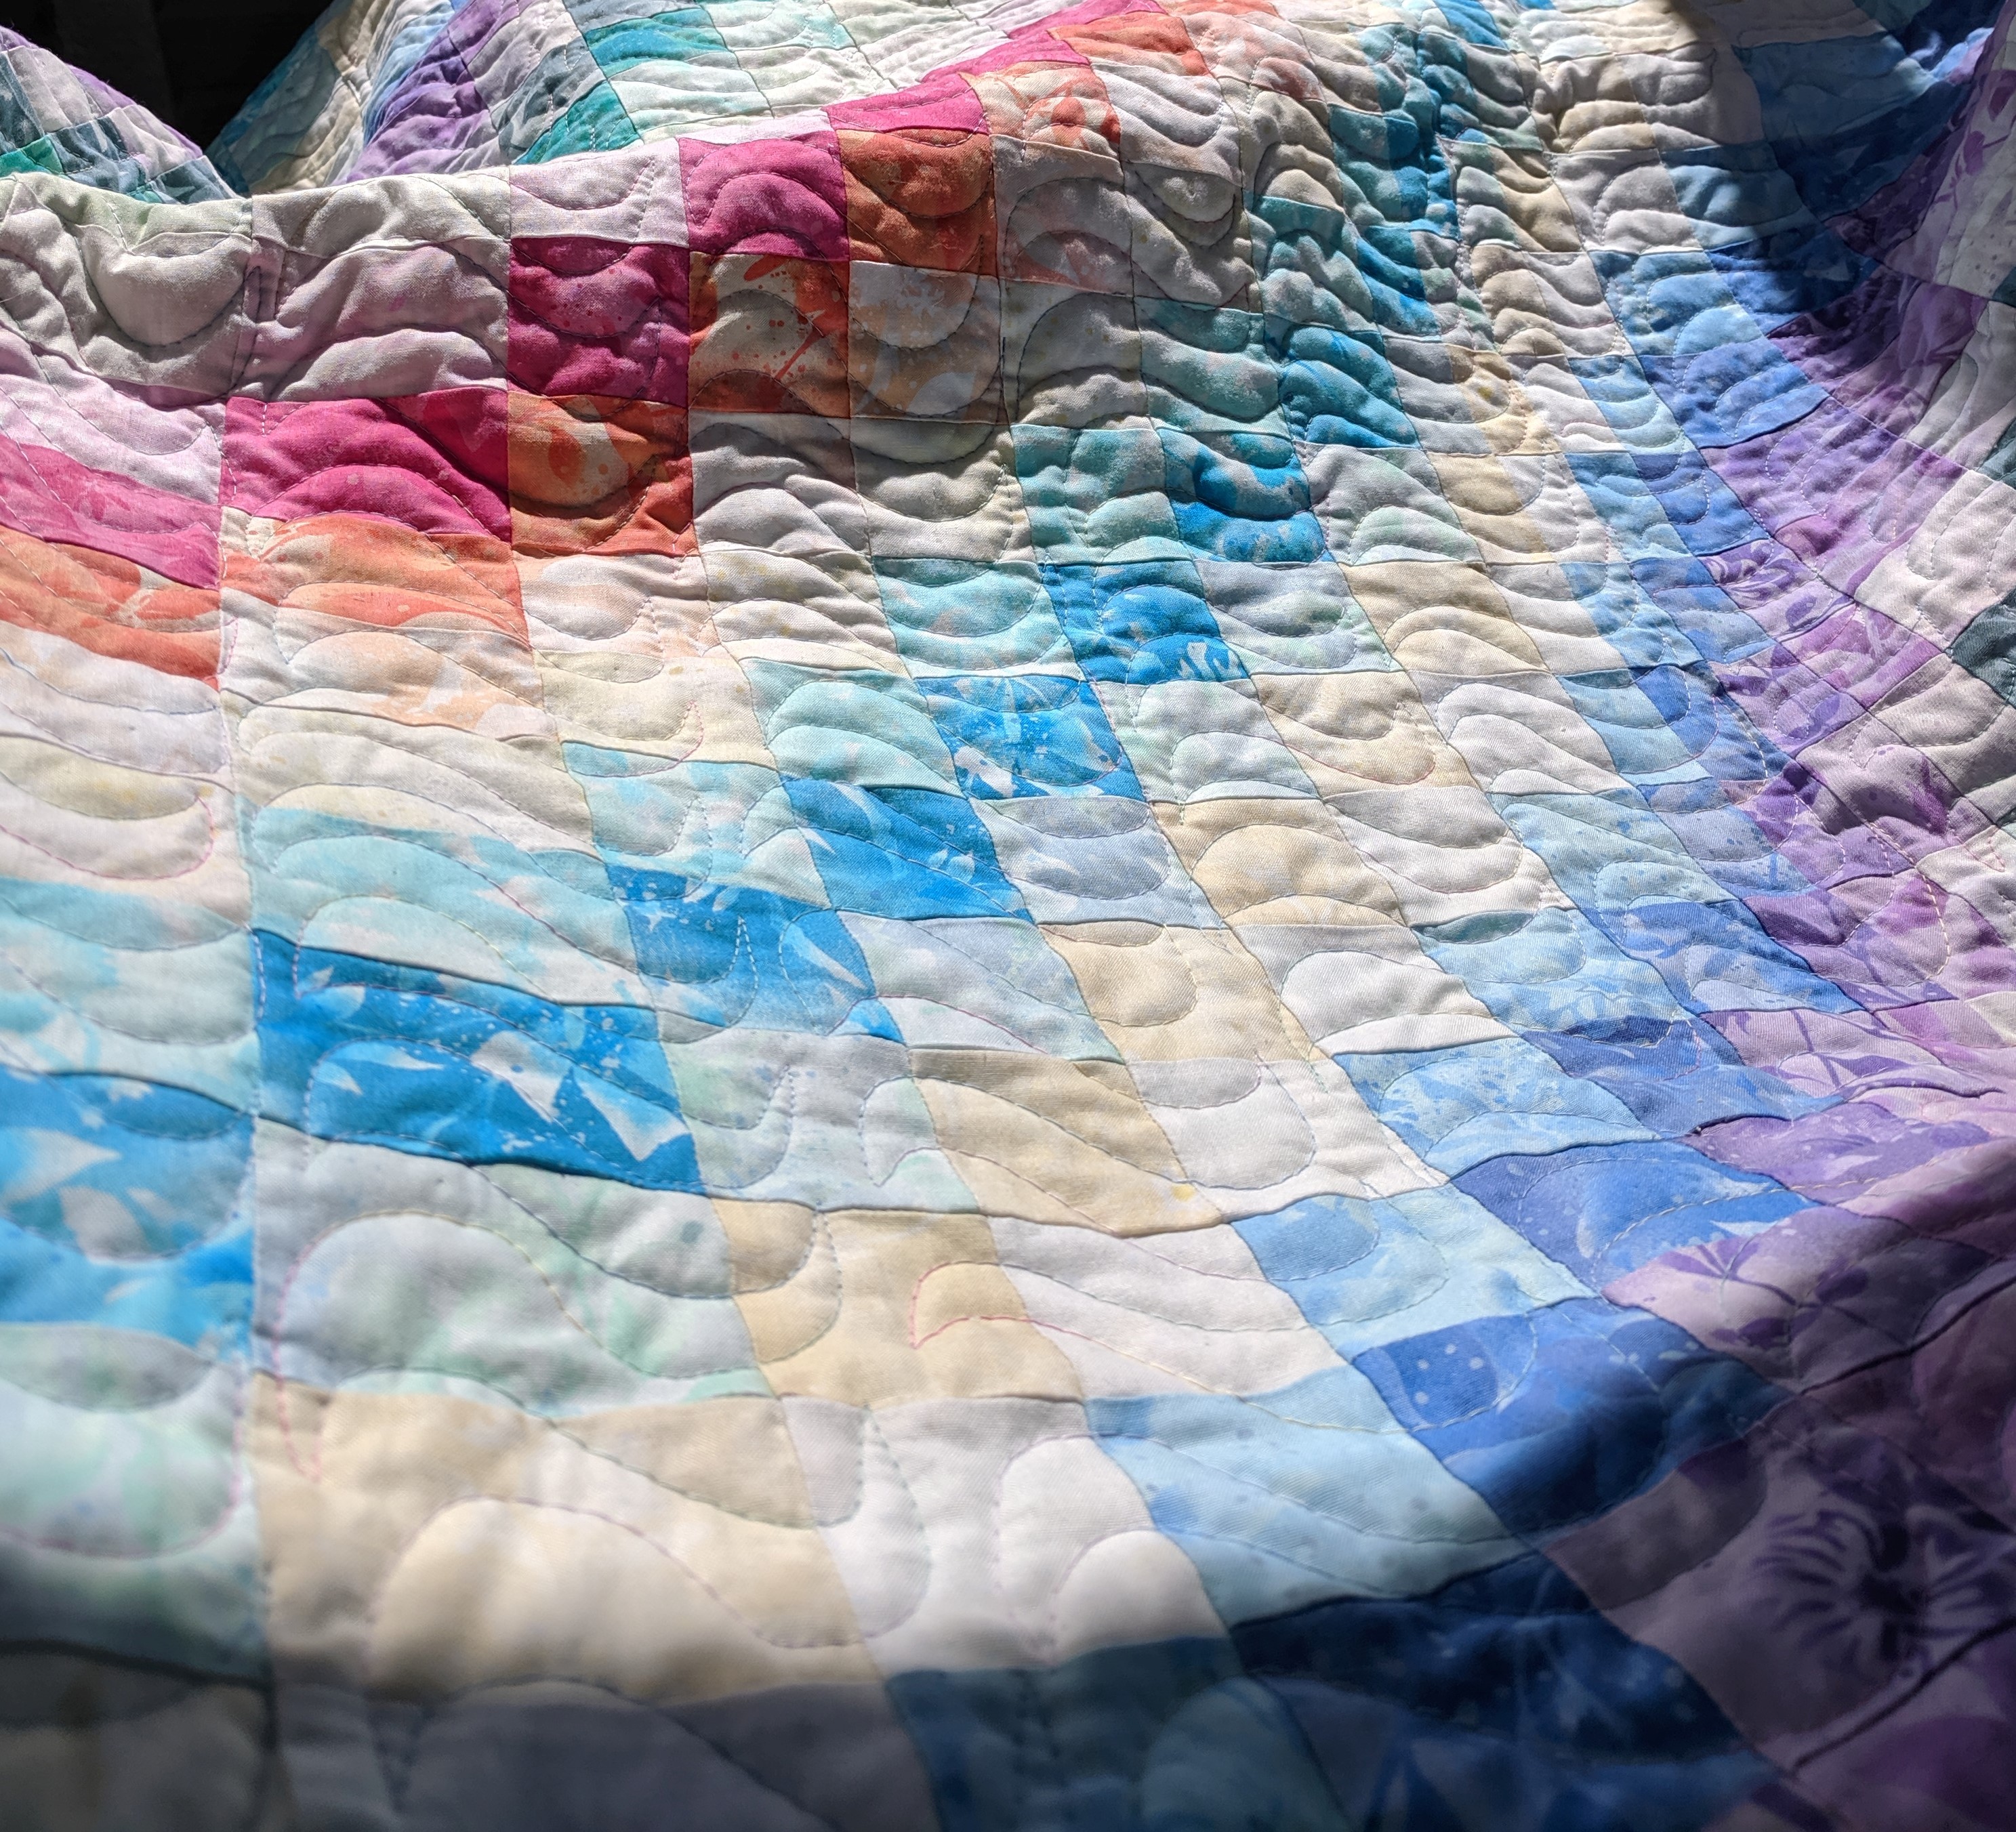
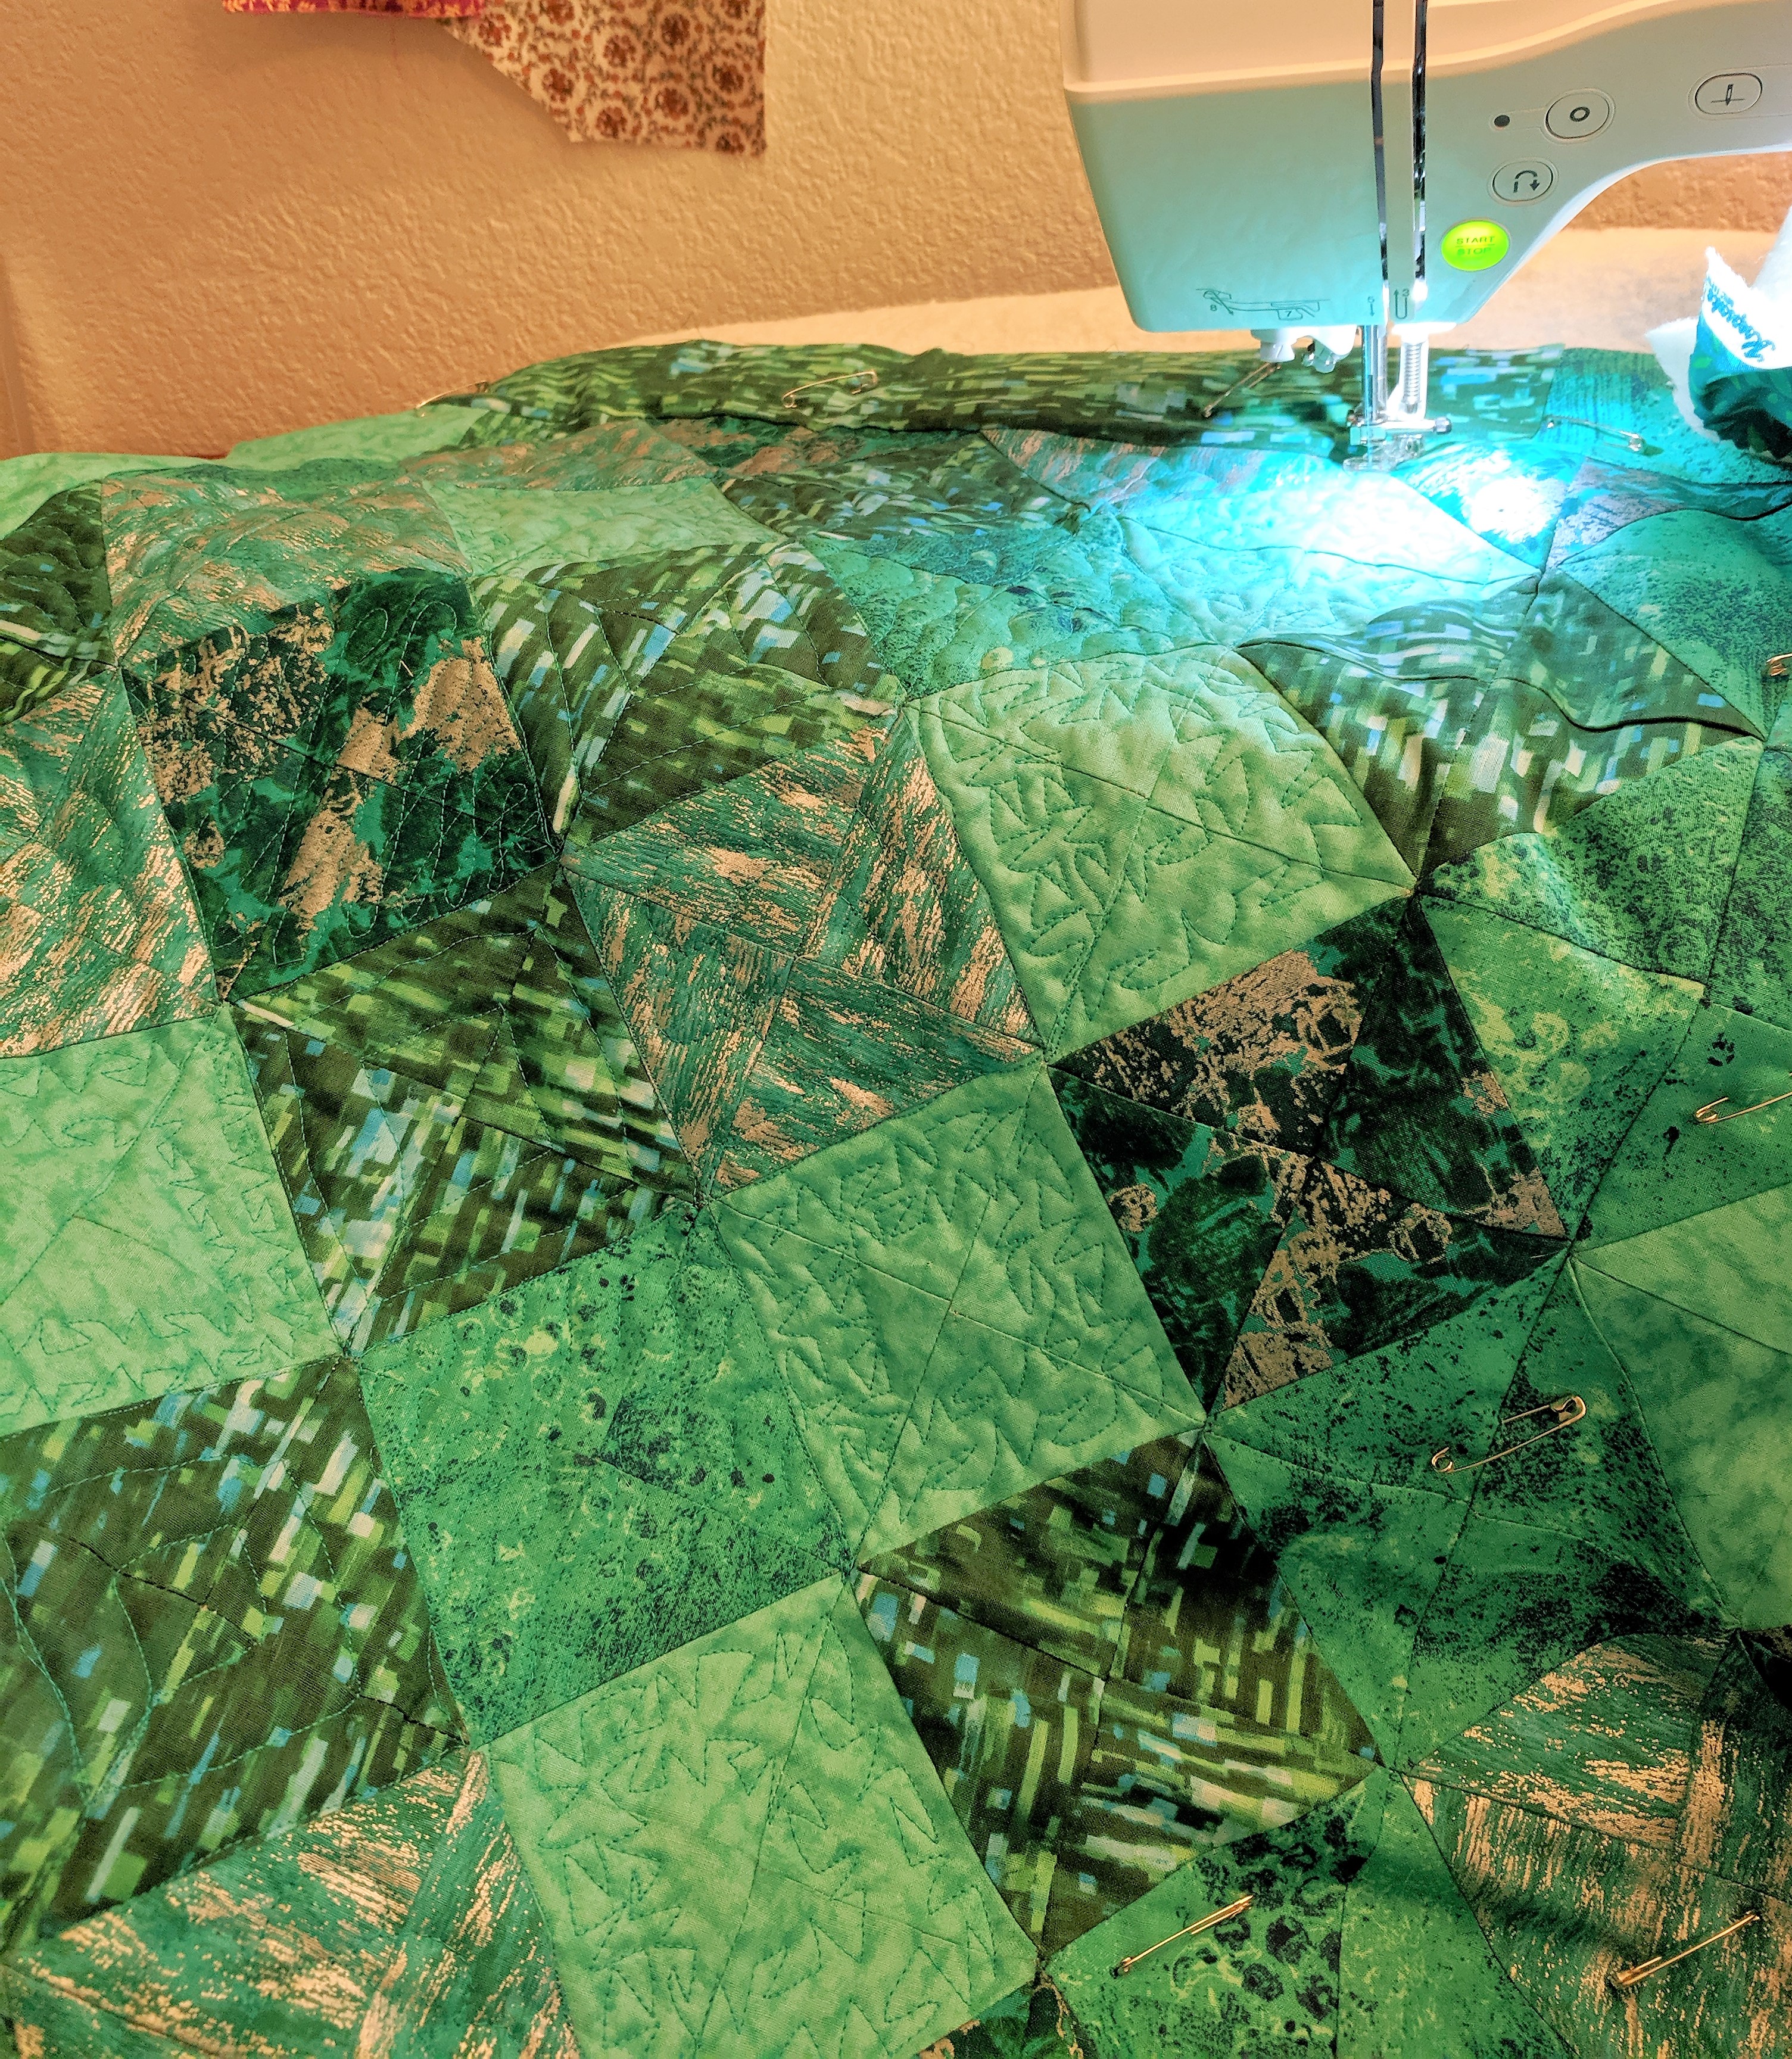
Then I basted and quilted it with my little “toothpaste” designs! Doesn’t it look like little squeezes of toothpaste? 🙂 I wanted a design that was flowy like the bargello itself, but possible to do in an all-over fashion. After doing the “custom” quilting on the Green Diamond Quilt, I wanted to see what would happen if I did the same thing on the entire quilt – and save myself some brain energy. I couldn’t decide what color thread to use, so I opted for variegated rainbow pastel thread that blends in pretty well to both the quilt top and the backing. Plus it’s another level of colorfulness that is fun.
Some free motion in real-time! Remember that the fabric is moving, not the needle 🙂
The toothpaste design is done in columns, so I started in the true middle, and worked up and down as I moved to the right (which gradually decreases how much sandwich is in the throat of your machine – between the needle and the case), then flipped it around and did the exact same thing to the other side. Since I’d practiced a lot on pen and paper and with scraps – more practice than last time! – the quilting came together pretty easily. Plus, each intersection is only 4 pieces of fabric coming together instead of 8, so it was significantly less bumpy than the Green Diamond Quilt.
But still, this quilt was a beast to wrangle with my machine. It has decent throat space but a bunch of cotton is heavy, and the quilt would fall into my lap as I moved up, which made it harder to control since I was working against gravity. I was only able to drape so much on myself before it would fall down, but I have a big enough table that the quilt could sit on the table in the other directions. I understood immediately why those set-in sewing machine tables are super popular, and why a longarm would change the game completely. But I’m not there yet – I still have many smaller scale projects I’m excited to work on, and twin-ish/queen-ish size quilts are still possible for me.
Glamour shot outside before washing – look at the cool shadows!
On my bed after washing
That said, I got the quilting done in three nights and am super pleased with the results. After washing my Green Diamond Quilt, I knew it would only look better after washing, and it does. 🙂 It’s crinkly and soft and puffy in all the right ways. Plus because it’s cotton, it feels cool to the touch. I have it on my bed right now, but because it’s primarily thin cotton batting, there isn’t as much warmth as I’d like – I’m naturally a 3 blanket person. So I bought this “dream puff” polyester batting for my next bed quilt that claims it’s twice as warm as down, so we’ll see 🙂
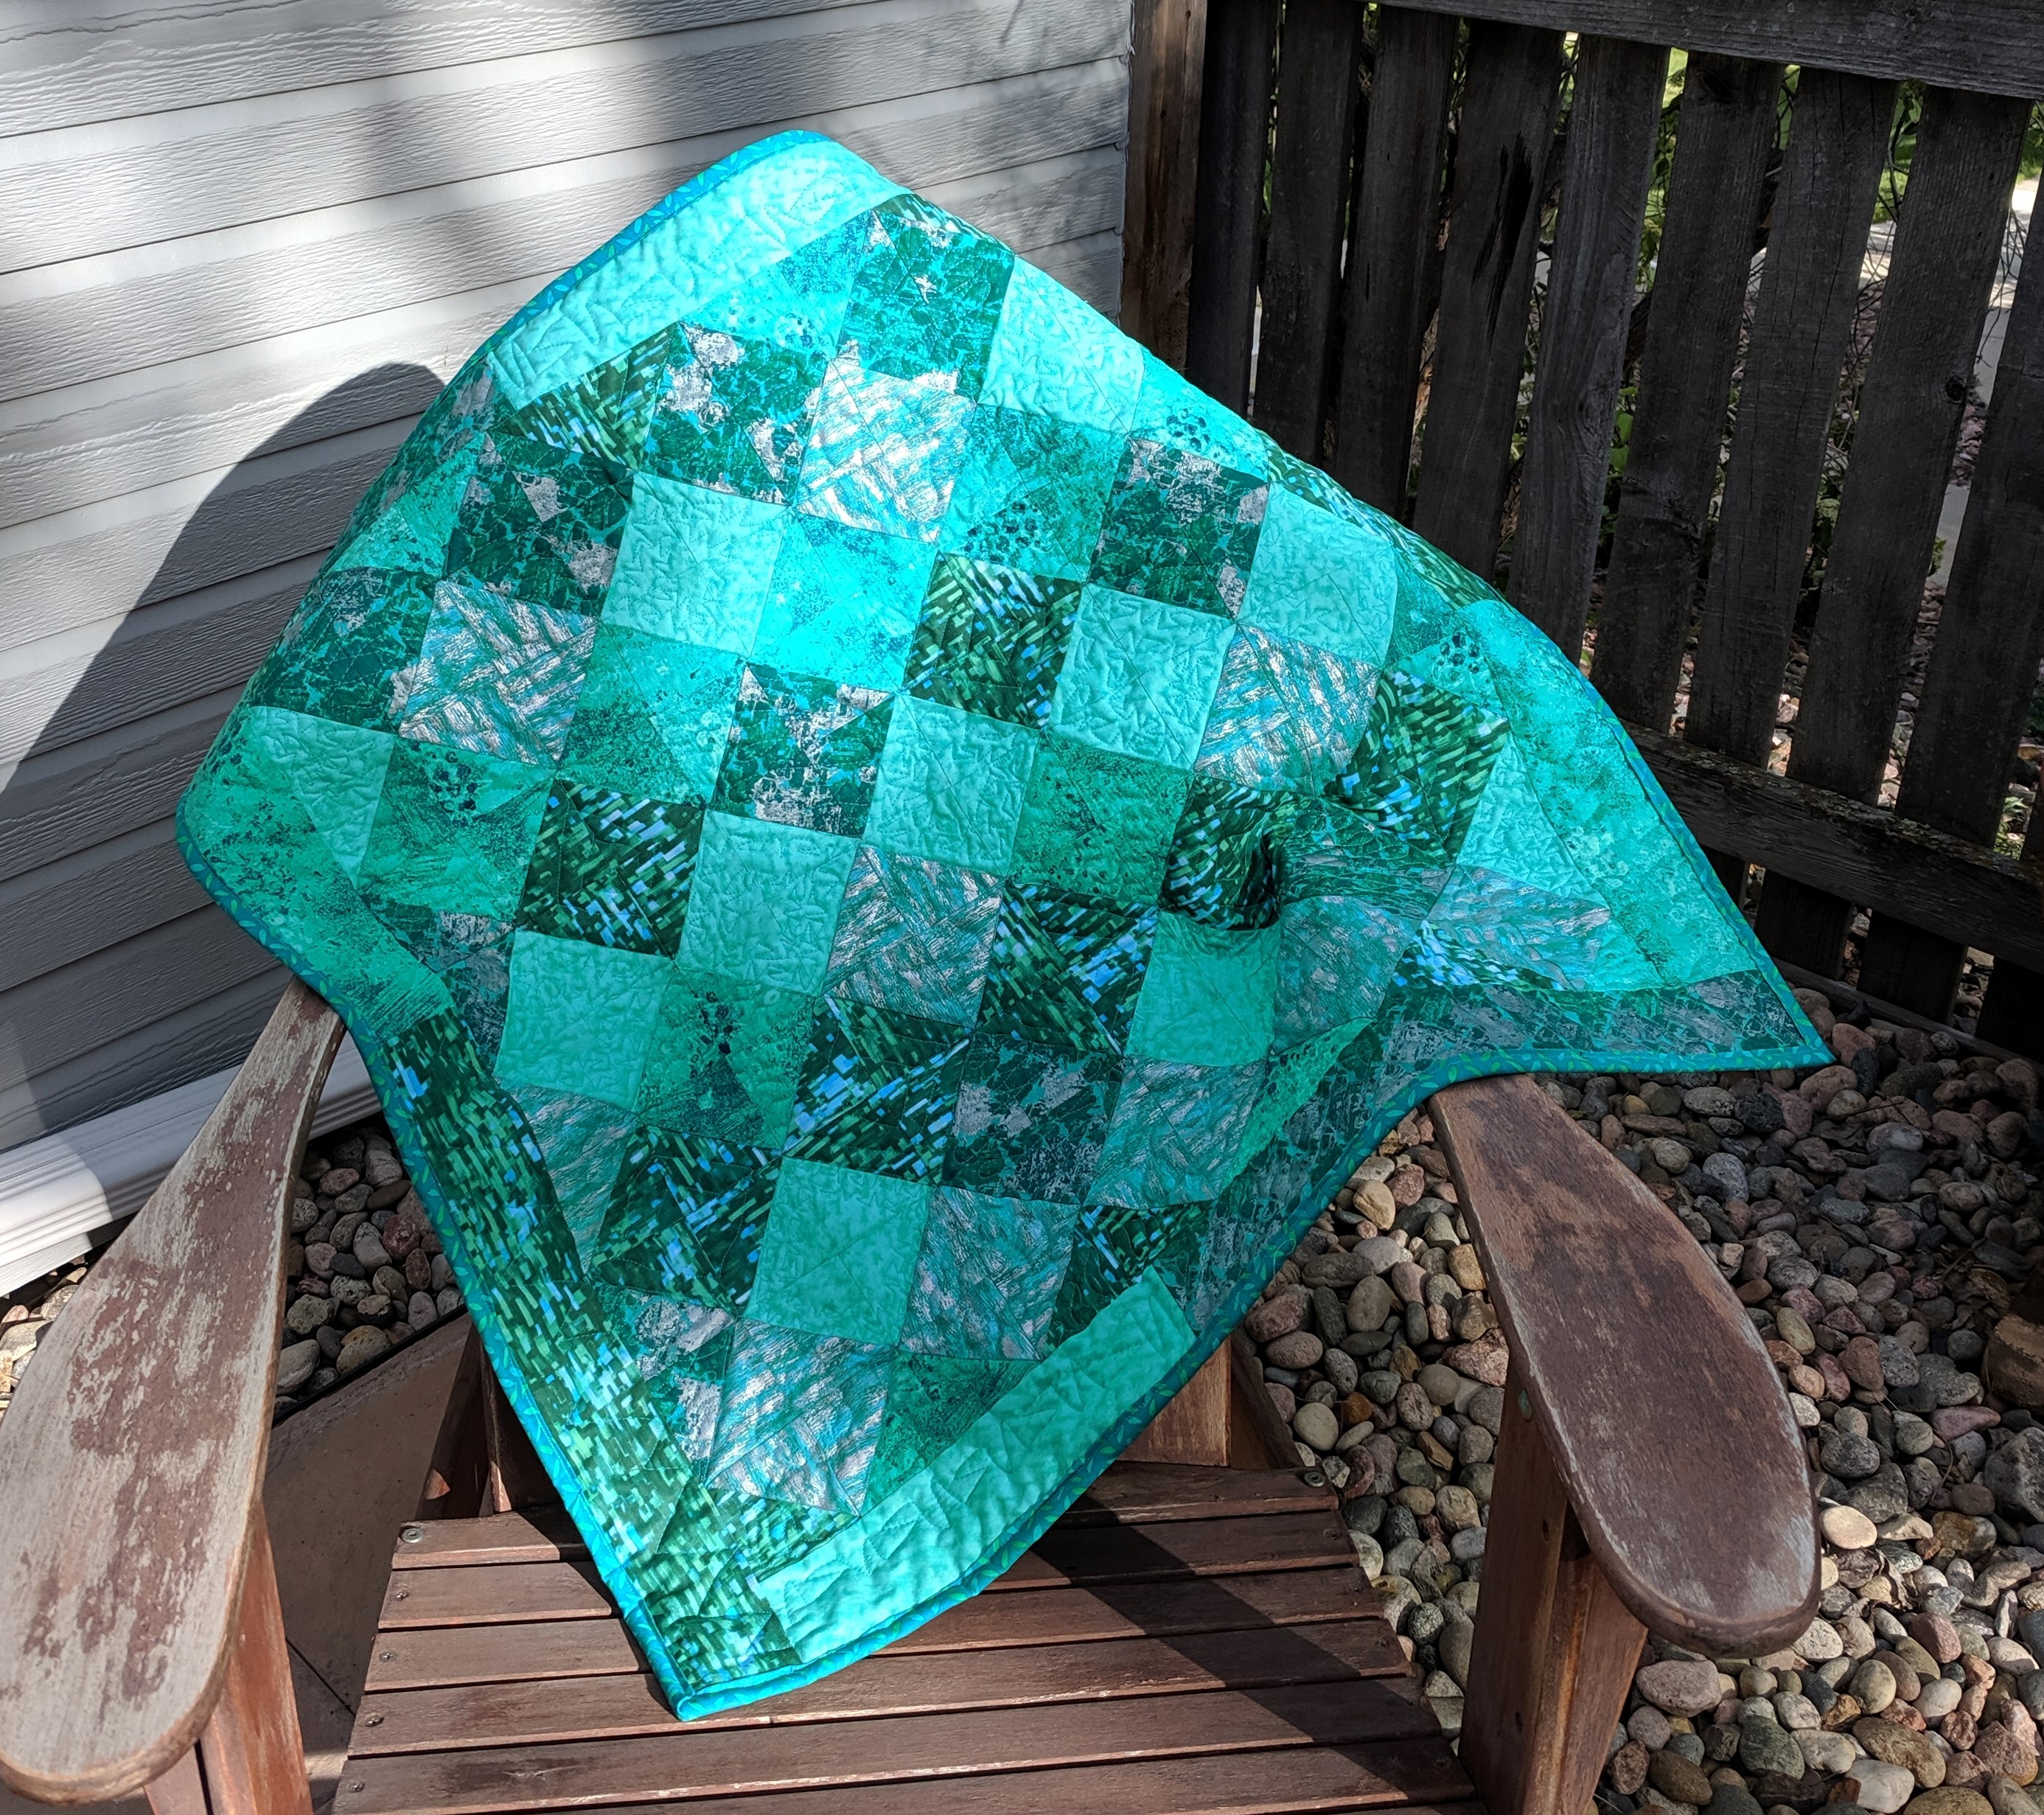
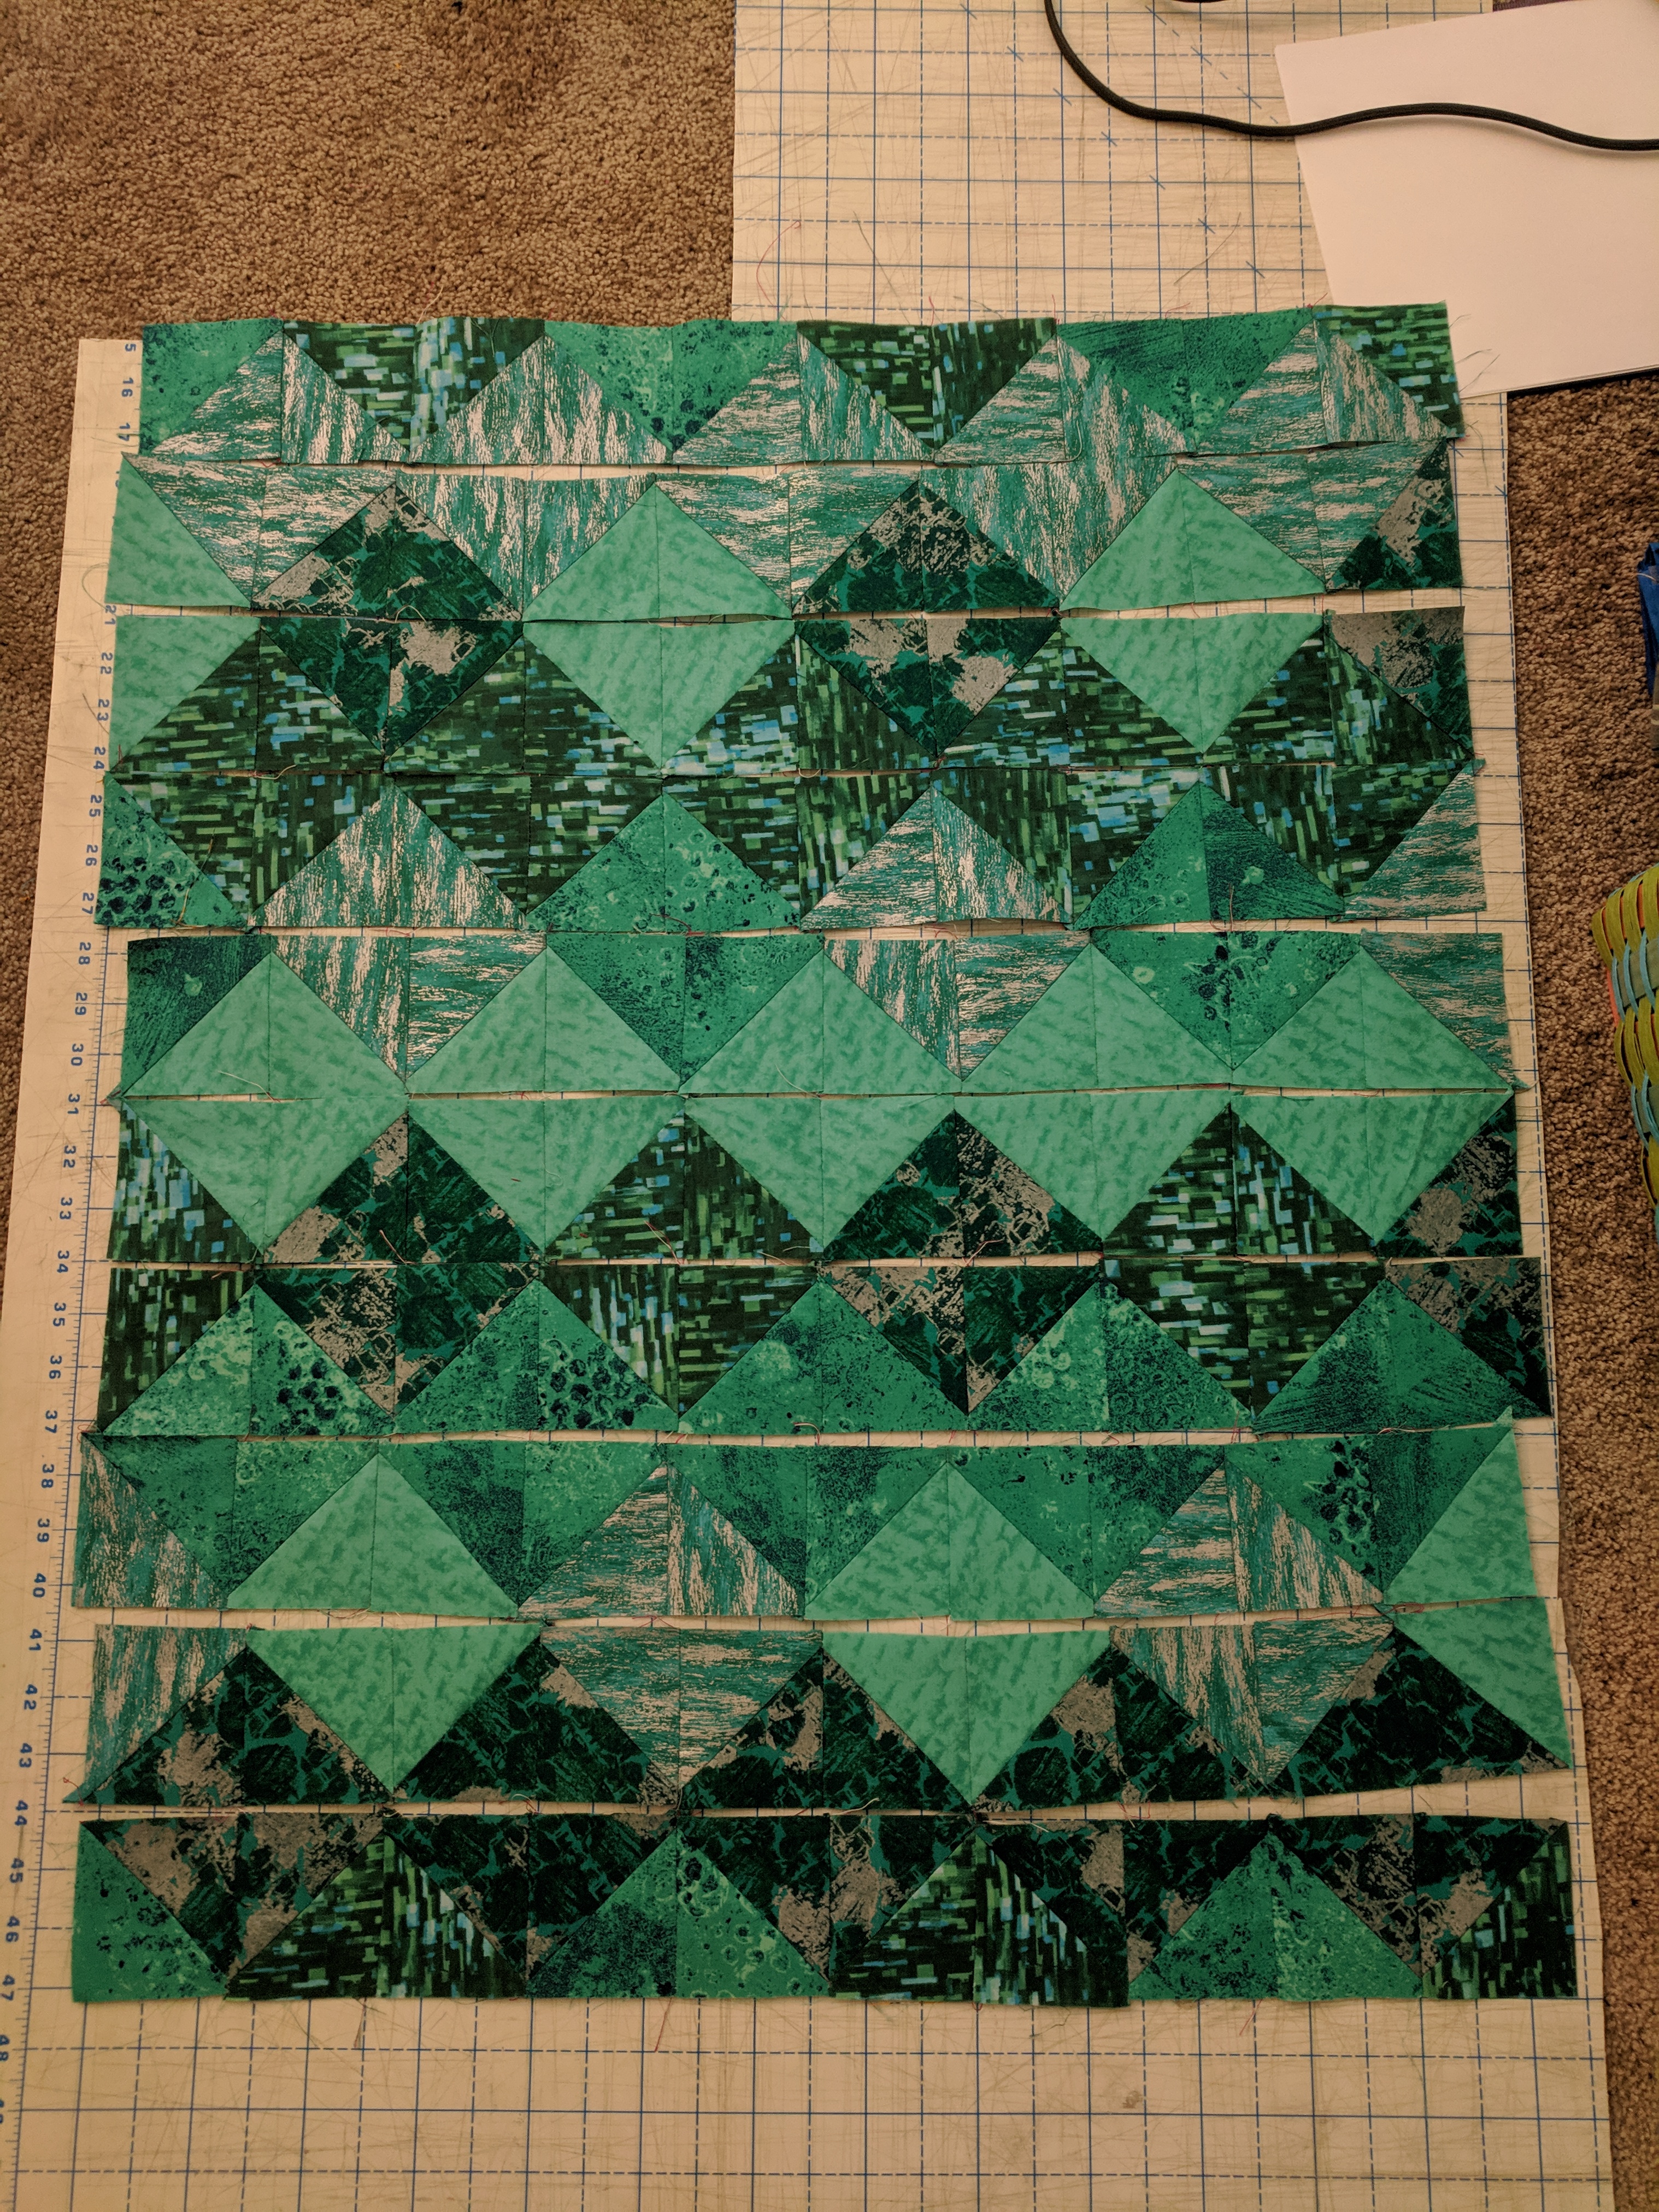
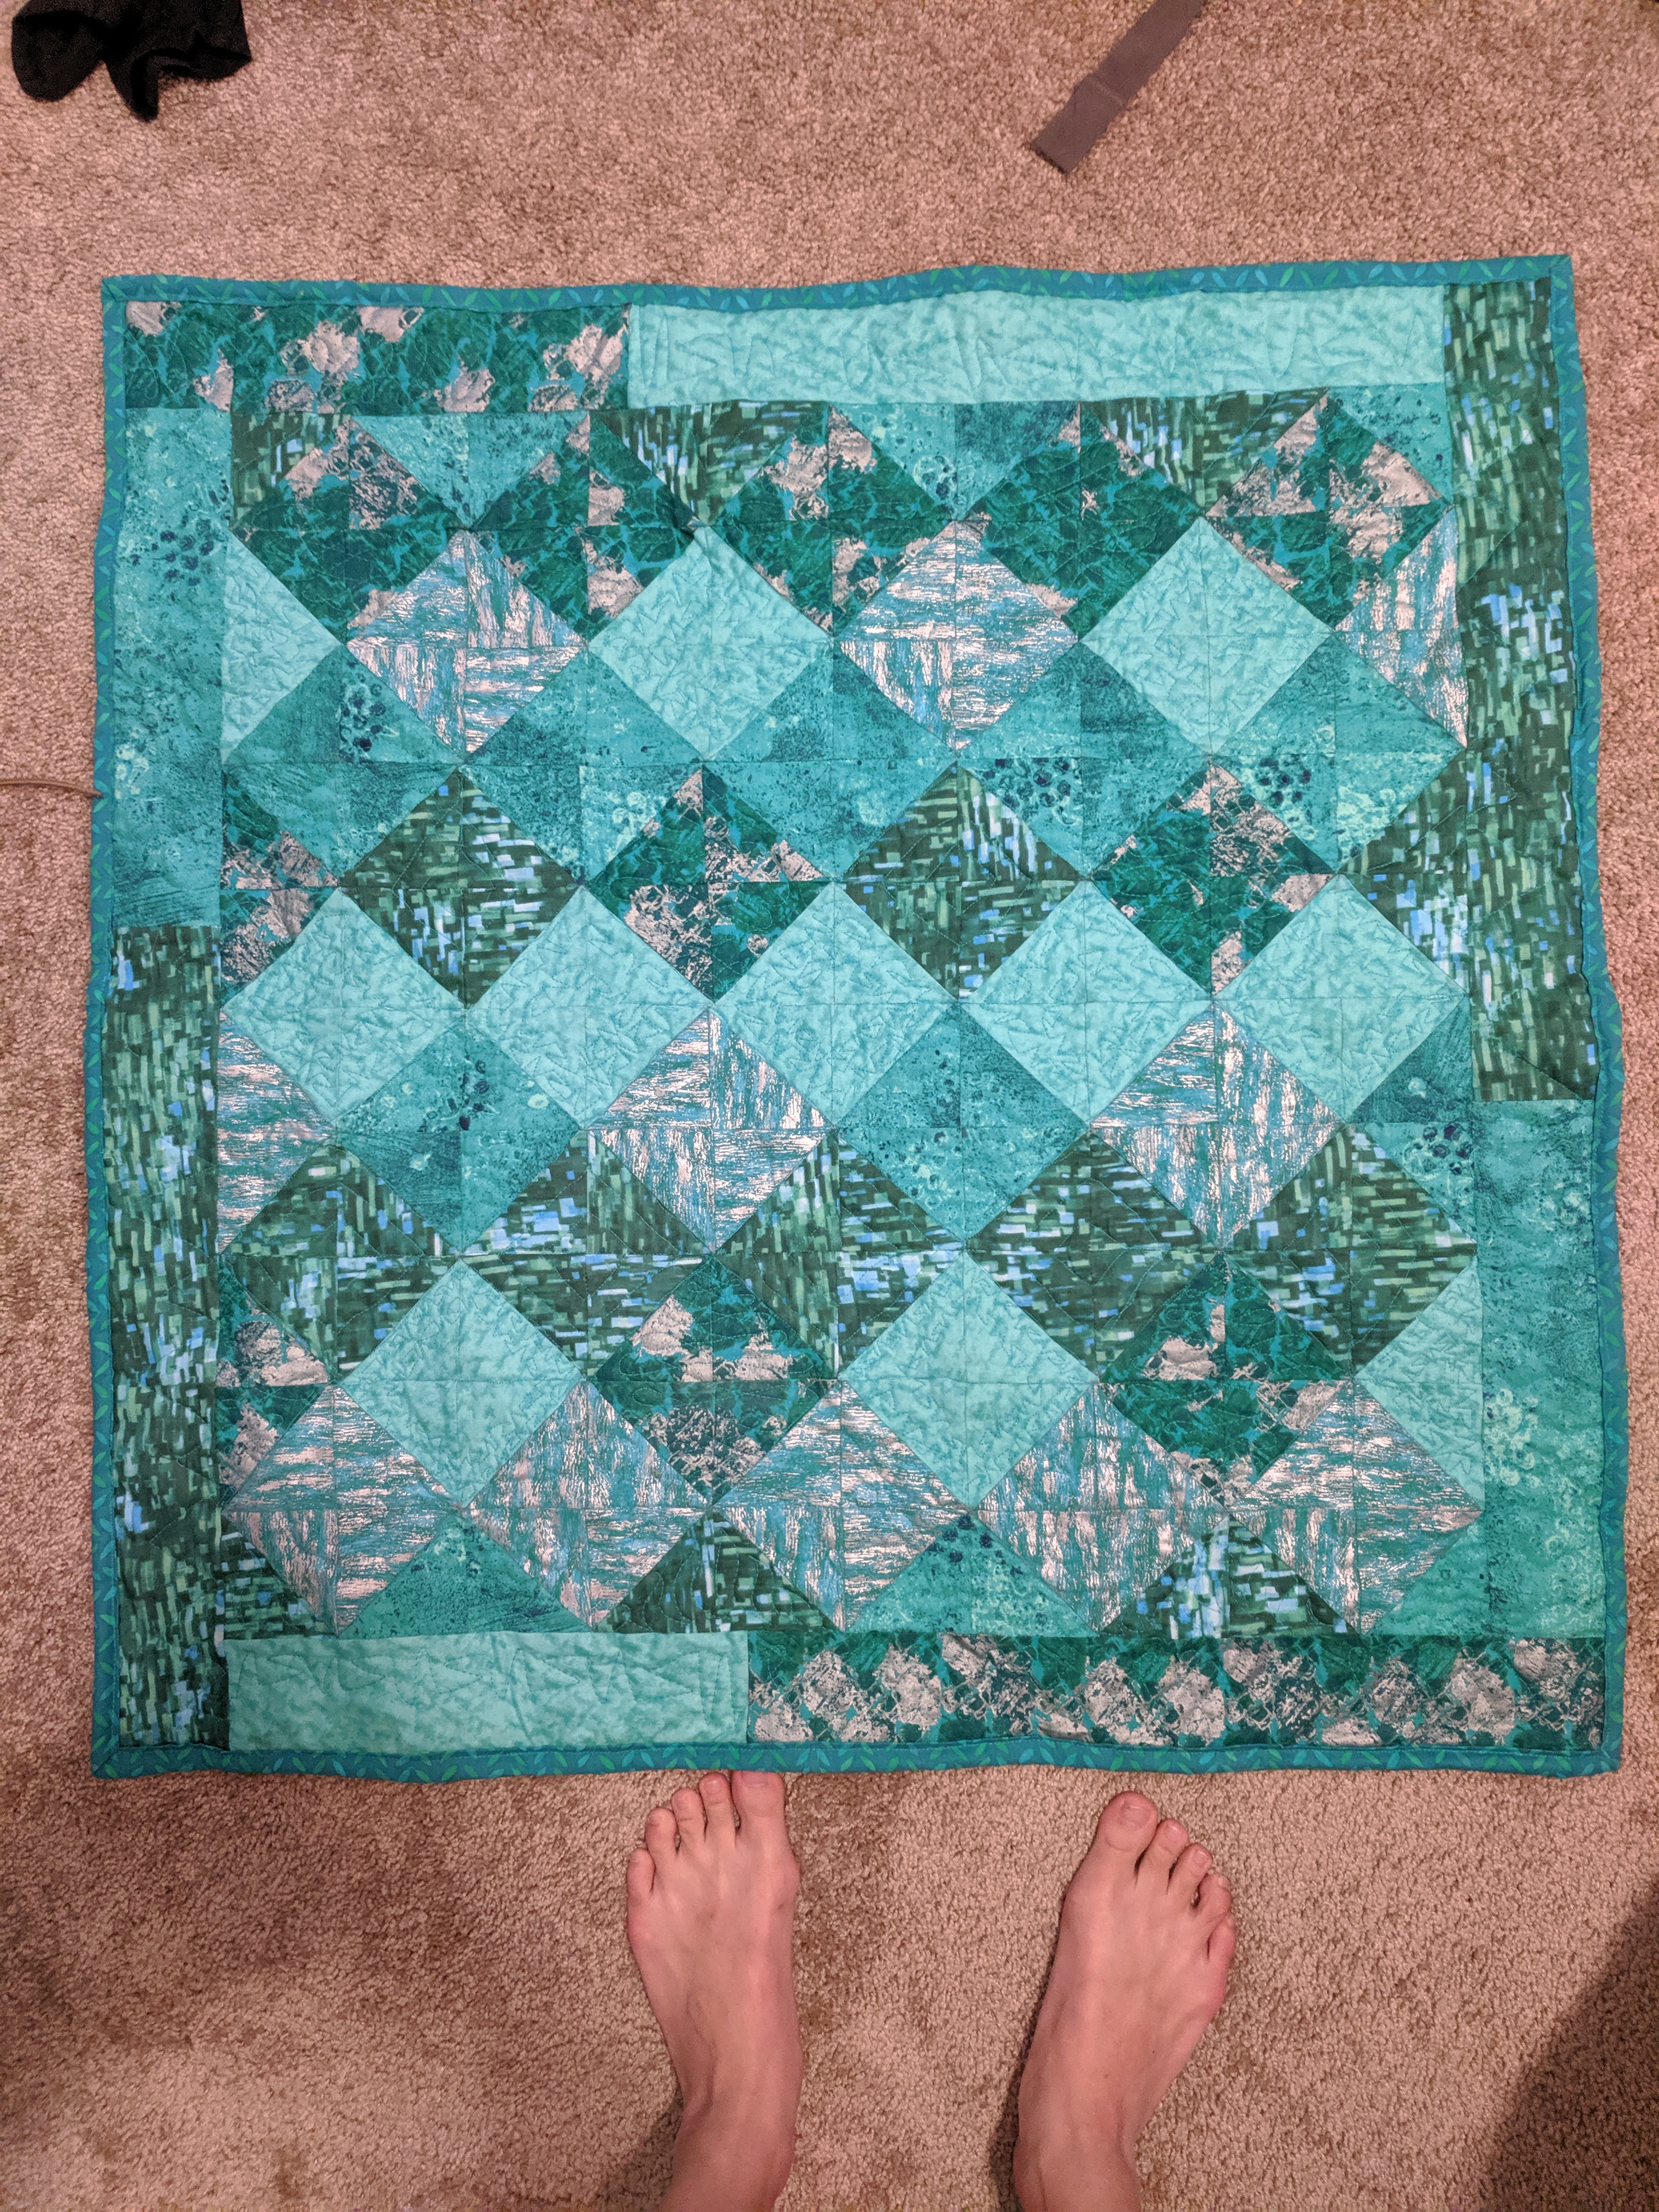
So the Green Diamonds was meant to be a trial “mess up” quilt before I attempted to quilt the rainbow bargello (see next week). I got a cheap 5-fabric fat quarter (18″x21″ piece) bundle from Joann, and cut each fabric into squares. I made half square triangles (HSTs) of each pair of fabrics – so each fabric had a set of HSTs with each other fabric. I decided to lay them out in a fake “on point” design, so that each fabric was represented by a row of diamonds. This created a secondary block, or pattern, between the rows of diamonds that’s diamonds of alternating fabric. I sewed these together in rows, then sewed the rows together. I used some excess fabric for the border.
Let’s take a second to talk about quilting. A quilt, by definition, is a piece of fabric (quilt top), a piece of batting, and another piece of fabric (backing), and at some point those three layers are held together by thread. For the most part, quilters these days use 100% cotton fabric for the quilt top and backing, and there are many different kinds of batting: cotton, polyester, cotton/poly blend, wool, etc. These three layers together are called the quilt sandwich, and the act of putting the thread through all the layers is called quilting. 🙂 Quilting can be done by hand or by machine.
Hand Quilting
Design: hand sewing a running stitch to make lines or a design across the quilt top.
Tying: using a needle to draw thread through all three layers and tying the thread on either side of the sandwich. Can be used with buttons or other baubles.
Machine Quilting
Walking Foot: usually used for straight line or simple designs, a walking foot is an alternative presser foot (thing that holds the fabric down against the machine as you’re sewing) that helps feed the top of the sandwich through the machine at the same rate as the feed dogs that are moving bottom of the sandwich. Normal presser feet do not bring the top through as effectively, and stitching can become uneven and fabric can get stretched or distorted.
Feed dogs are the little strips that come up and down and move the fabric through the machine as the needle moves up and down. In mechanical machines, the needle and feed dogs are moved by the same crankshaft.
Free Motion: a free motion foot is used instead of the presser foot, and the feed dogs are lowered so they do not move the fabric. The quilter moves the fabric around the sewing machine space so that the needle travels across the fabric. Can make lines and patterns like hand quilting.
Longarm: a special sewing machine where the fabric is held stationary on a large frame, and the quilter moves the machine with the needle around the quilt. Machines like these are very expensive but incredibly effective. Much easier than moving the fabric in free motion.
So I knew I wanted to do free motion with this quilt. I did a lot of practice with pen and paper (surprisingly useful) and on scraps. In a fit of ambition, I decided that each fabric would have its own design. There is “dot-to-dot”, NZNZ, swirl with petals, wavy lines, and wishbone. Let me say this now: I didn’t practice enough on all of the designs. I’d done wishbone before on a pillow, so that one turned out pretty nice. And I surprised myself by having some very nice wavy lines, too. Dot-to-dot was the hardest – creating a straight line mid-fabric without any guides (I decided to forego drawing in water soluble marker on my fabric) is really hard.
Before you quilt the sandwich, you have to baste it so that all the layers stay aligned and don’t move around while you’re quilting. You can hand baste with stitches, spray baste with adhesive, or safety pin (my chosen method). You lay your sandwich on a flat surface (preferably not carpet), and I like to tape down the edges of my backing so it doesn’t slide about. Then you start pinning in the center and move outwards, smoothing wrinkles as you go. This also makes sure that you don’t end up with weird wrinkles, pleats, or bunches in your finished product (but more on that later).
So anyway after pinning the living daylights out of my sandwich, I sat down to do some free motion. You always start in the middle and work your way out, just like basting. I decided to work down the rows so that I could keep doing the same design and keep it in my muscle memory. One of my issues with this quilt was moving from diamond to diamond – some of my designs didn’t bring me back to my starting point, or guide me into the next diamond. Also, since this was an HST design, there can be up to 8 layers of fabric at the intersections, which made it bumpy and hard to quilt near the centers and points of each diamond.
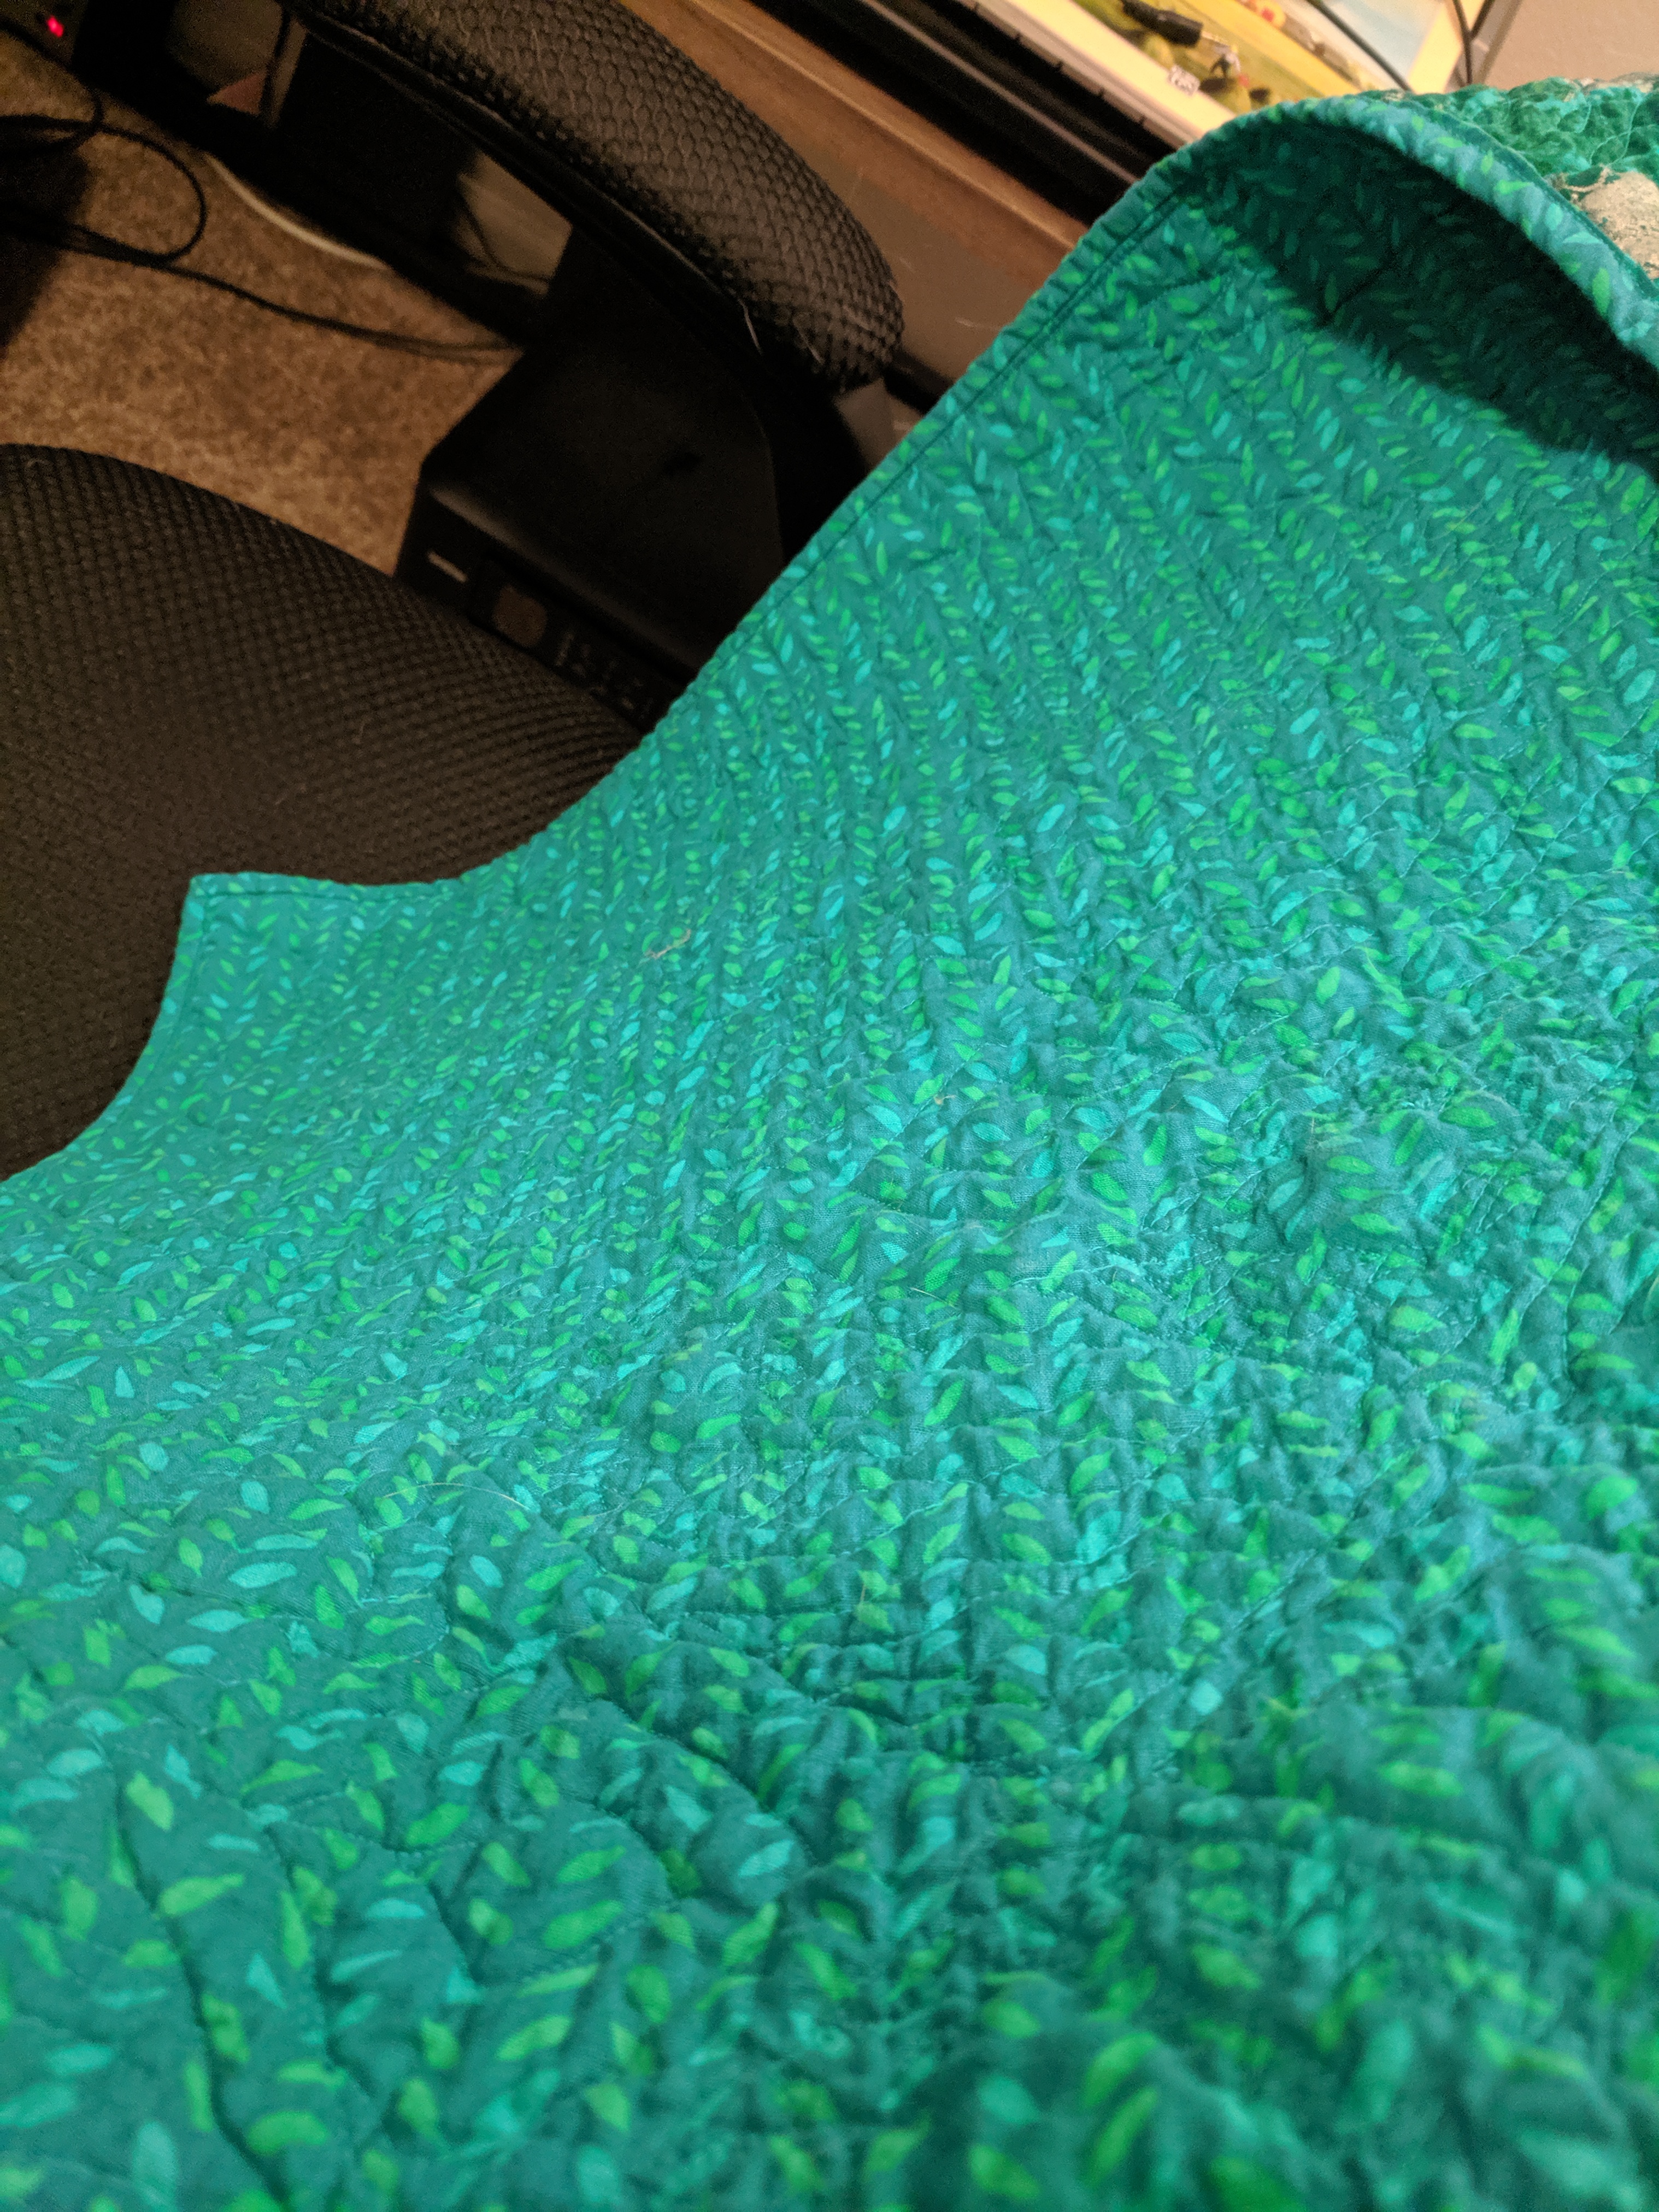
It took a bit, but I quilted this in a couple nights and put the binding on (strip of fabric wrapped around the edges of the fabric).
Now – about the wrinkles and bunches. I loved my finished product, but there’s one last step in quiltmaking. Washing and drying. No one likes something they can’t throw in the washer and dryer. I was extremely worried about threads coming loose, or the binding just spontaneously falling off (extremely unlikely), but I threw it in the washer anyway. And when I put it in the dryer, I didn’t even look at it.
But then it turned out wonderfully crinkly and soft, and nothing bad happened 🙂 Washing your quilt helps the batting fluff up a bit, and the quilting sinks down, making a nice texture that hides mistakes (of which I made many) and bumps (of which there are many) and pretty much everything else. Plus it makes the whole thing soft and cuddly, which is what quilts are (for me) meant to be. I don’t think you’d wash an art quilt, or something with super detailed free motion, but for my purposes, I learned to stop worrying about the tiny things because I can’t even find them anymore when I look at the quilt. And as Angela Walters says, “better finished than perfect”.
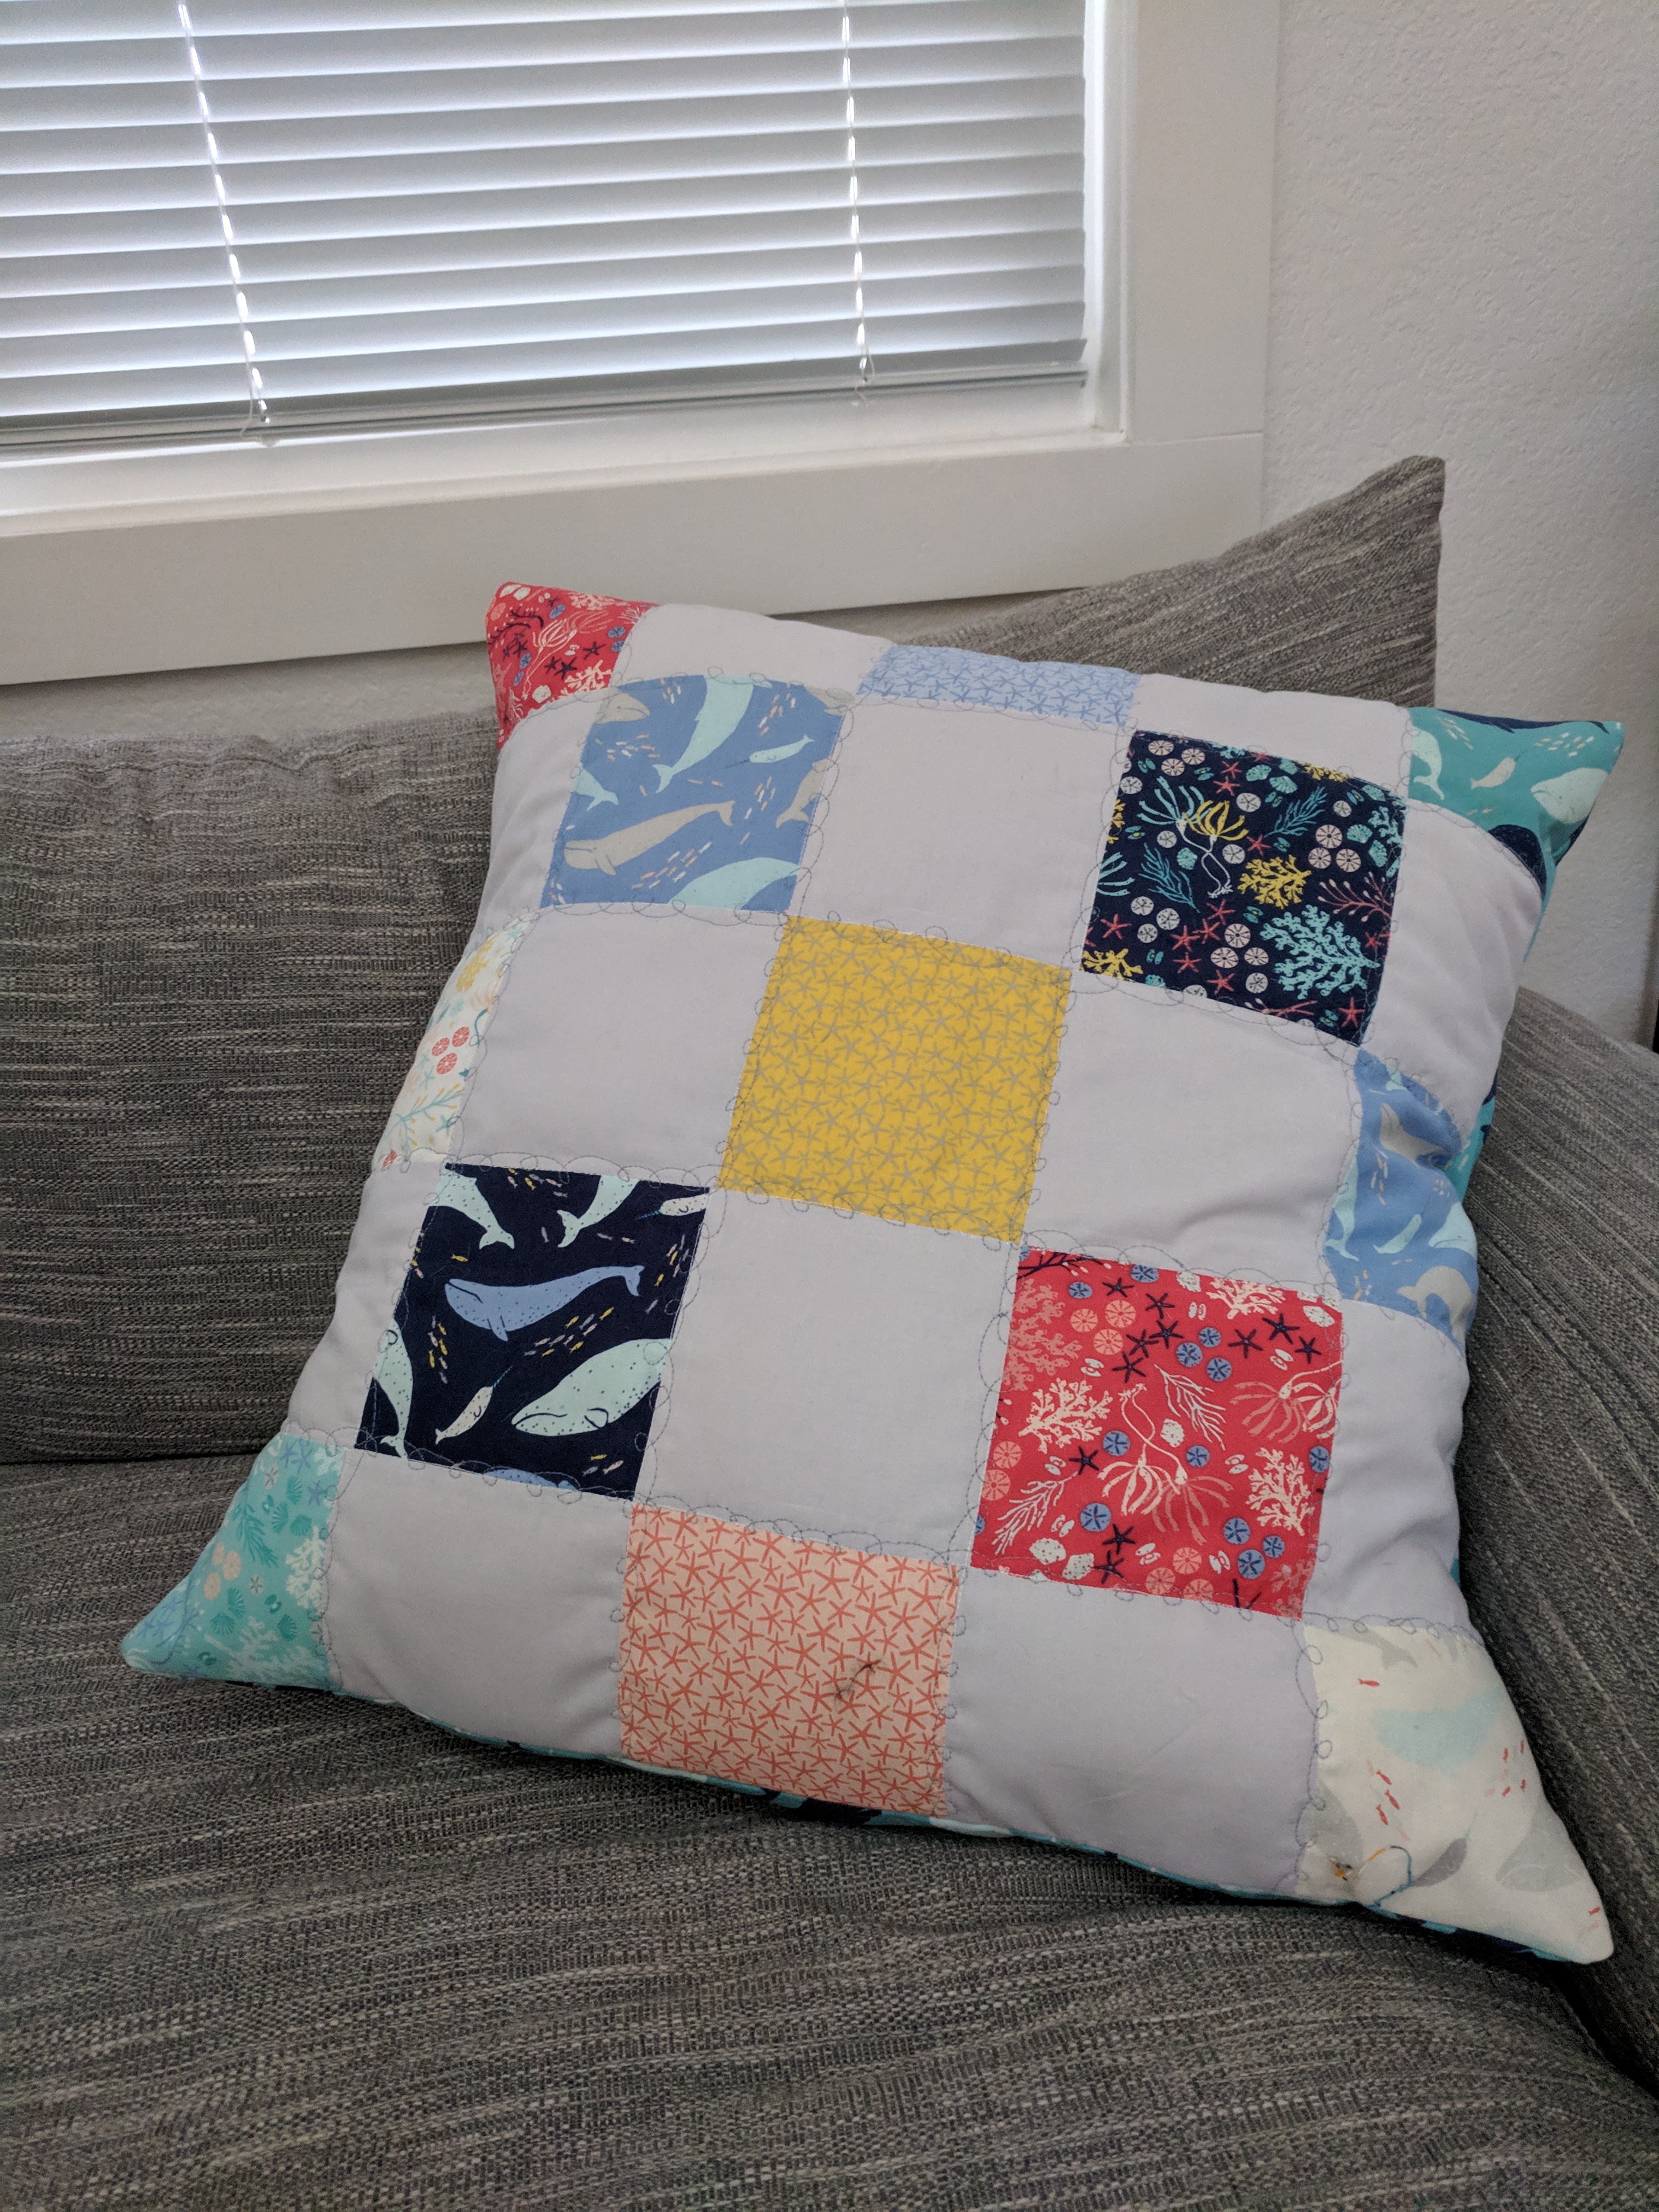
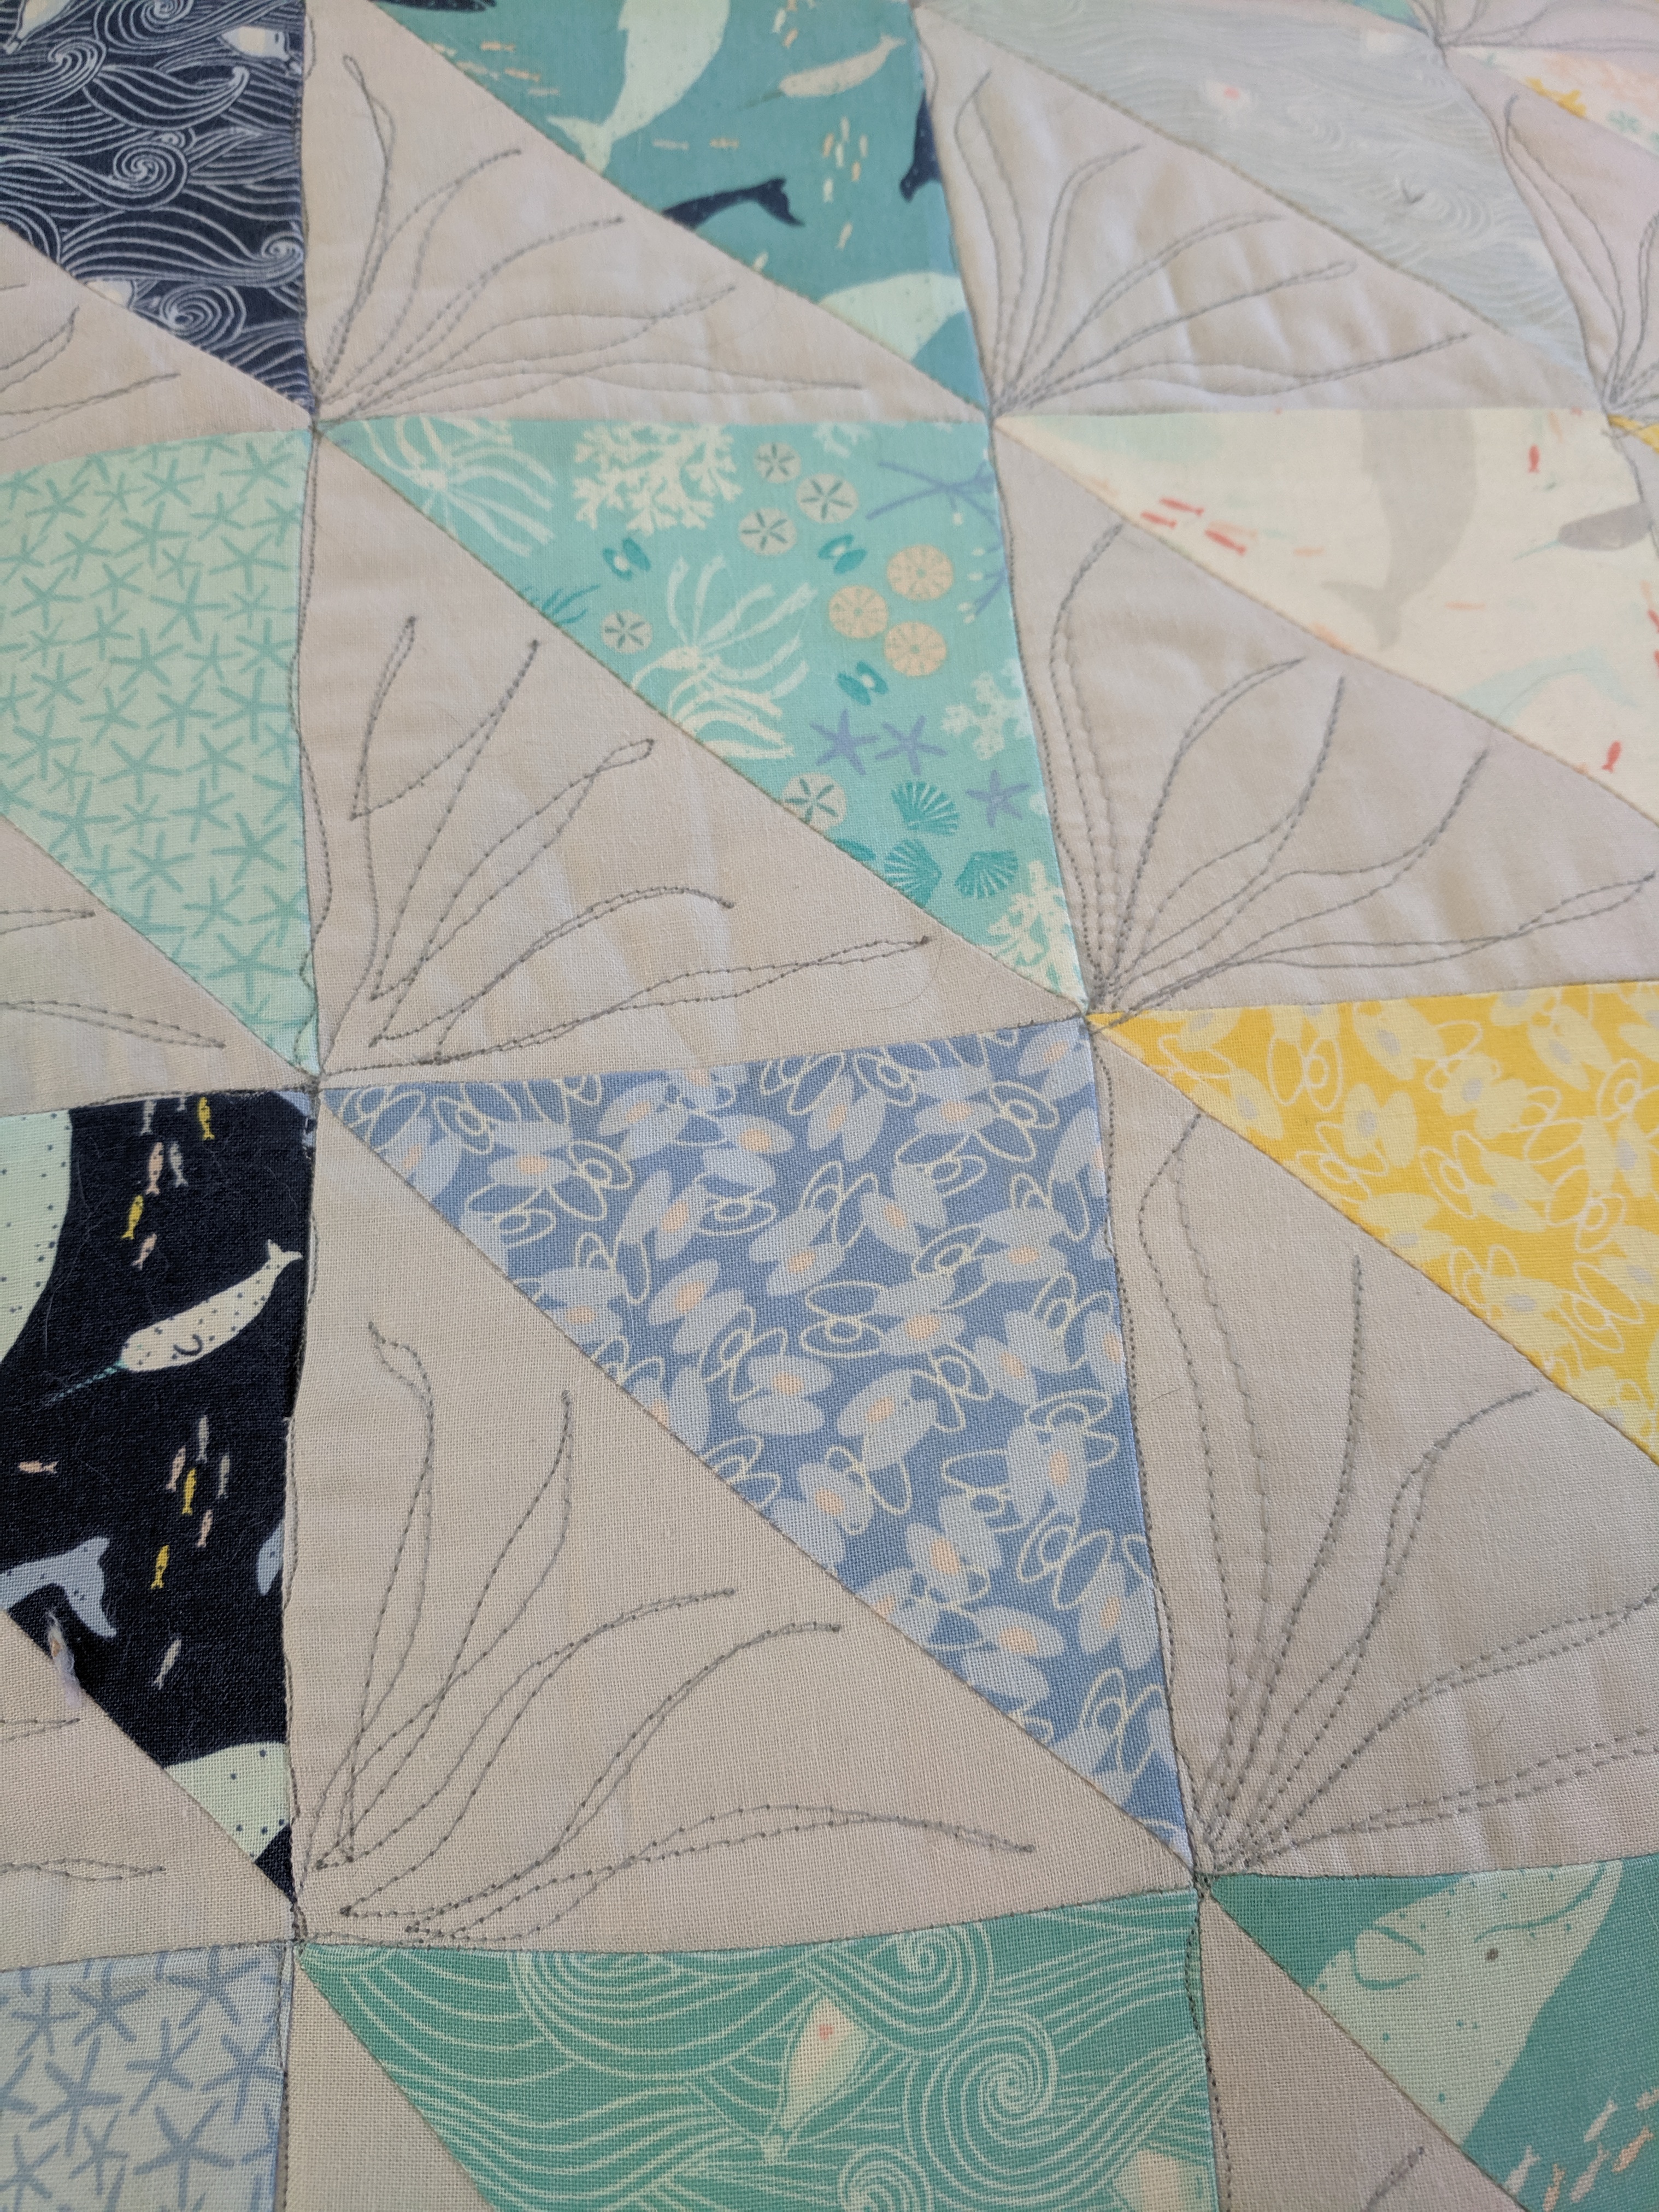
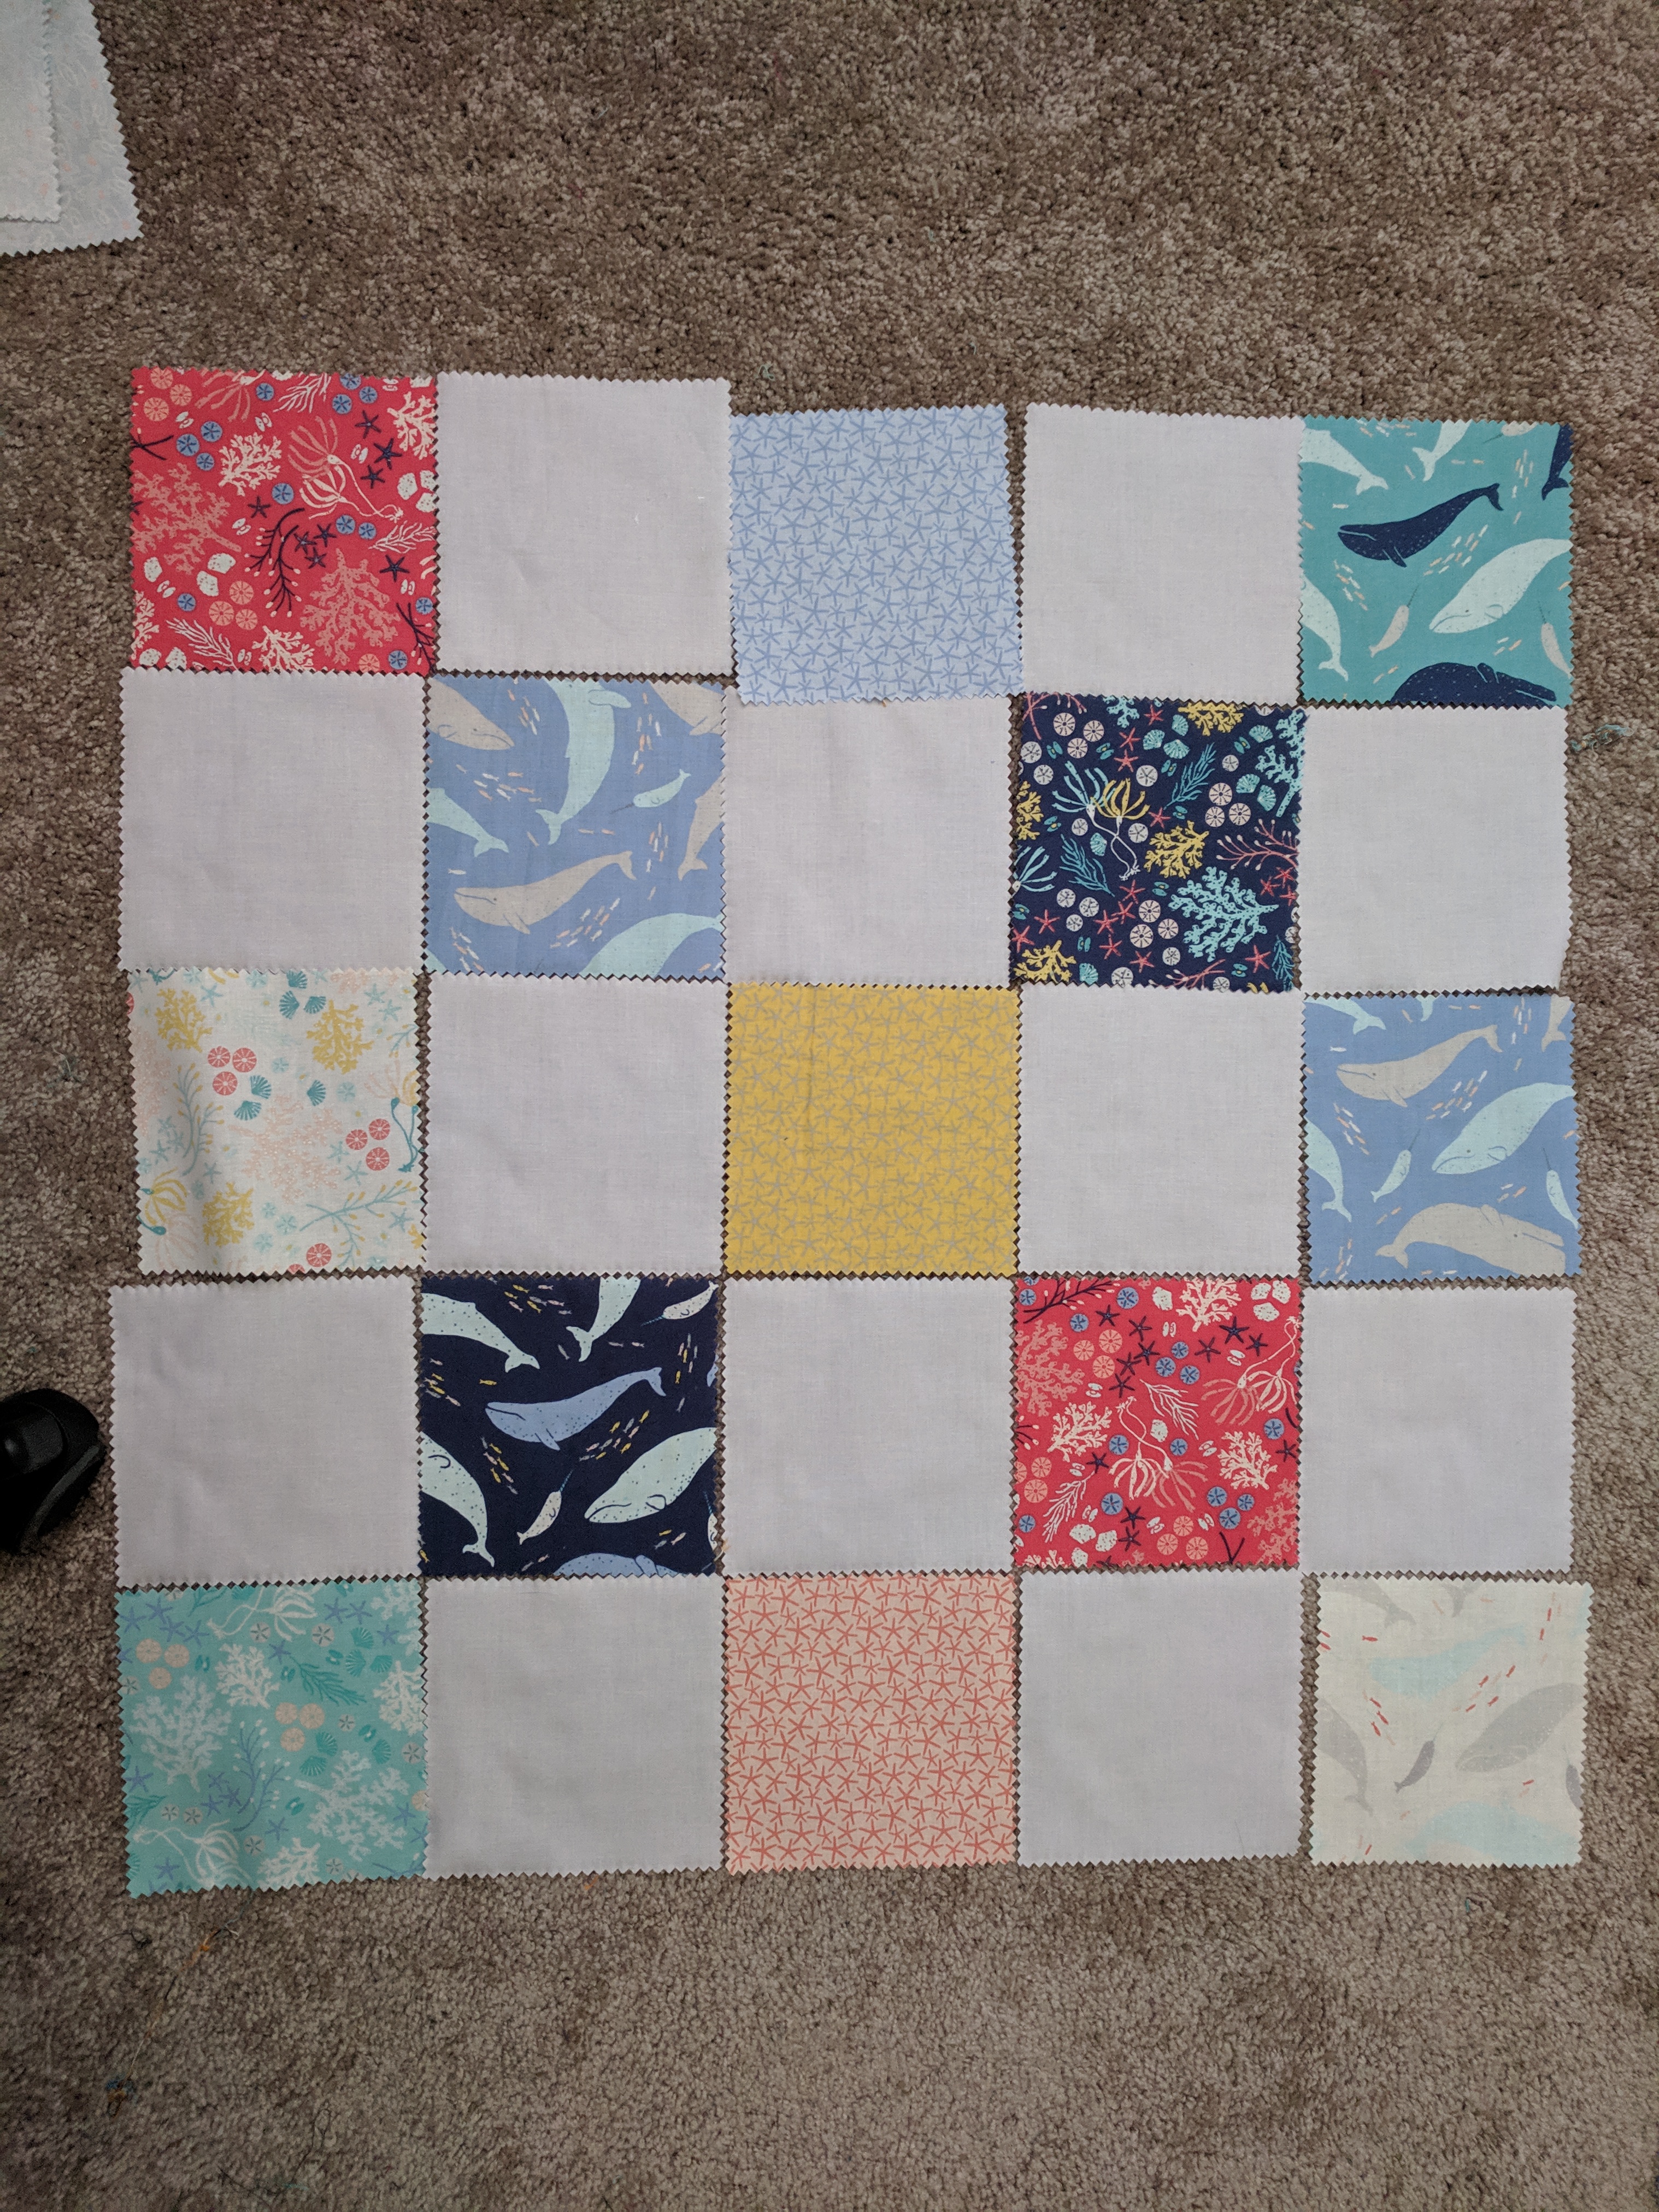
These pillows were my first foray into quilting! I got the High Seas 5″ squares on sale and paired them with a light gray background fabric.
I did a simple loopy free motion design on the 5″ square layout, and some coral-like wavy shapes on the half square triangle layout. This was me figuring out how to do free motion quilting effectively, including wrangling the excess fabric, what speed to move at, and how to control the whole situation. More about free motion quilting next week! 🙂
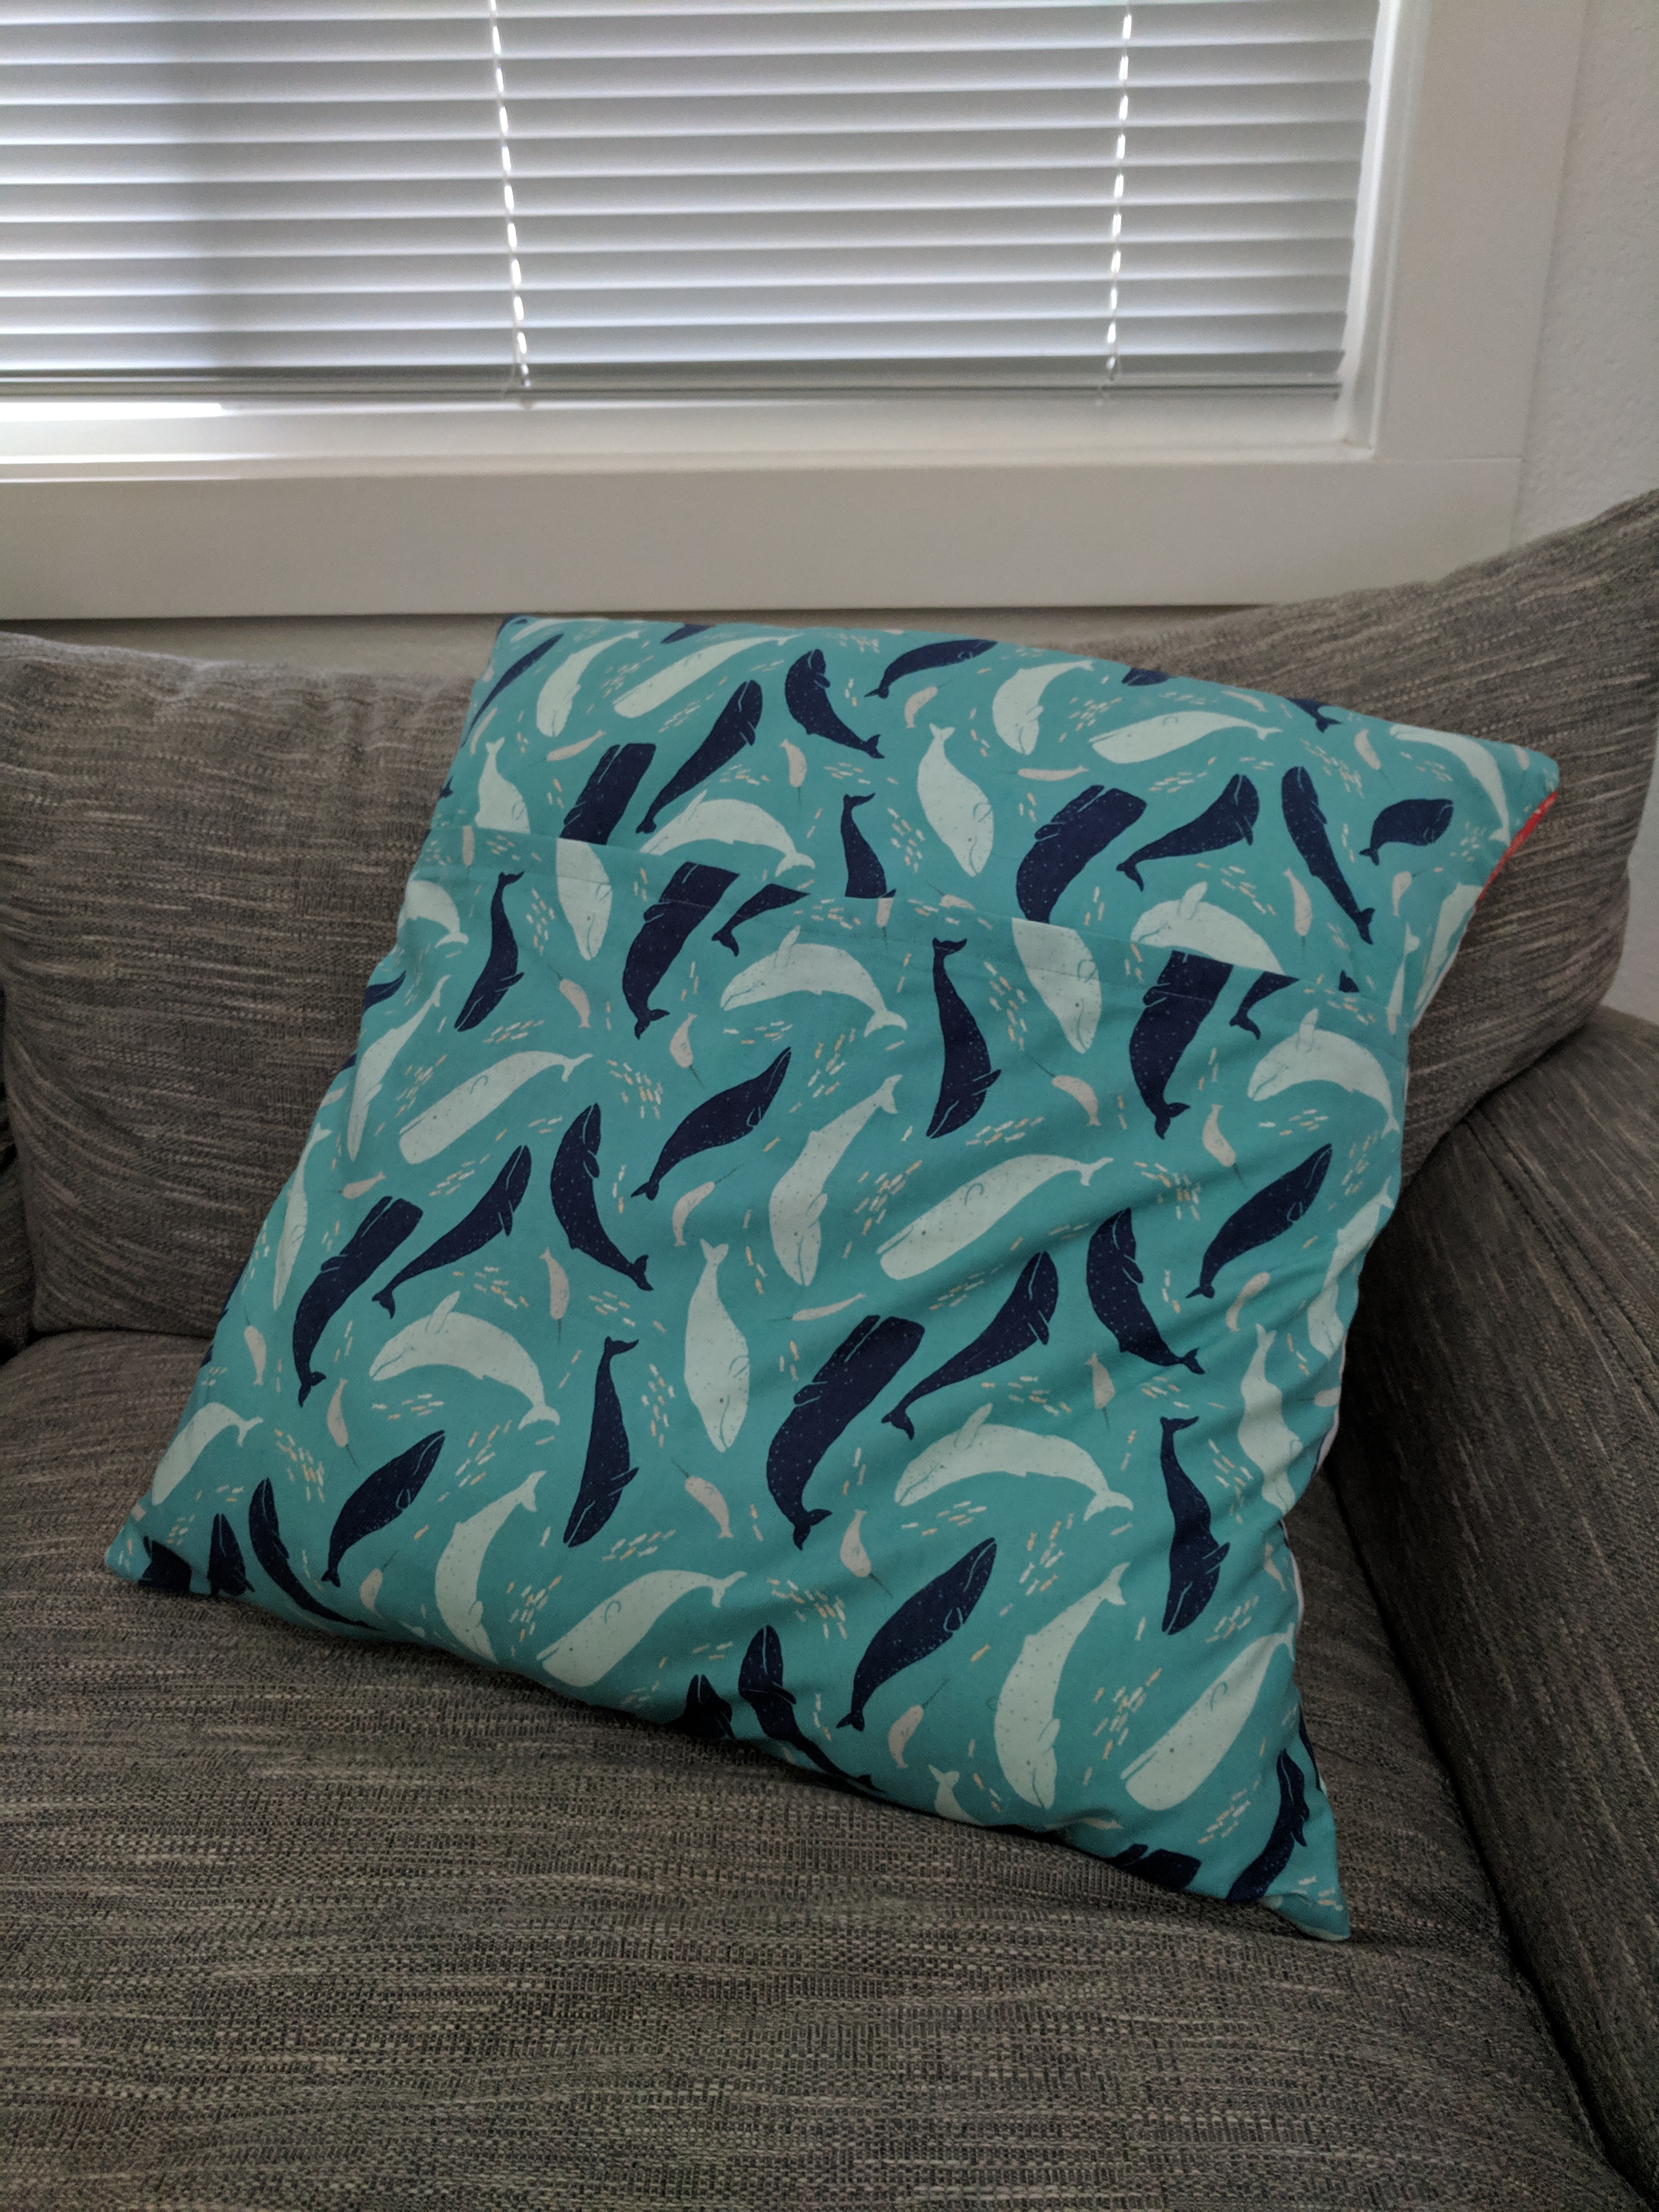
The backs for both the pillows are this adorable whale fabric, and I’m planning on making a shirt out of the leftovers. 🙂
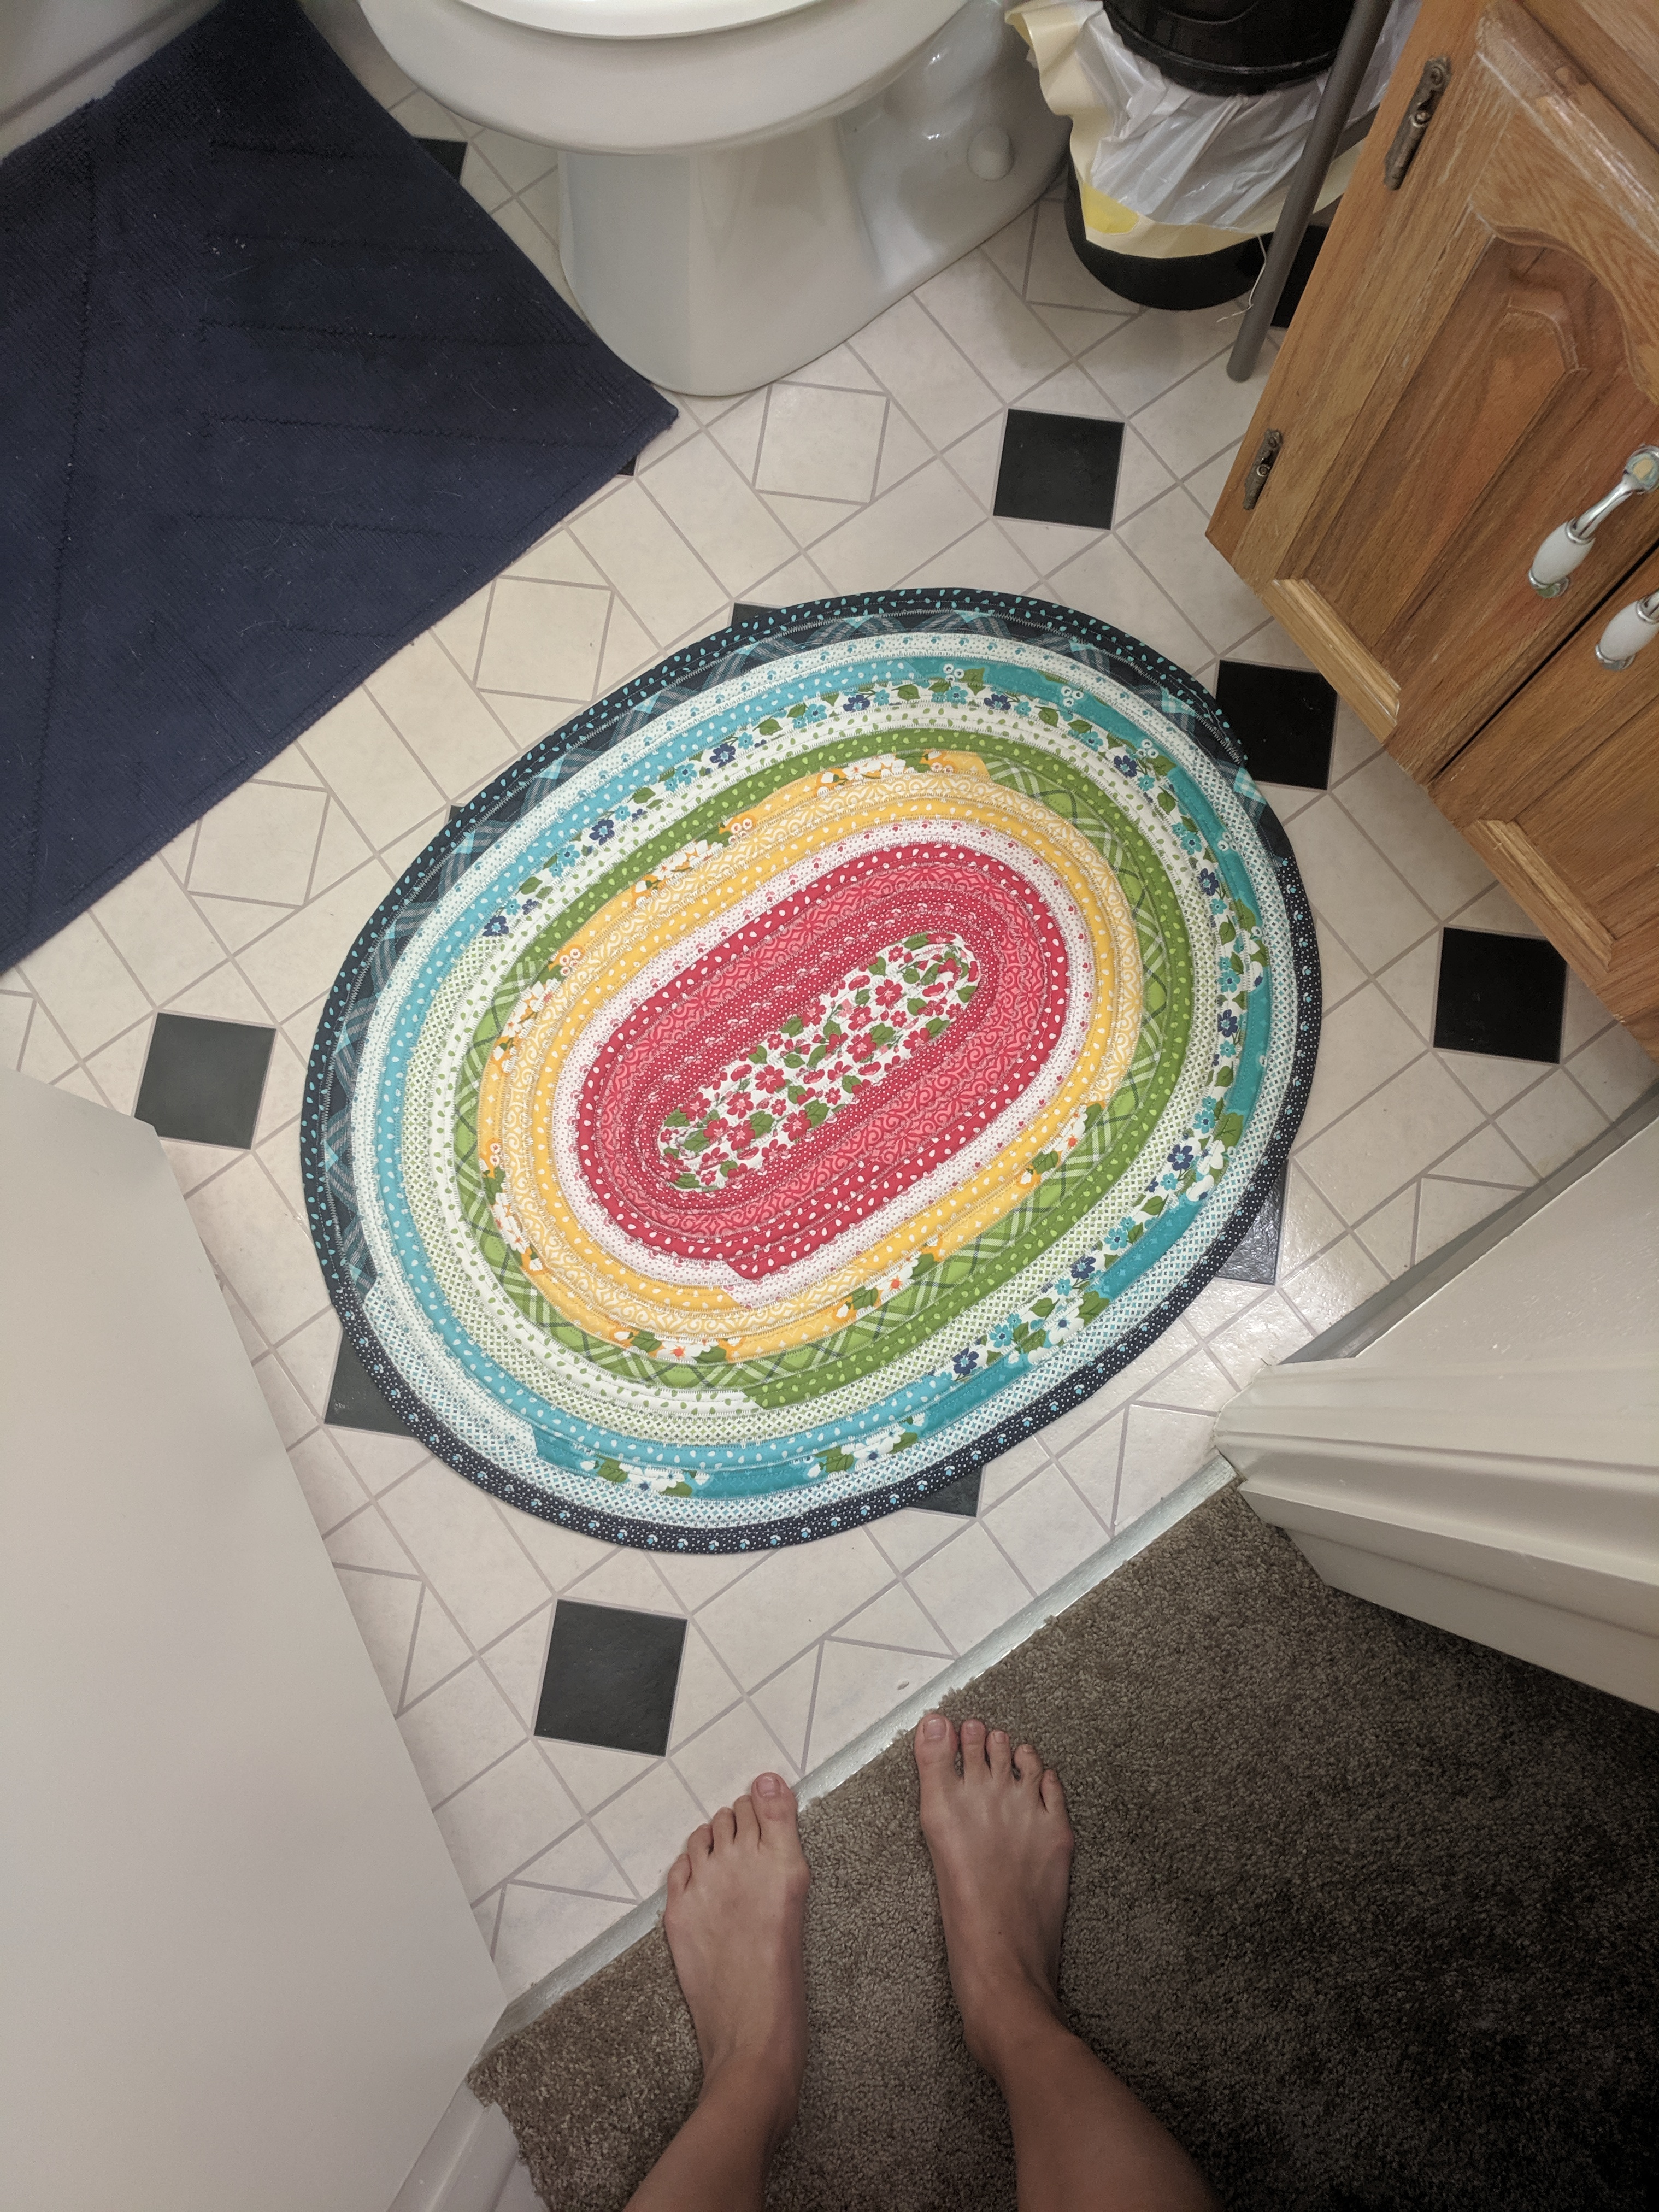
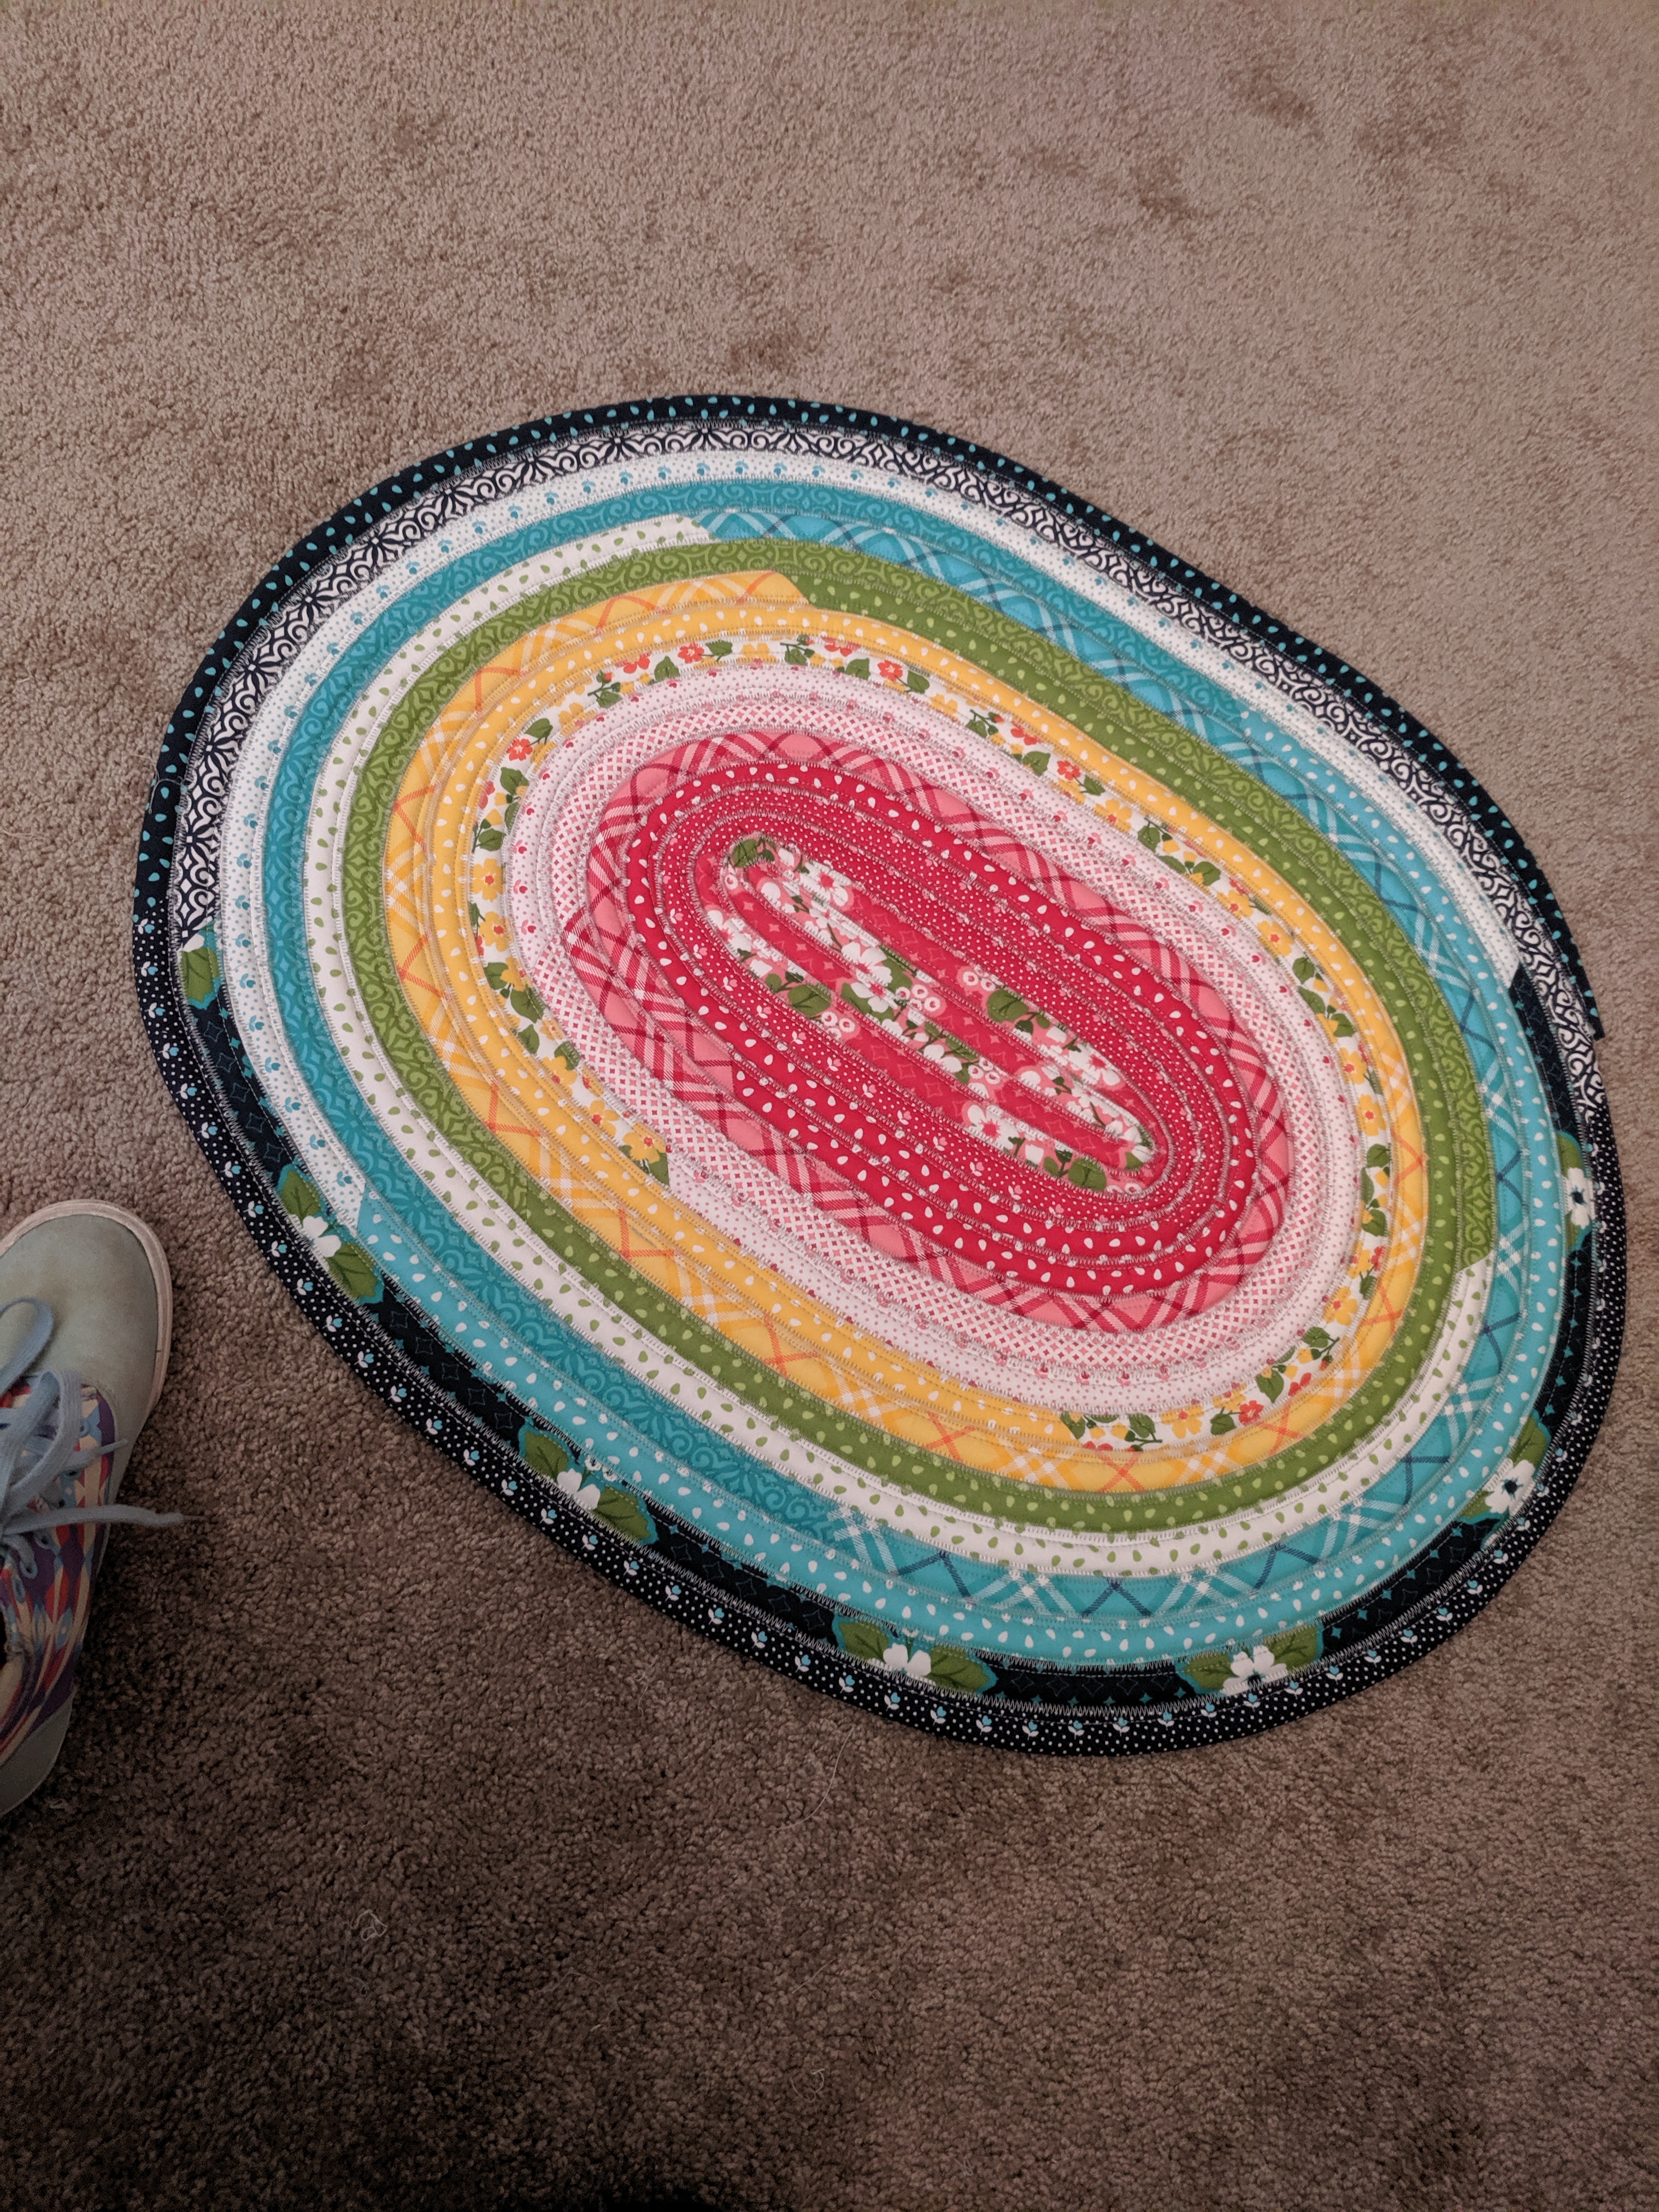
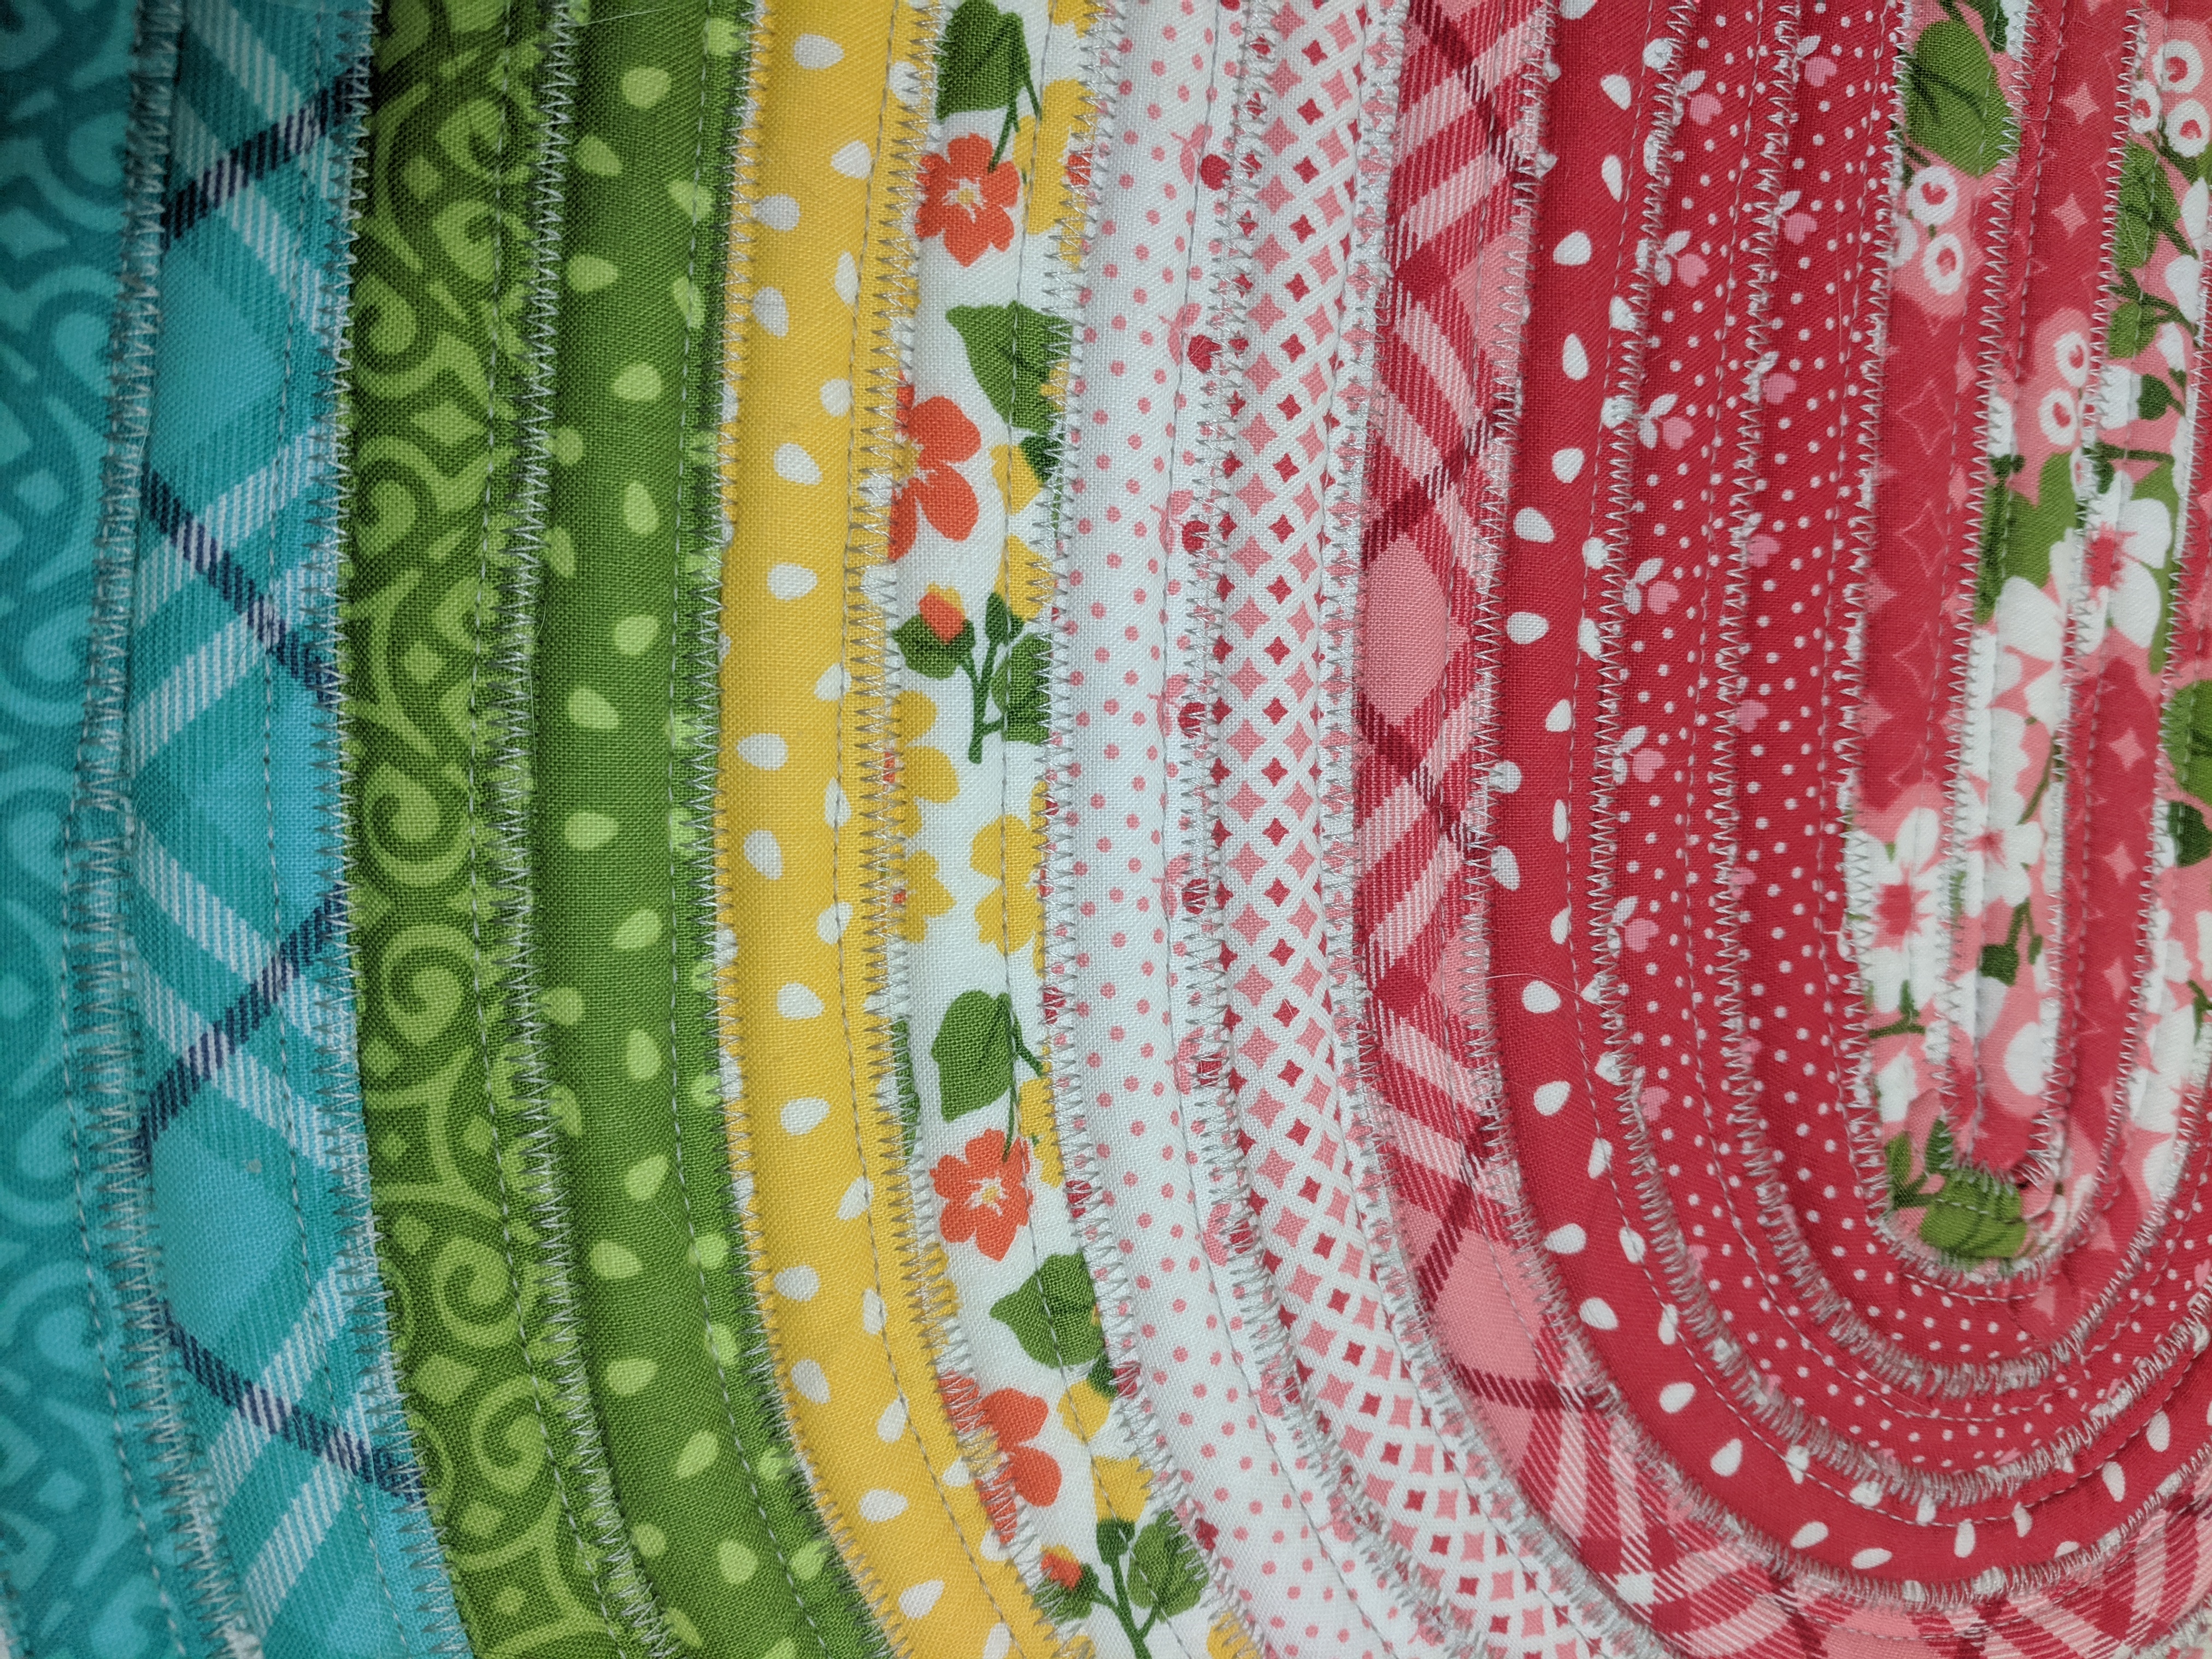
These are some mini jelly roll rugs 🙂 A jelly roll (technically trademarked by Moda Fabrics) is a roll of 2.5″ x 44″ strips of a fabric collection, and usually has 40-ish strips. I modified the RJ Designs Jelly Roll Rug pattern to use 20 strips for each rug so they’d turn out to be doorway-ish-sized. The assembly is super easy, all the strips are sewn together, and then you fold and sew precut batting strips into the long strip of fabric. So then you have a long strip of fabric folded around batting, and swirl that around itself to make the rug. It was a bit fiddly but I used my walking foot on the machine to help guide the fabric through evenly. Apparently if you use the whole roll, or even two rolls, for one rug you can get a supersized jelly roll rug, which I might make for my living room.
The fabric line I used is called All Weather Friend by Moda Fabrics. I gave one to a couple for their wedding, and “all weather friend” describes marriage perfectly! 🙂