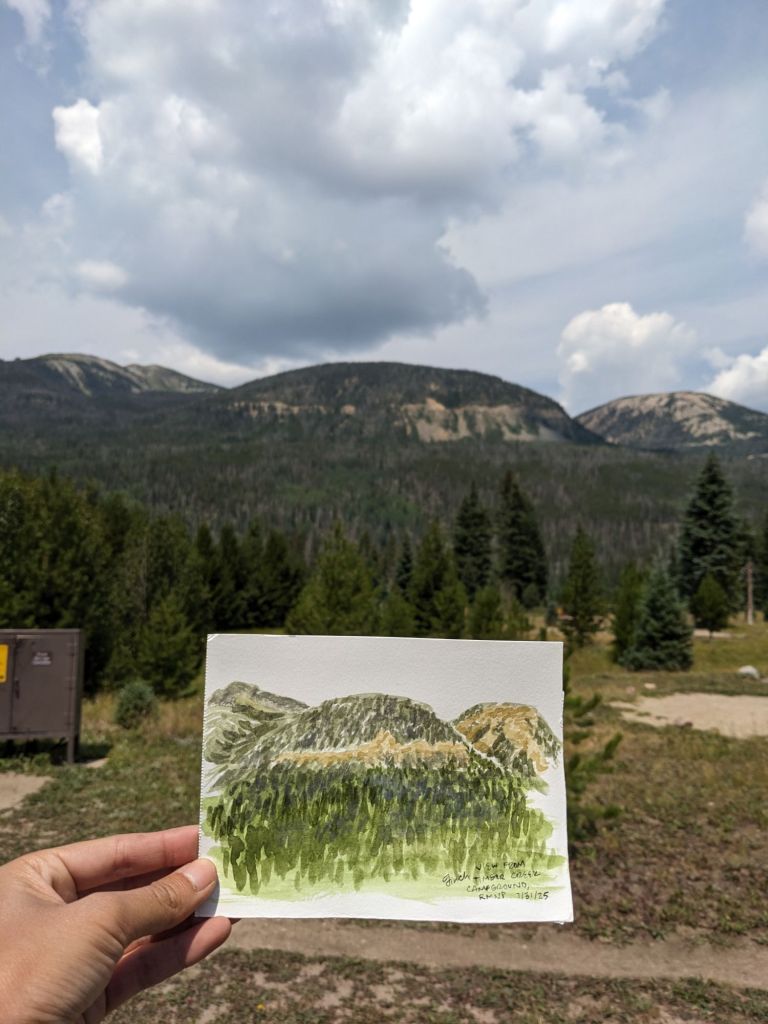
This lil postcard features the Grand Ditch, a water diversion structure that takes water from the tops of the Never Summer Mountains on the *west* side of the Continental Divide and ports it to the Cache la Poudre River, leading to the South Platte River. Part of this trip was dedicated to feeling some civil-engineering-and-climate-change-related feelings about the Colorado River and the development of Colorado. The Grand Ditch and Colorado-Big Thompson project enabled and continue to supply water for agriculture, industry, and municipalities on the *east* side of the Continental Divide, and these diversions have significant impacts on the Colorado River watershed by reducing the flow that would have been there.
On the left, I did the pen sketch first, and then the watercolor – I kind of like the differences between the paintings I do with pen and without, the pen ones end up more… tiny and detailed? But somehow feel restrained, or constrained? On the right I did a watercolor sketch underneath the color, and it ends up bold, and colorful, and not quite “accurate”, I focus more on color zones instead of lines.
I wanted to do a painting that had less detail and focused on big blocks of color to minimize all the painting of trees (my least favorite and least satisfying step). From the initial marker drawing (top right), it took me 2 minutes to add the pen details, and then 16 minutes to add the watercolor.
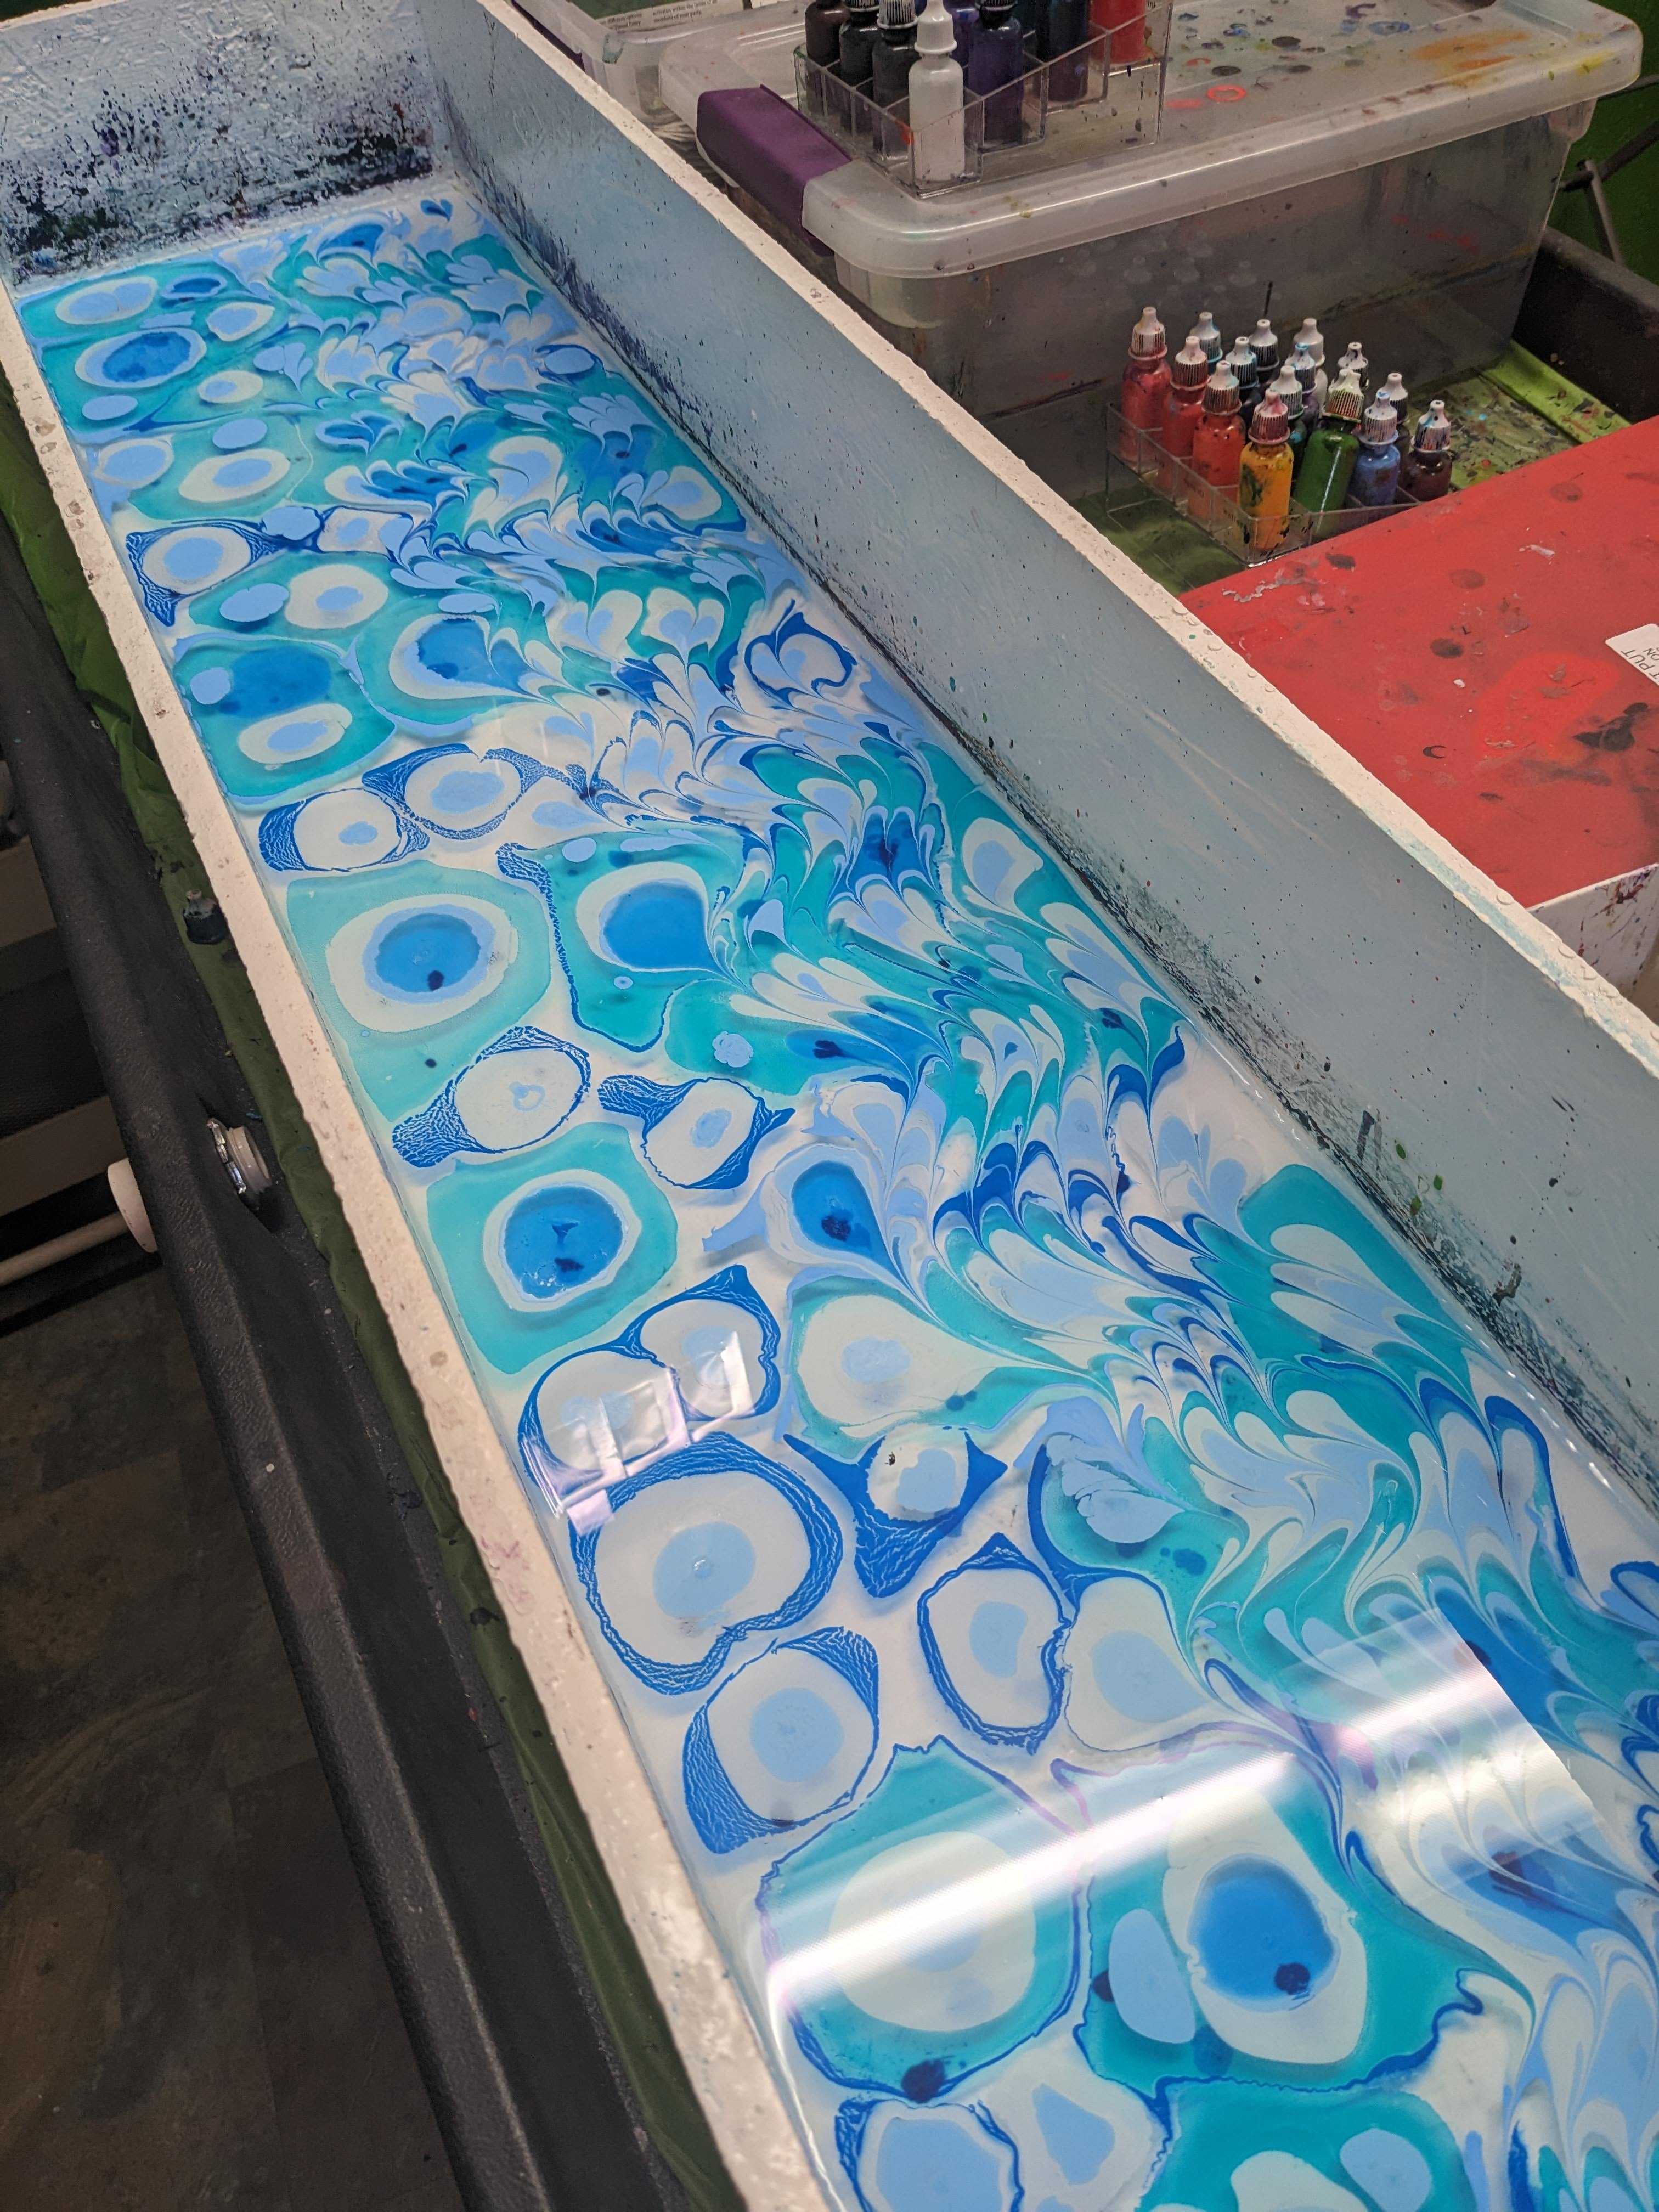
The silk marbling was incredibly meditative and calming, just dropping in the colors and swirling them together. I was going for a “river rocks” type of design and I think I really got it.
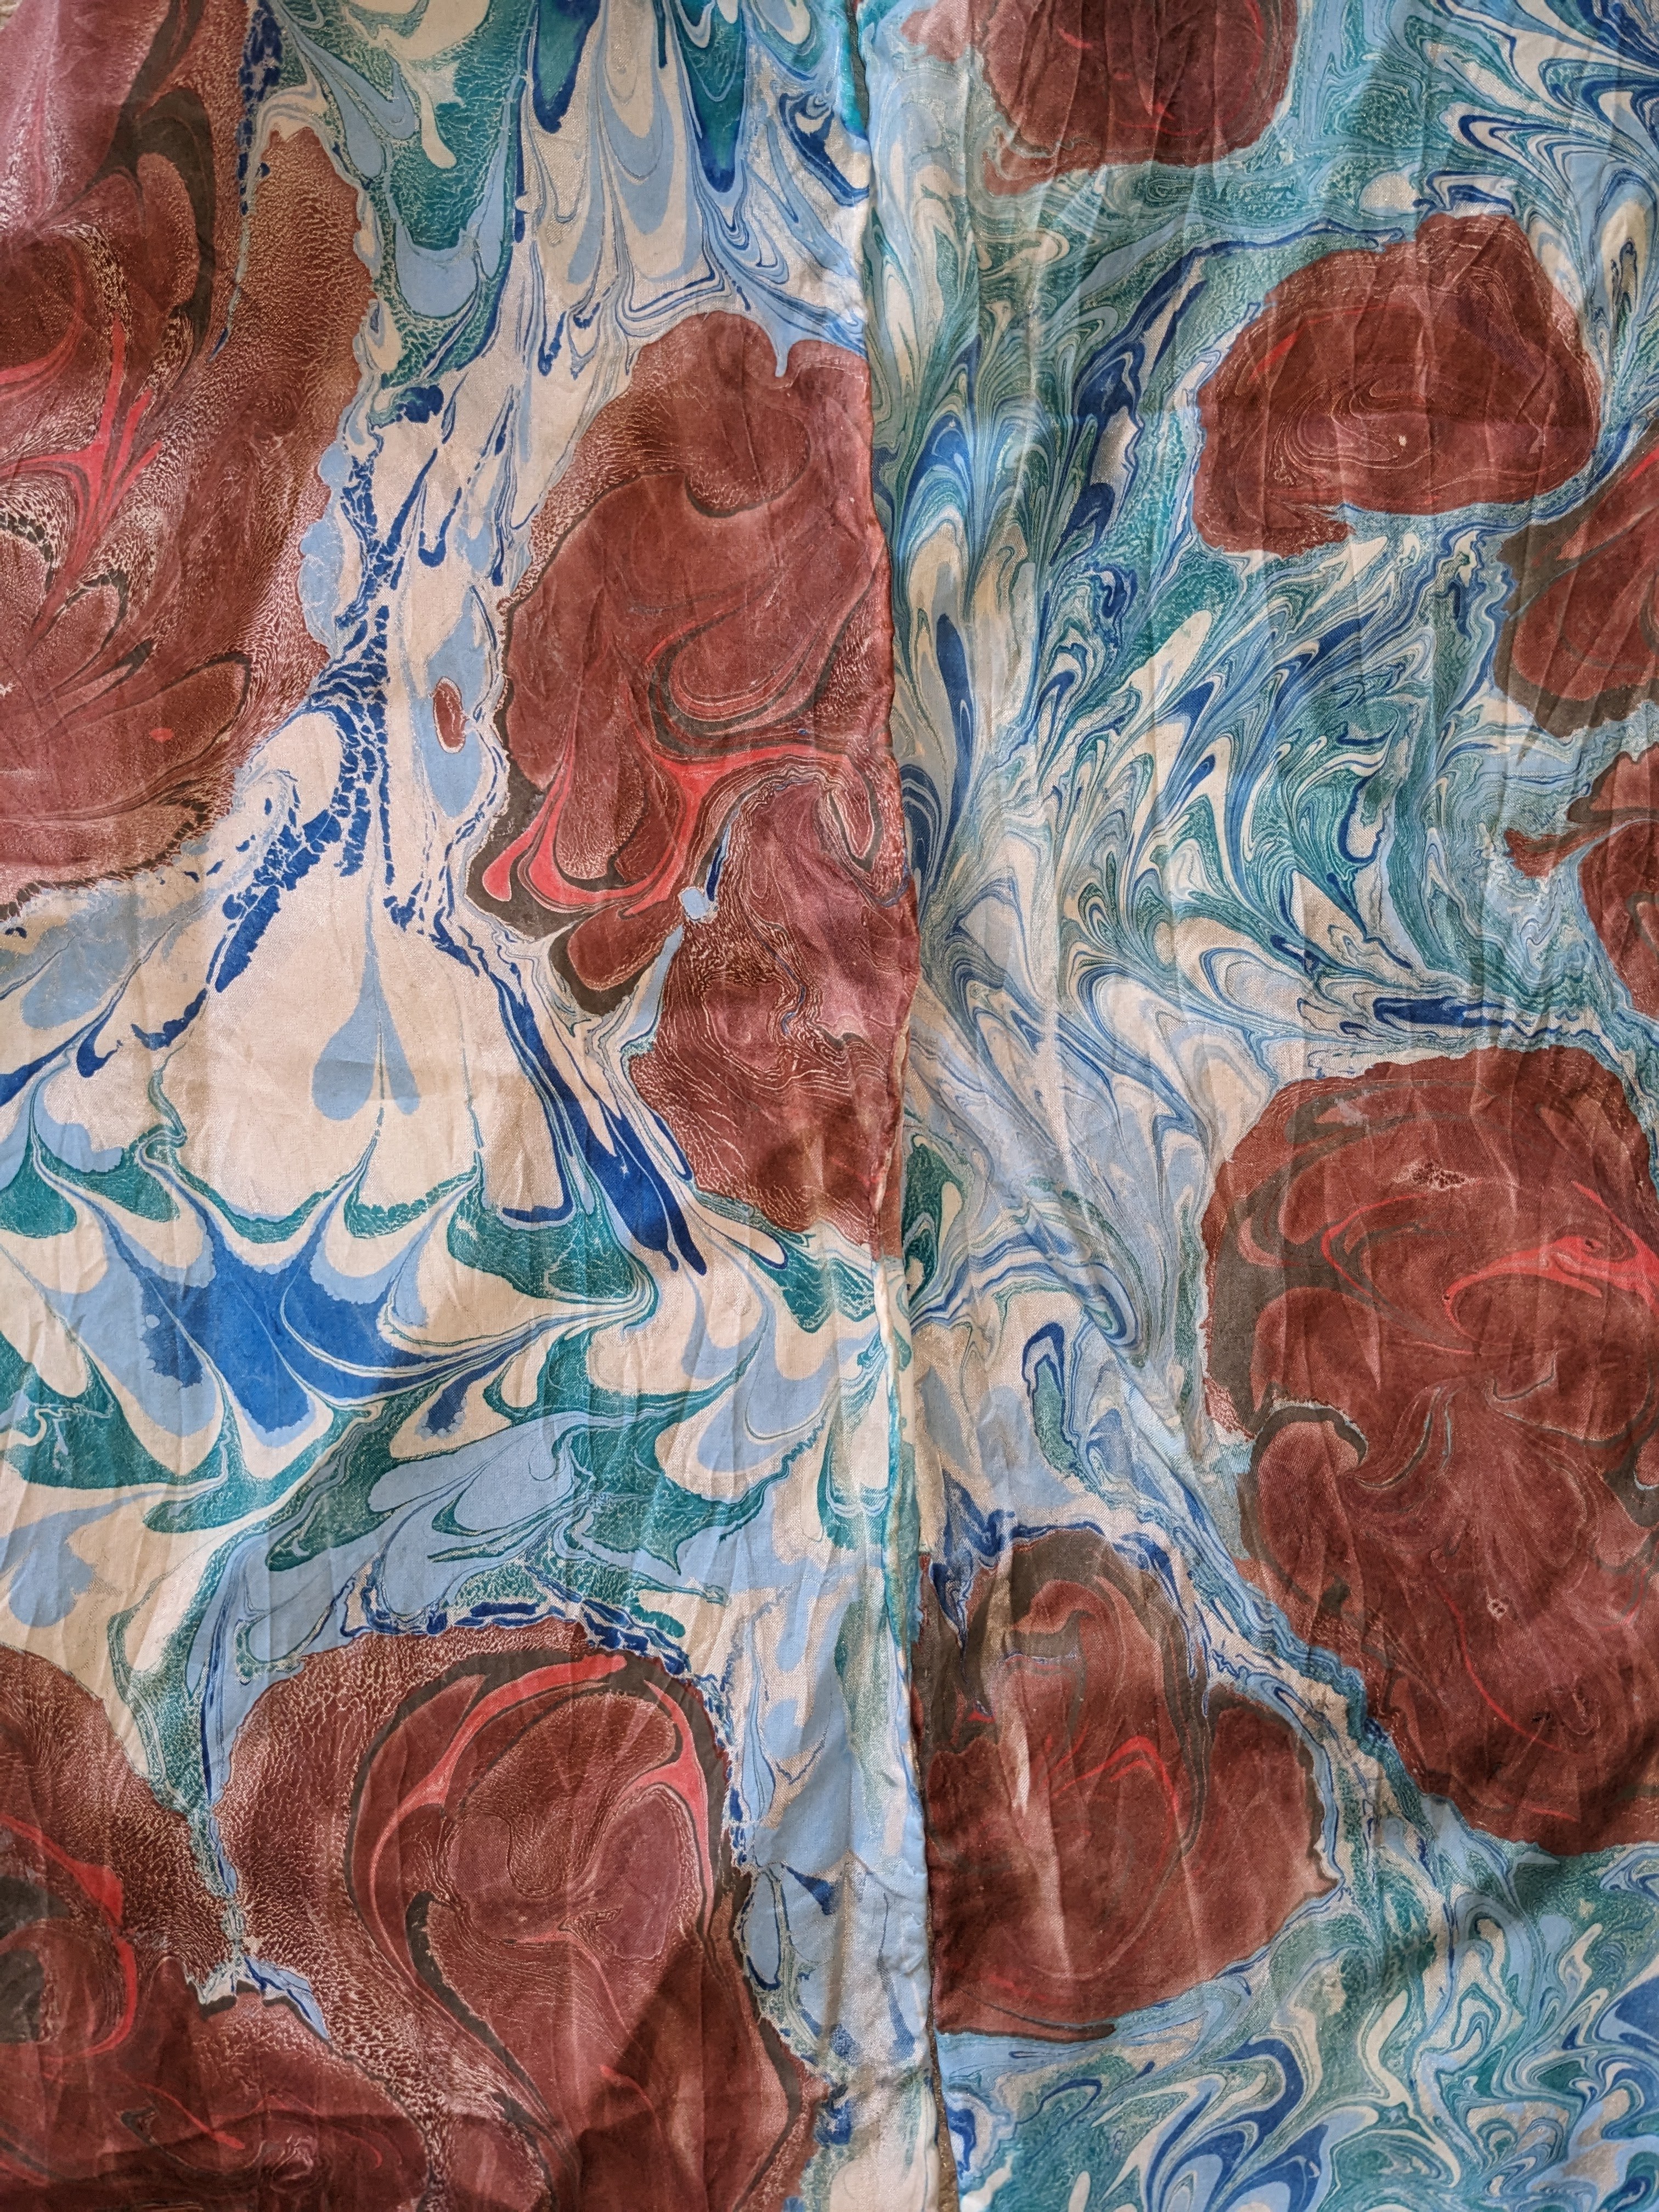
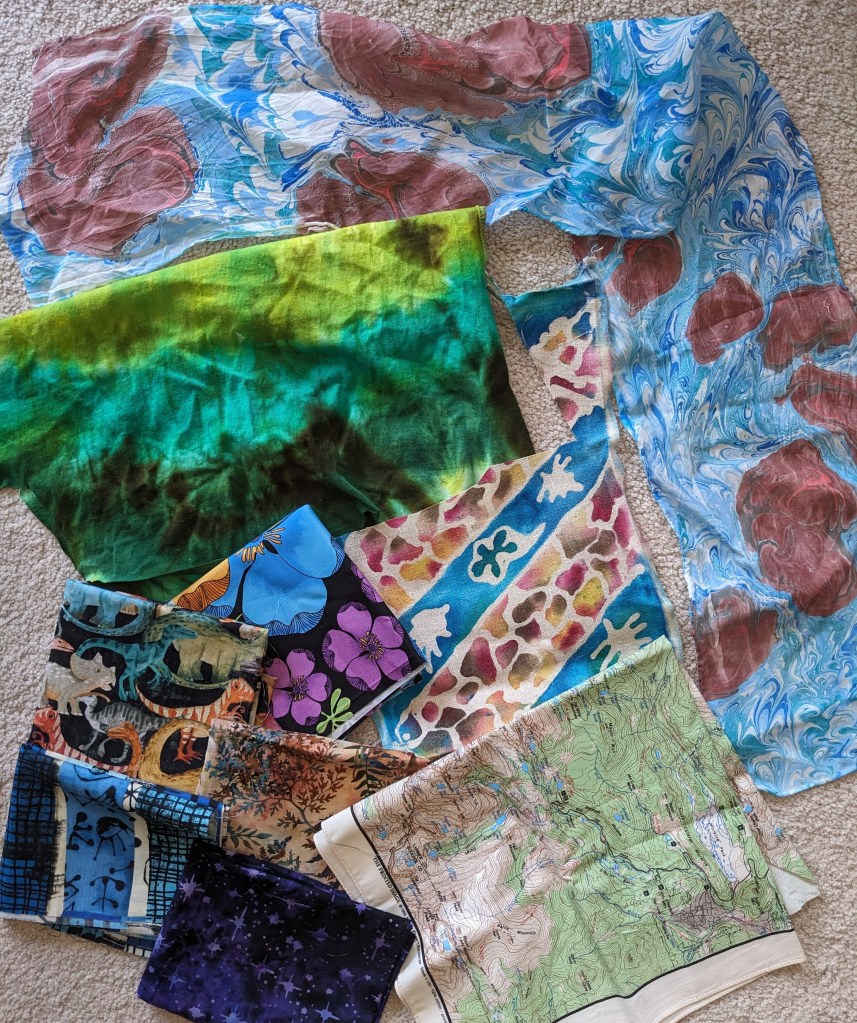
Finished river rocks marbling on the top and right, sleeve of the tie dyed shirt on the left, batik inspired by the Grand Ditch in the middle, fabric from Grand Lake on the bottom left, and the RMNP map bandana on the bottom right.
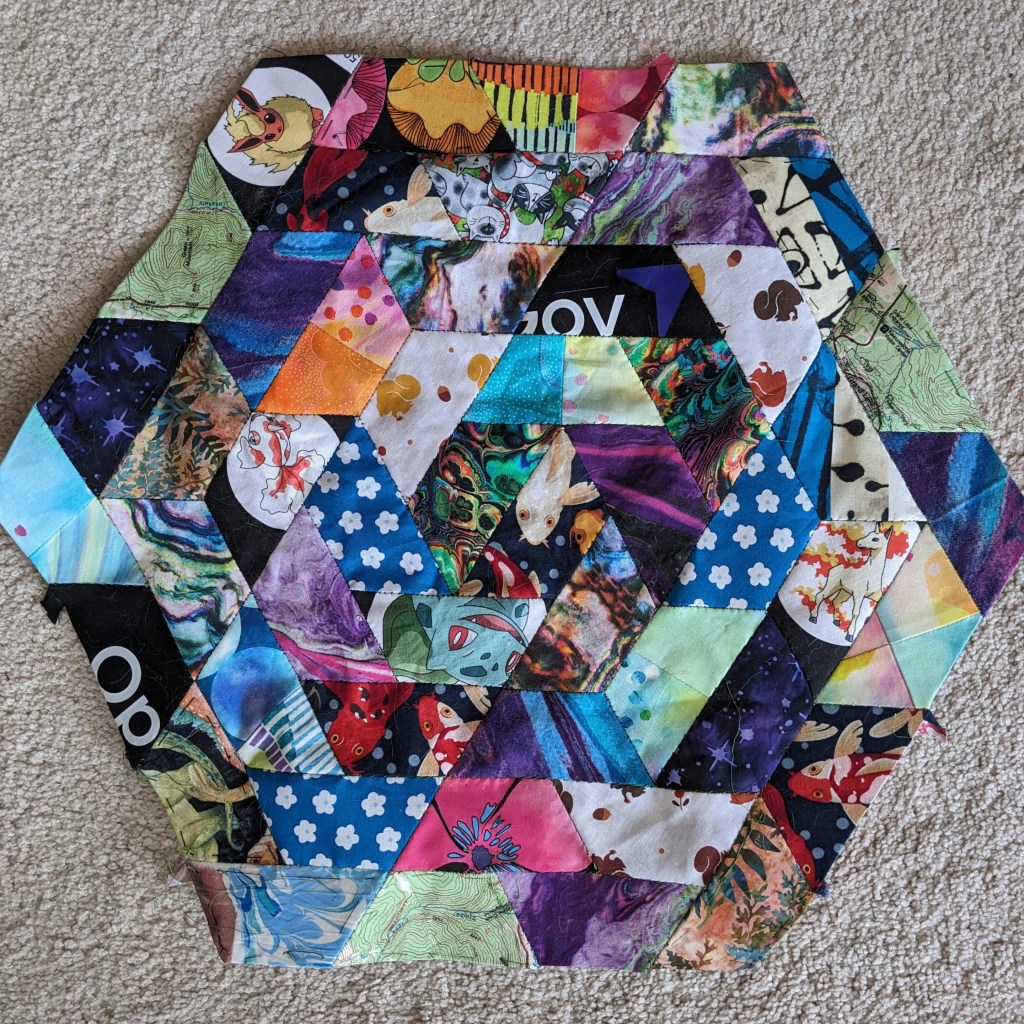
And I added my new fabric into my current project, an English Paper Piecing quilt of trapezoids for my bathroom 🙂 which now, of course, vaguely smells like campfire, but that’ll fade.
This is the painting I went to do, and I hiked a new trail to do it! Adding the color to the sketch from the left took 40 minutes 🙂 And a few people stopped to comment and talk to me, which I usually appreciate as long as they are respectful and treat me like a person instead of content.
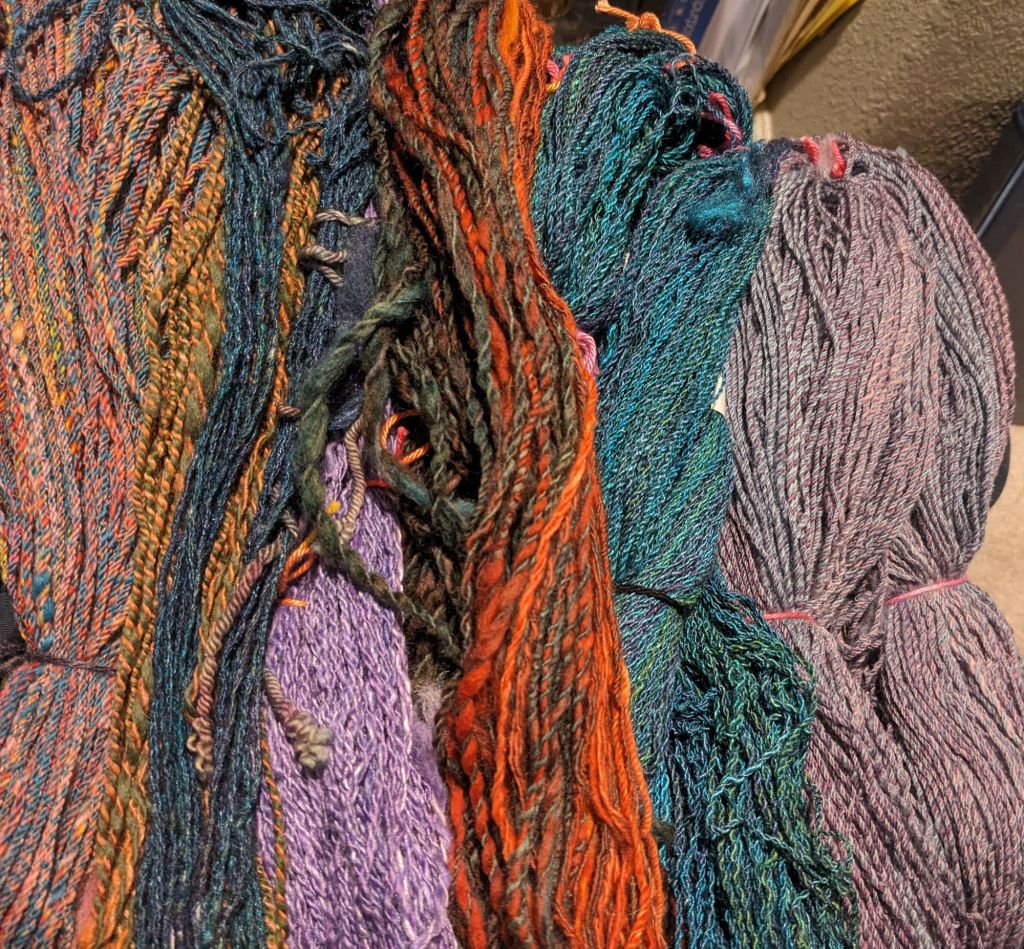
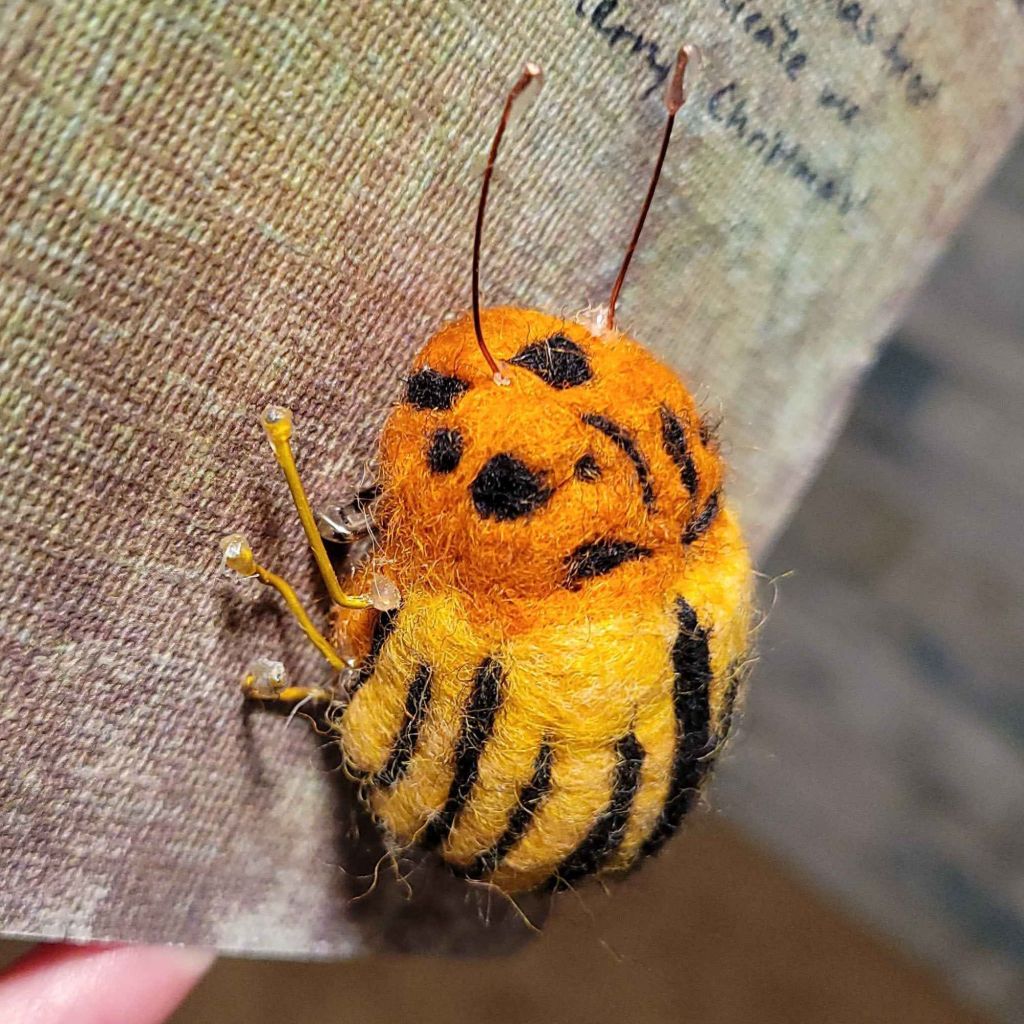
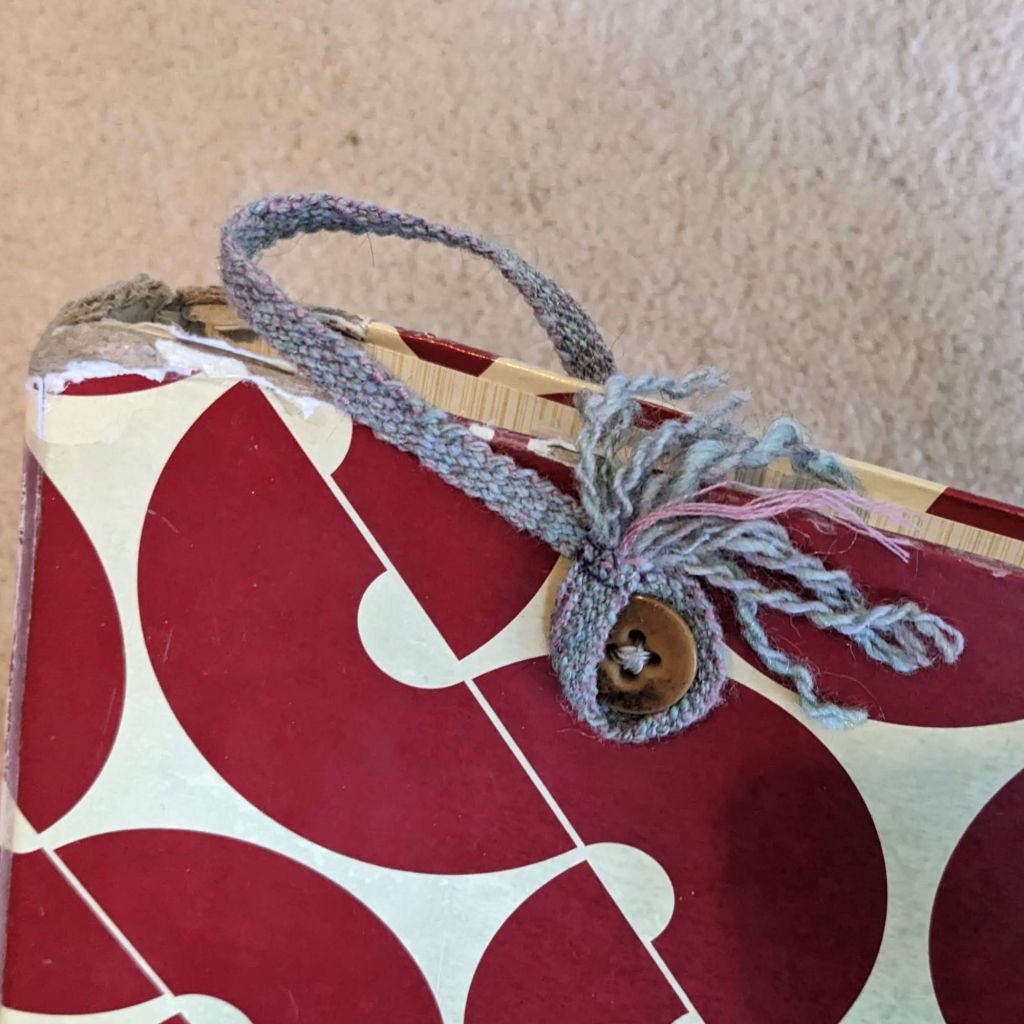
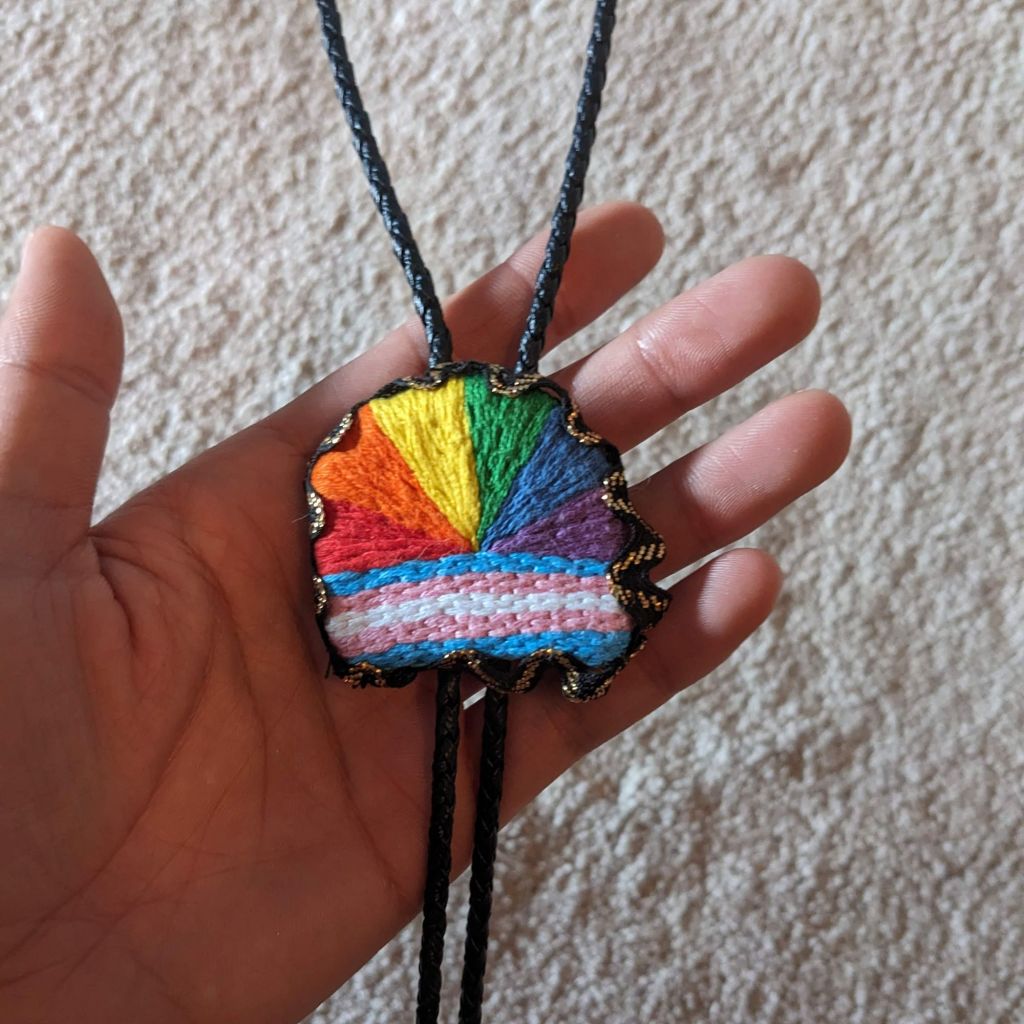
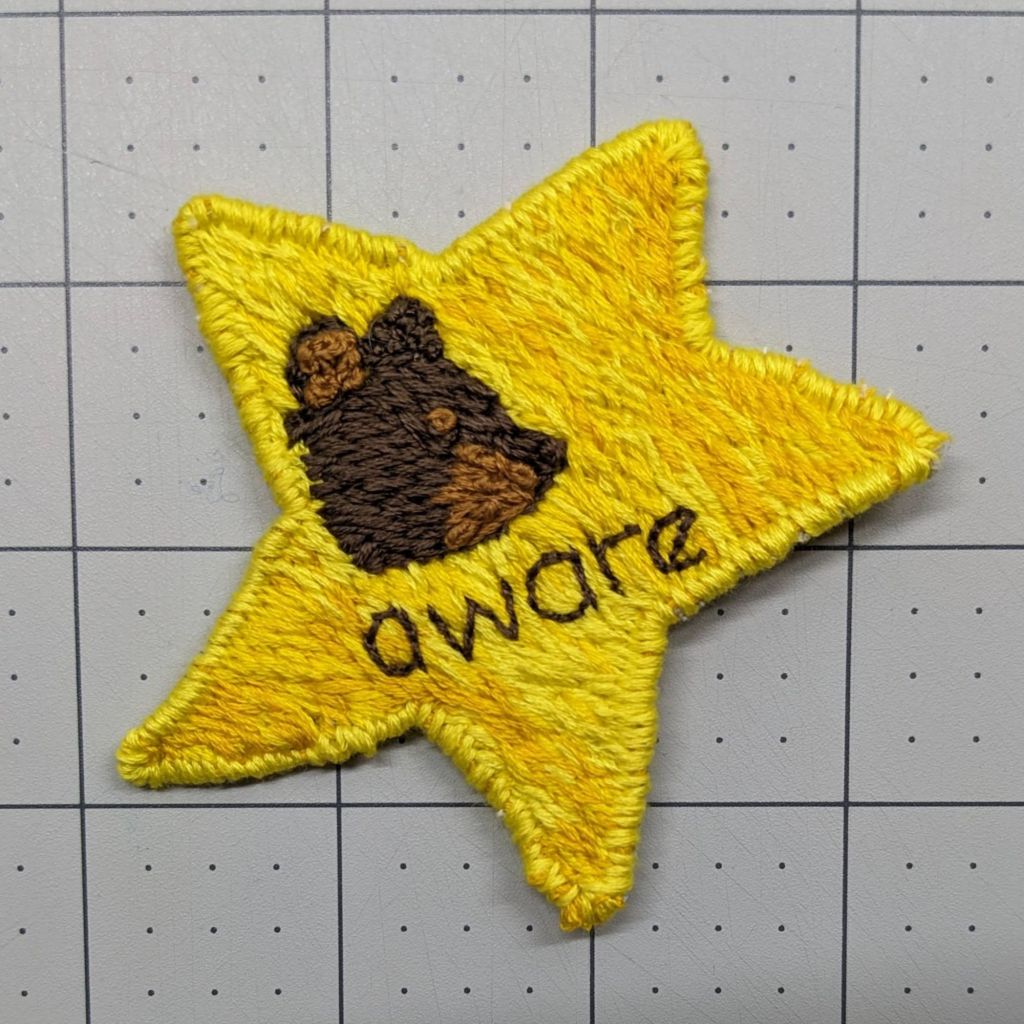
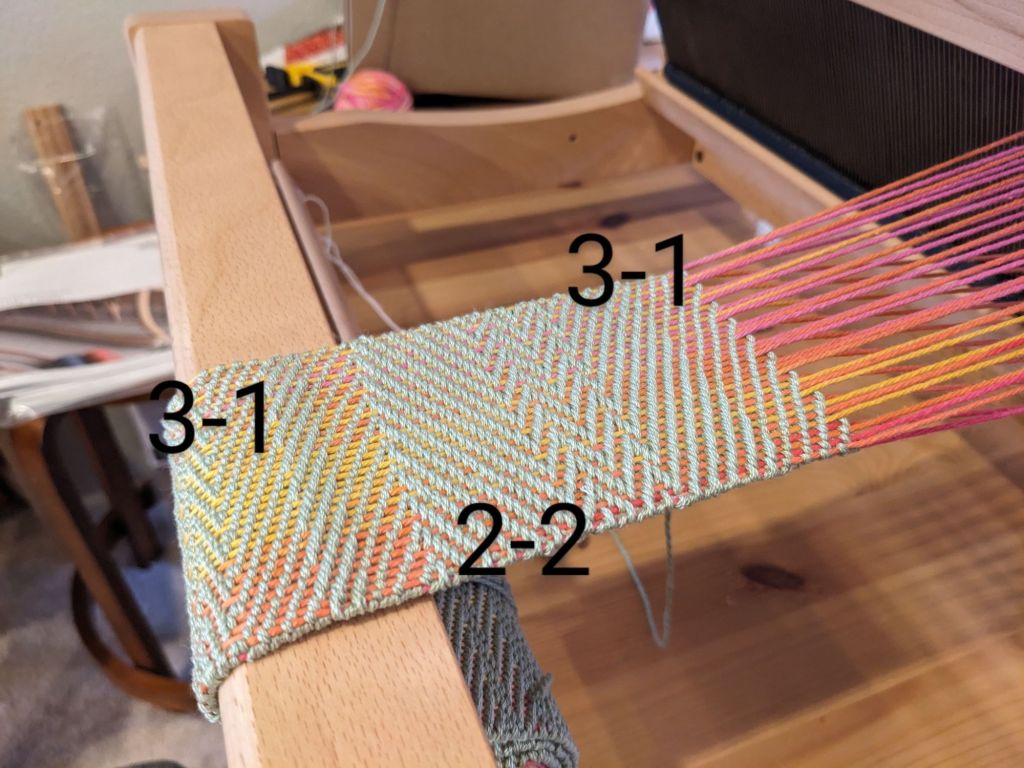
Handspun 🙂 mostly wool, with the occasional silk/wool blend. I find handspinning, whether at the wheel or on the spindle, very meditative and calming. There’s a rhythm, and a sense of creation and accomplishment. It is a wonderful thing to keep my restless hands busy with. Frosting decorations on cookies! Having a single line of design and multiple repeats was EXACTLY THE SAME as quilting 🙂 Needle felted bat pinNeedle felted beetle pinStrap for my choir binder so my hand doesn’t have to do so much work to hold it open. Backstrap loom, handspun wool blendI put together an embroidery kit for a friend, it was so fun to plan an entire project and *not* have to do it 🙂Embroidered gay and trans pride bolo tie pendant 🙂 I made this for an event at the CapitolI do visible mending on my clothes, so I decided to do an embroidered/woven patch inspired by my work in twill 🙂Embroidered bear aware patchMy first ever project on my loom was a twill sampler, which is now a bag strapLearning about twill textures: over 3, under 1; under 3, over 1; over 2, under 2
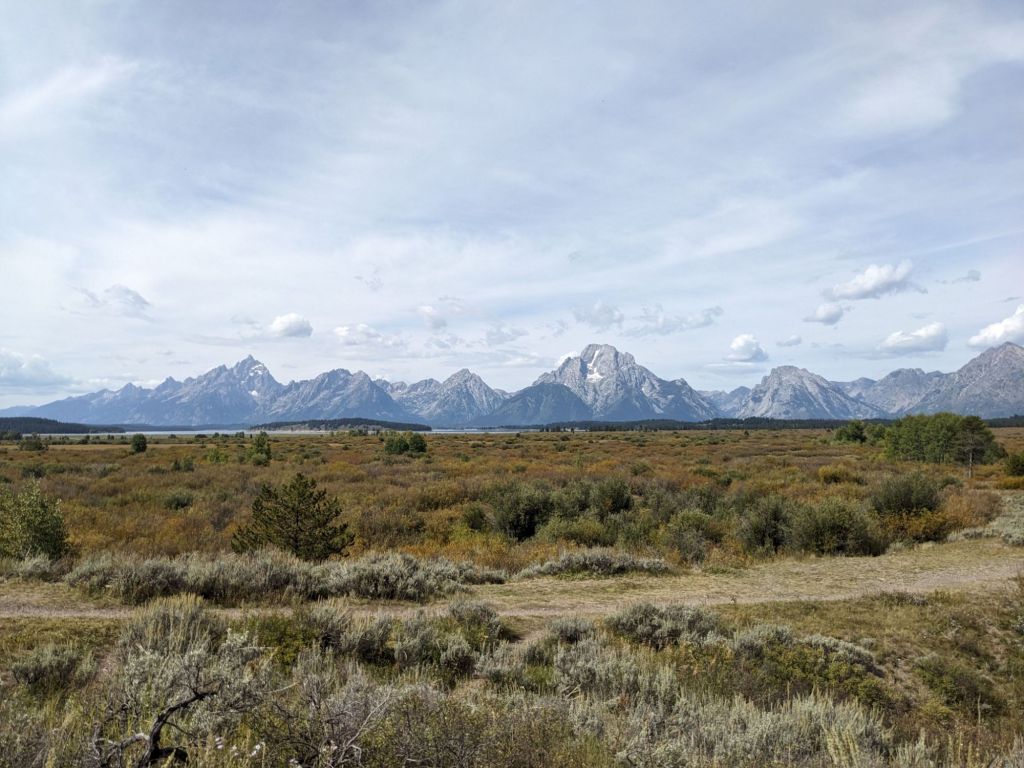
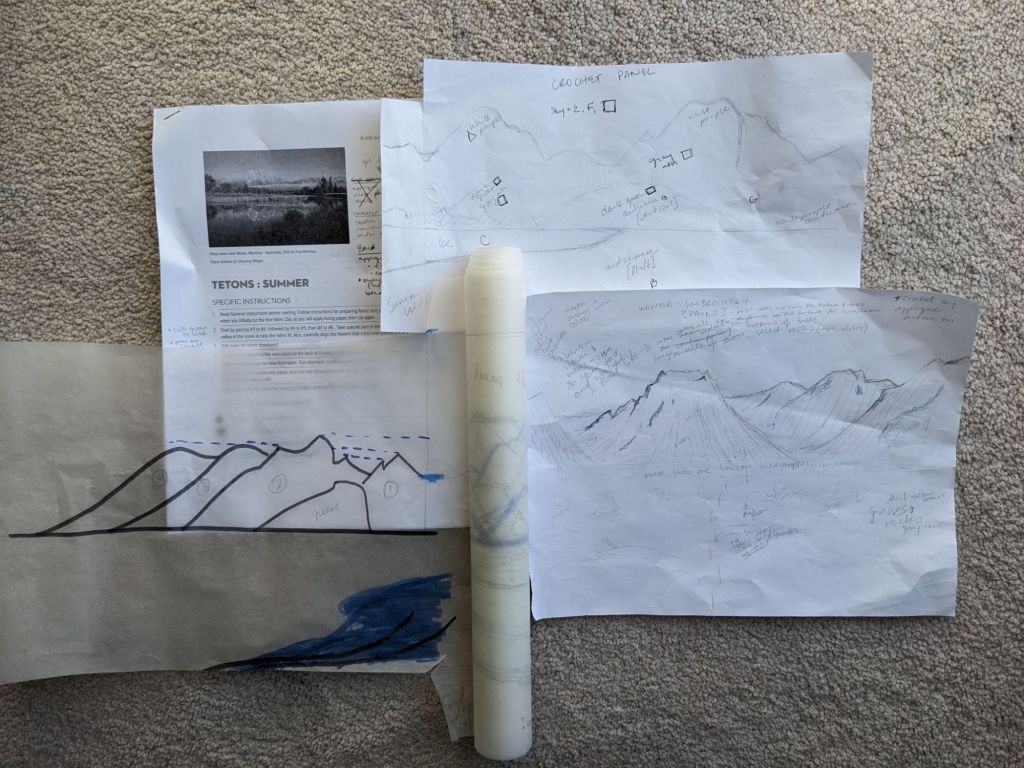
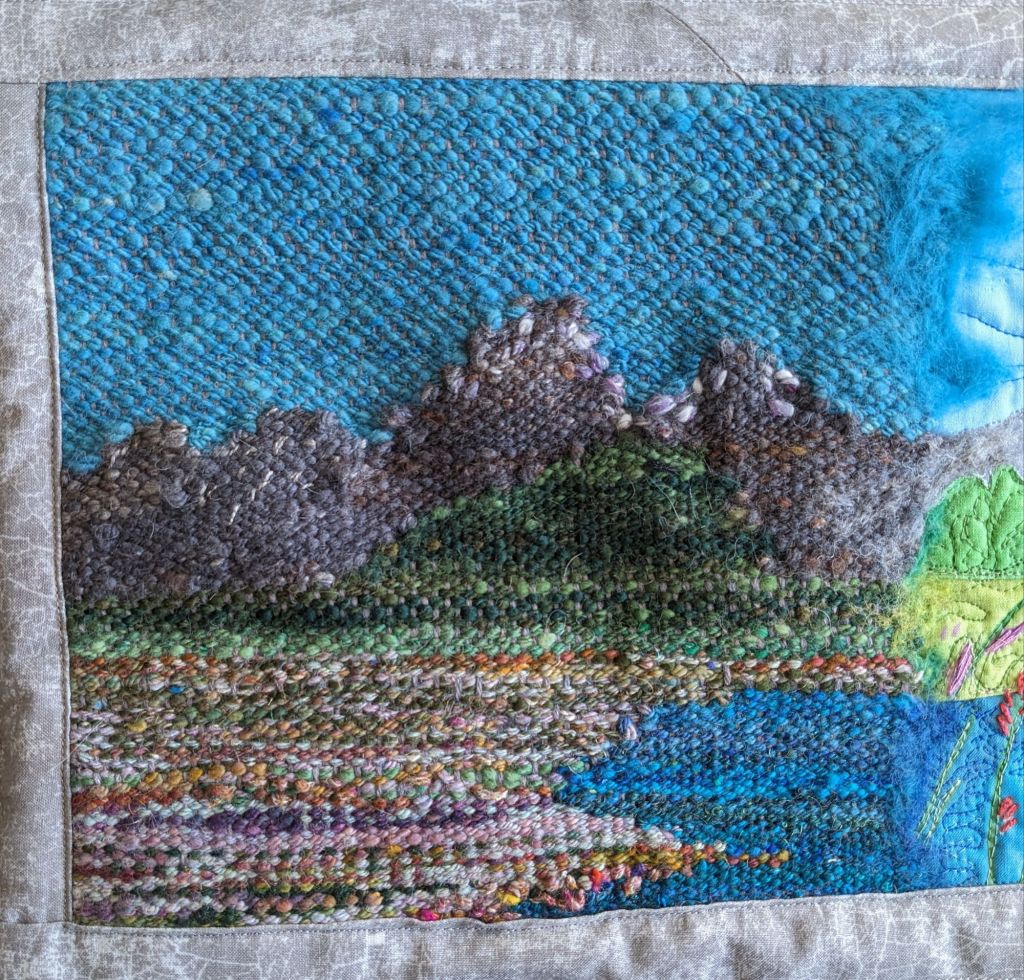
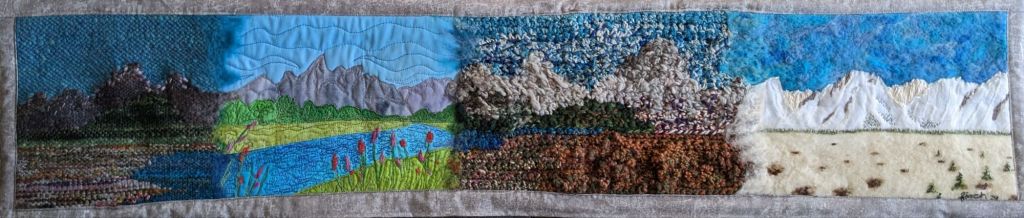
So I’ve collected a lot of skills 🙂 and after picking up a “summer” quilting kit from the Grand Tetons last year, I wanted to expand that project into a Whole Big Thing. The kit references the possibility of doing the same scene but with different fabrics for different seasons, but I wanted to do a full panorama with different peaks, depicting as much as I could of the Teton Range. I used some tracing paper to plan out panels for each of the four seasons, scaled so they’d match up with the quilted panel. My main reference photo is from Willow Flats Overlook when I visited in 2023. The perspective of the quilt is a bit different, but I kind of… made it work.
Main reference photo from Willow Flats OverlookPlans! The tracing paper rolls out into the whole panorama but having individual pieces was better while I worked.
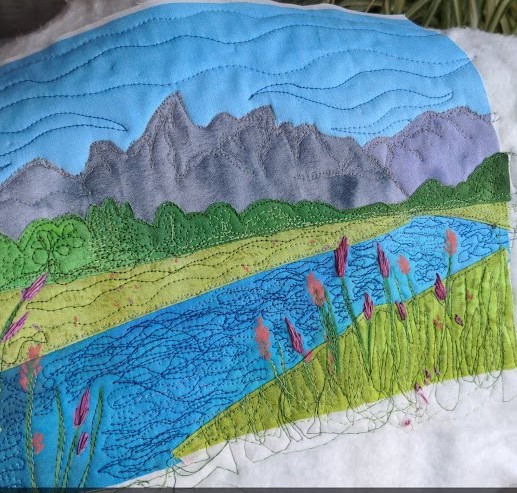
I started off with the applique quilting kit and added some free motion quilting for details. It was really fun to work on things on a smaller canvas and be able to do details without getting overwhelmed. I also added some hand embroidery for the flowers because I wanted them to pop out 🙂
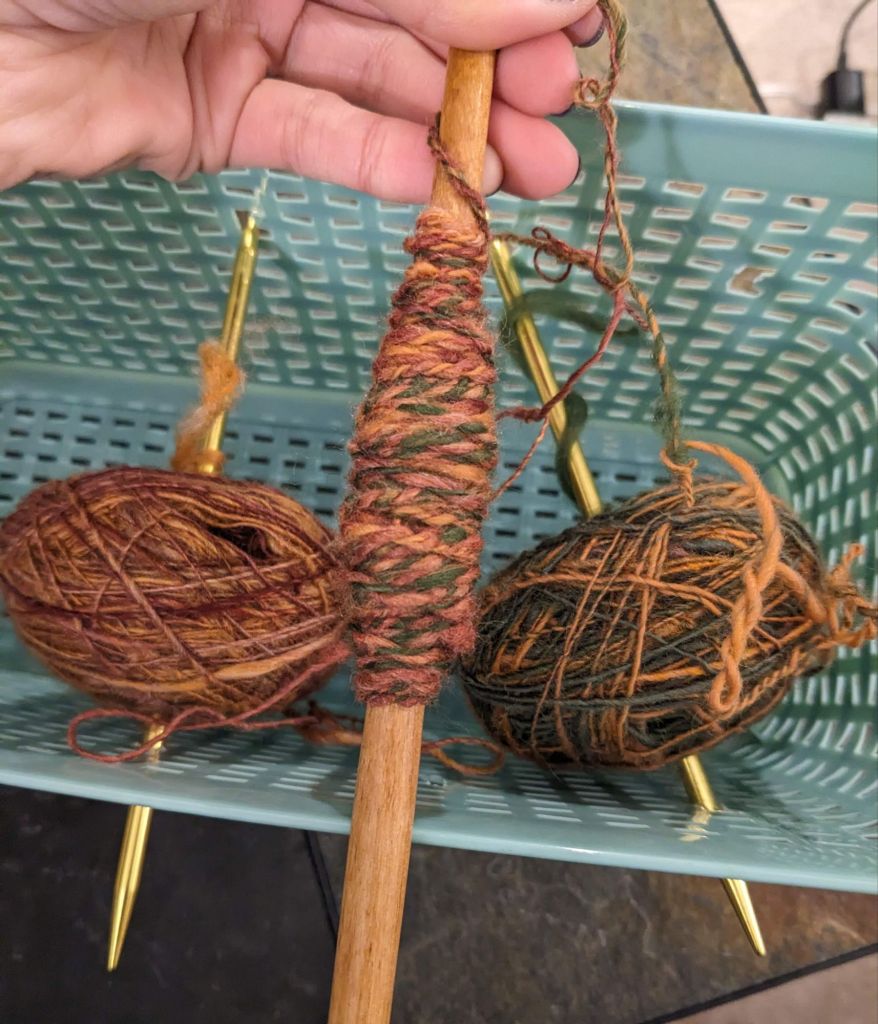
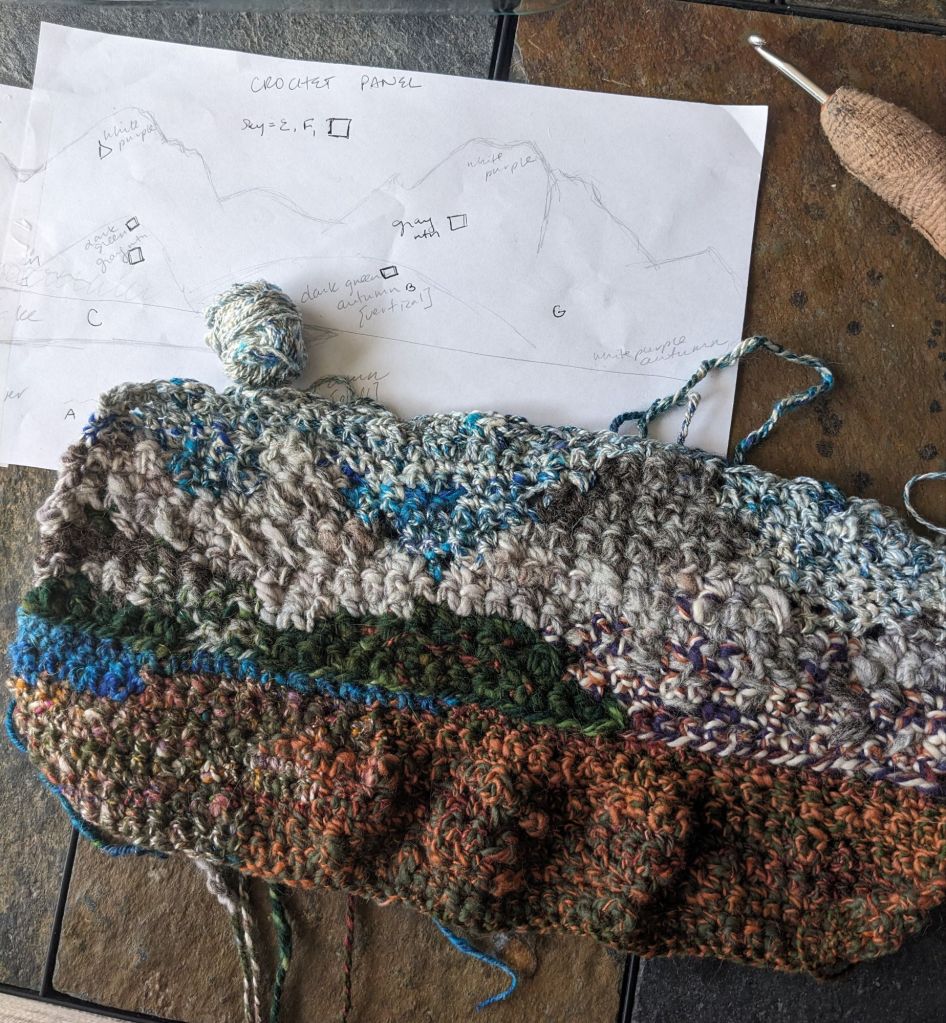
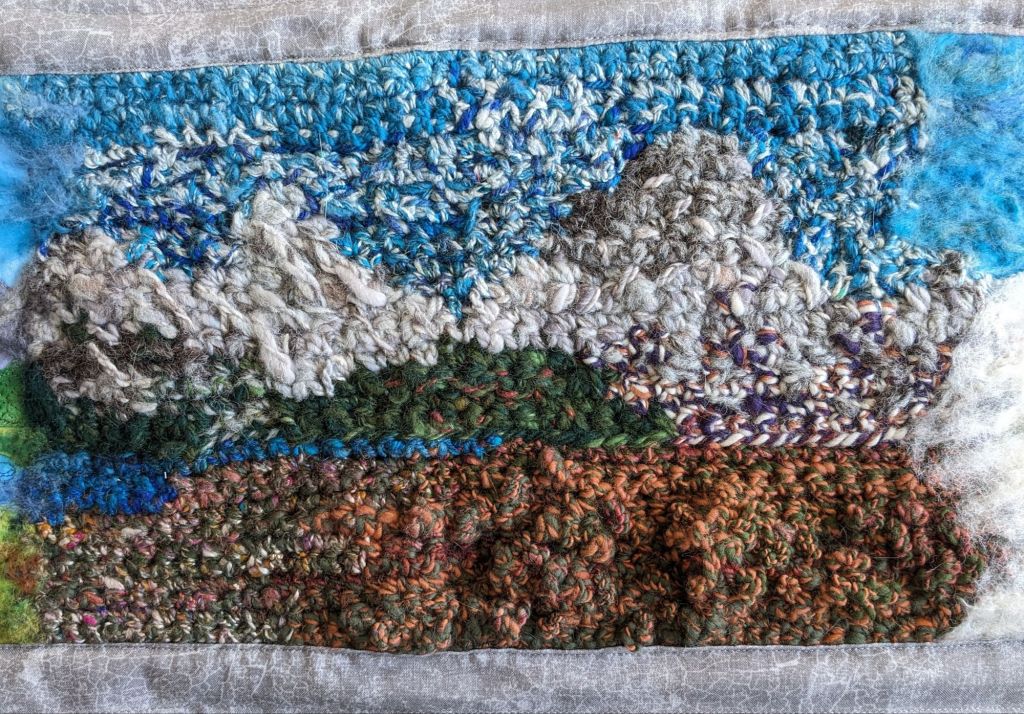
My first instinct for the next panel was to use crochet, using some funky colorwork and textured stitches. I spun up yarn for each of the different sections: sky, lake, mountains of various white and gray mixes, and autumn-y colors for the sagebrush.
a yarn I called “Autumn” 🙂
fiber blends I made at a workshop
I added some weird bumpy parts and extra stitches in the foreground to mimic the fluffy sagebrush 🙂
I struggled with getting enough contrast between the gray of the mountains and the blue of the sky, so I took a black and white picture and spun up some darker blue that I could blend into the existing sky.
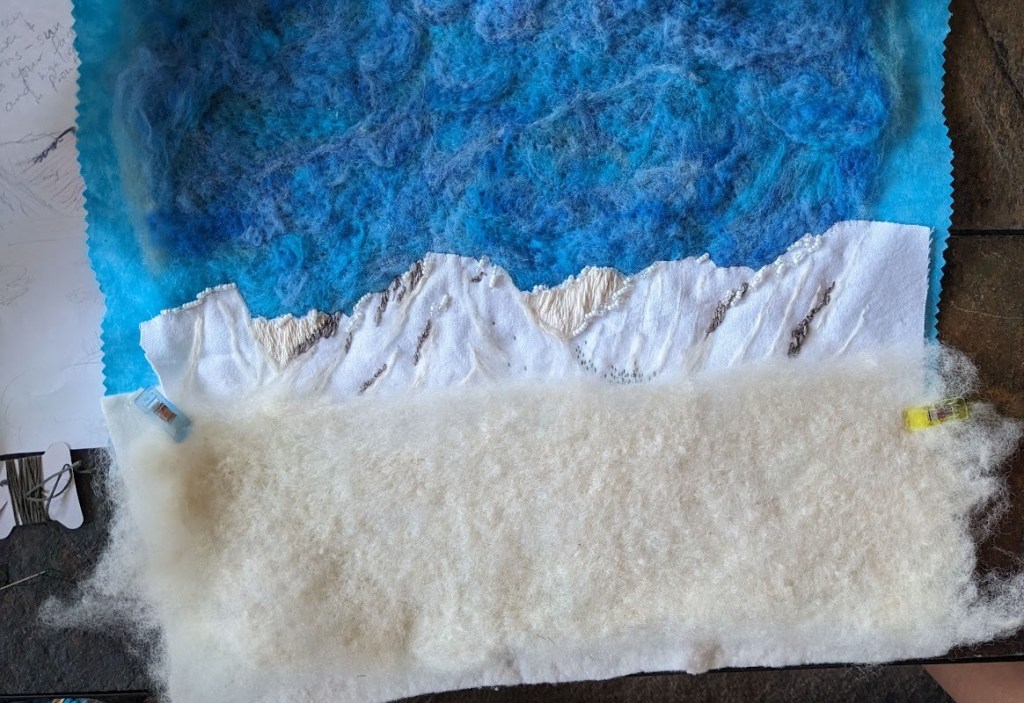
After I had summer and autumn, I struggled with what to do next. I knew I wanted an embroidery panel and a woven panel, but I wasn’t sure which should be spring and which should be winter. I talked it over with a friend and we decided that the crochet shouldn’t be next to the weaving, since they have similar textures and detail resolution. So winter was embroidery! I started by needle felting the background sky and foreground, to automatically add texture that I didn’t need to stitch. I spun some thin yarns of cream/white and rock gray, which was a fun challenge to spin thin enough and consistently enough that I could use it with a normal sized needle. I also thought some beads would be fun for the shininess of the snow 🙂
Winter embroidery in progress
I was planning to do the winter foreground details with embroidery, but I realized I wanted to incorporate paint into this project, so I used acrylic paint to add trees, bushes, and rocks. It was difficult to paint onto the felted surface because the brush strokes pick up fibers from the felt, but it was doable.
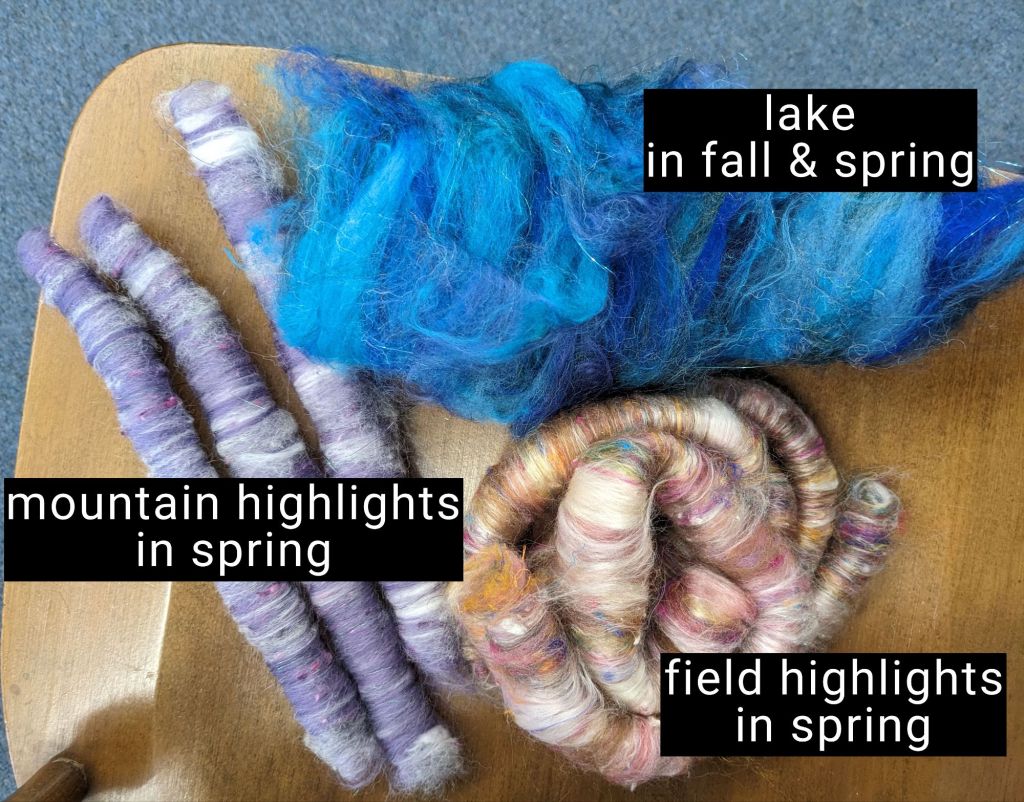
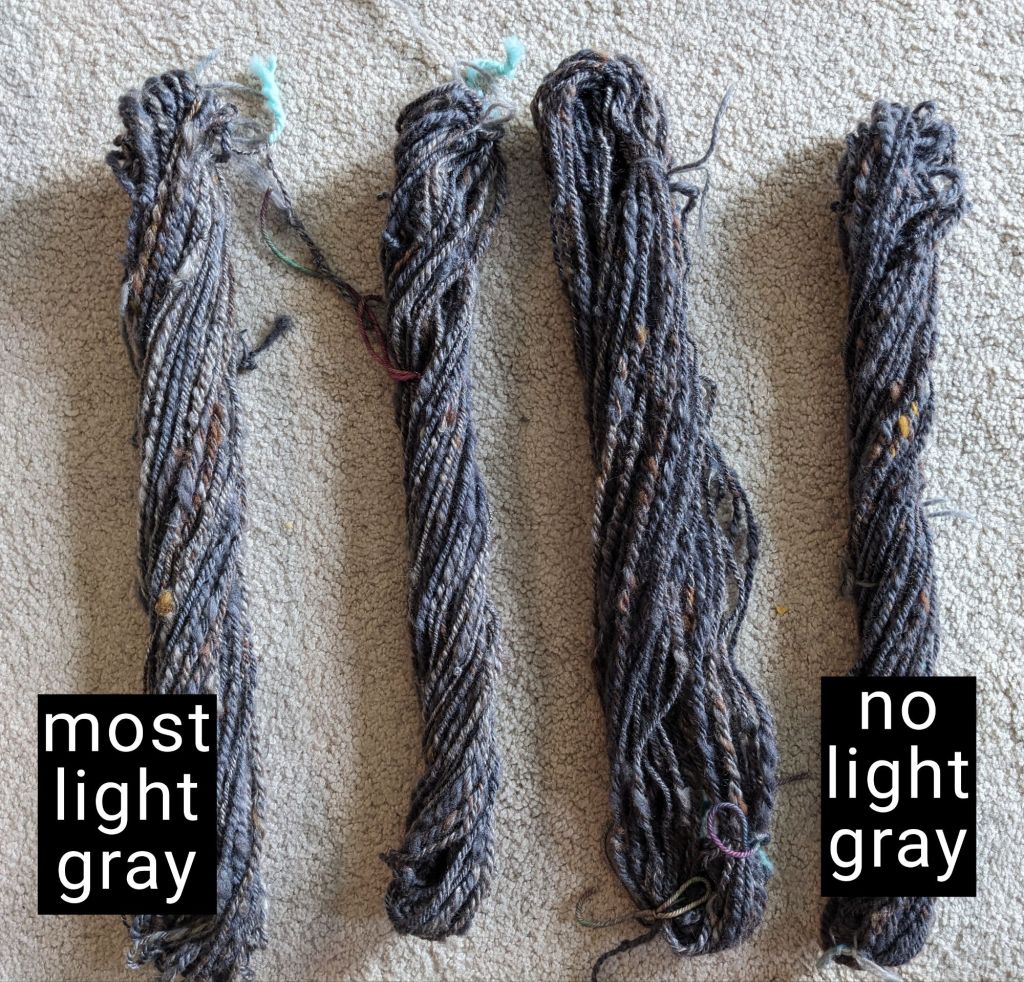
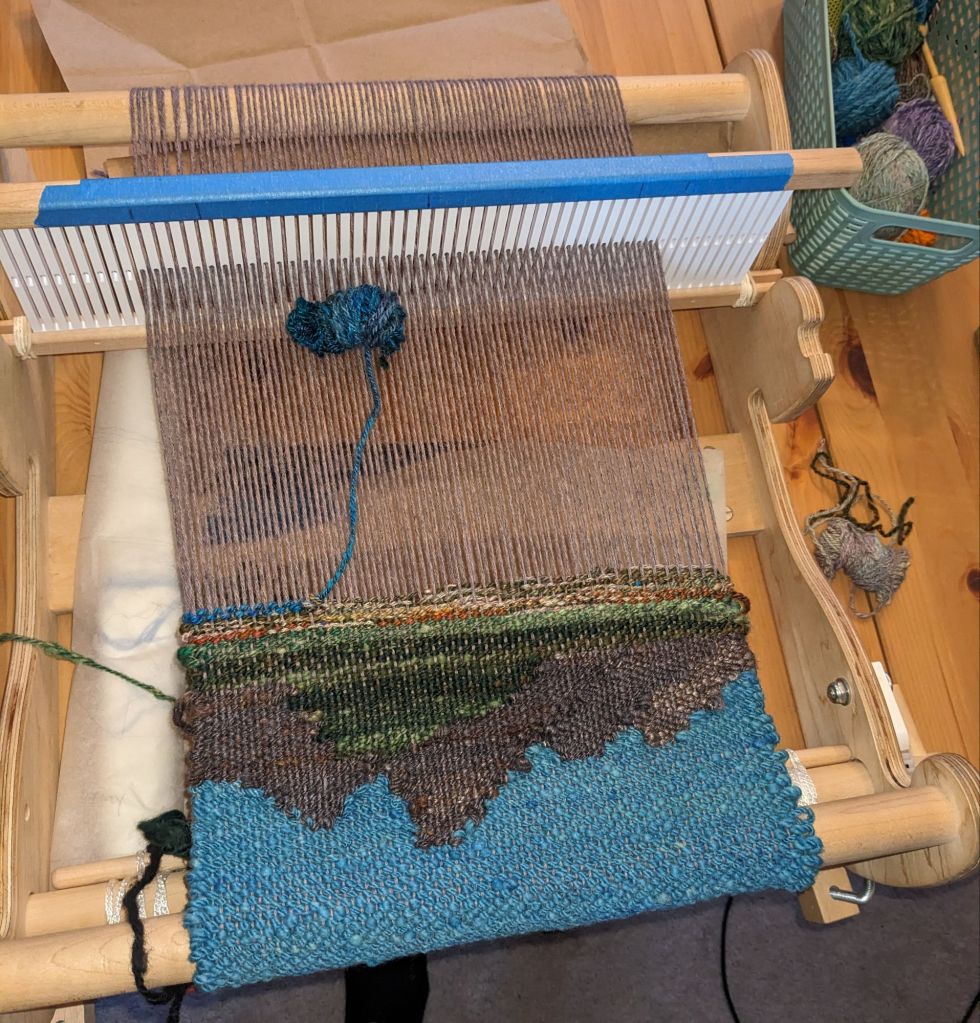
Then I needed a tapestry weaving for spring. Just like with the crochet, I only used yarns I’ve spun, and spun up a few more just for this. I had four different mountain-y layers that I wanted to represent, so I spun four different grays with graduated levels of light gray. In hindsight, I made WAY TOO MUCH, but it was fun. And now I have more mountain gray for later.
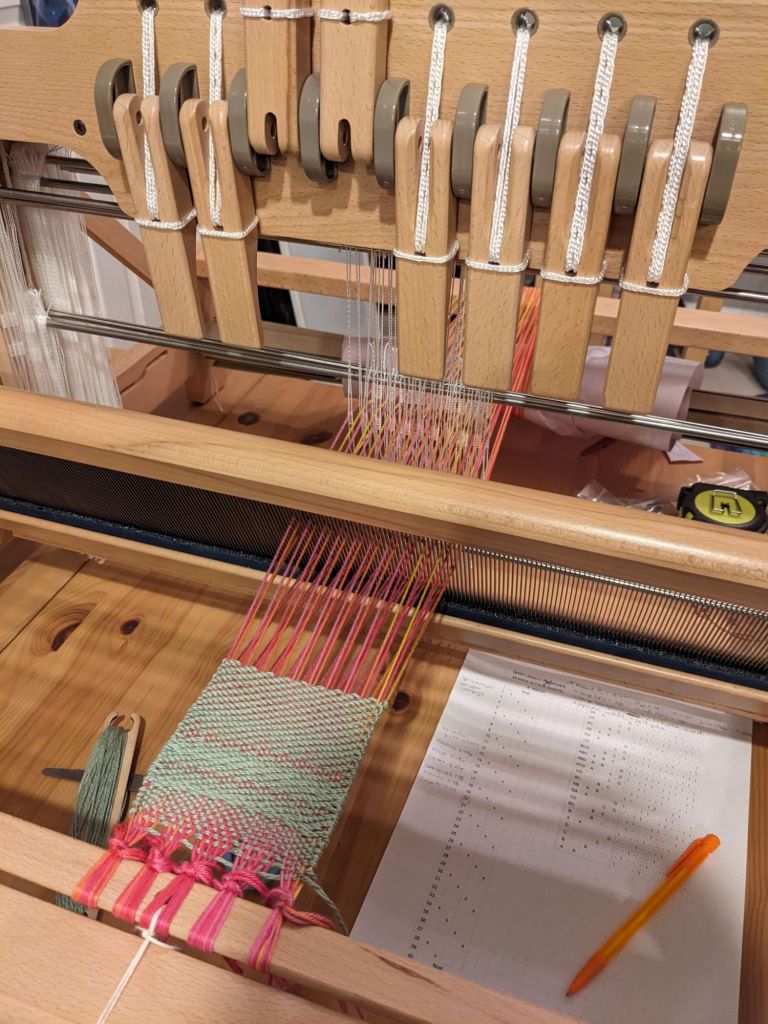
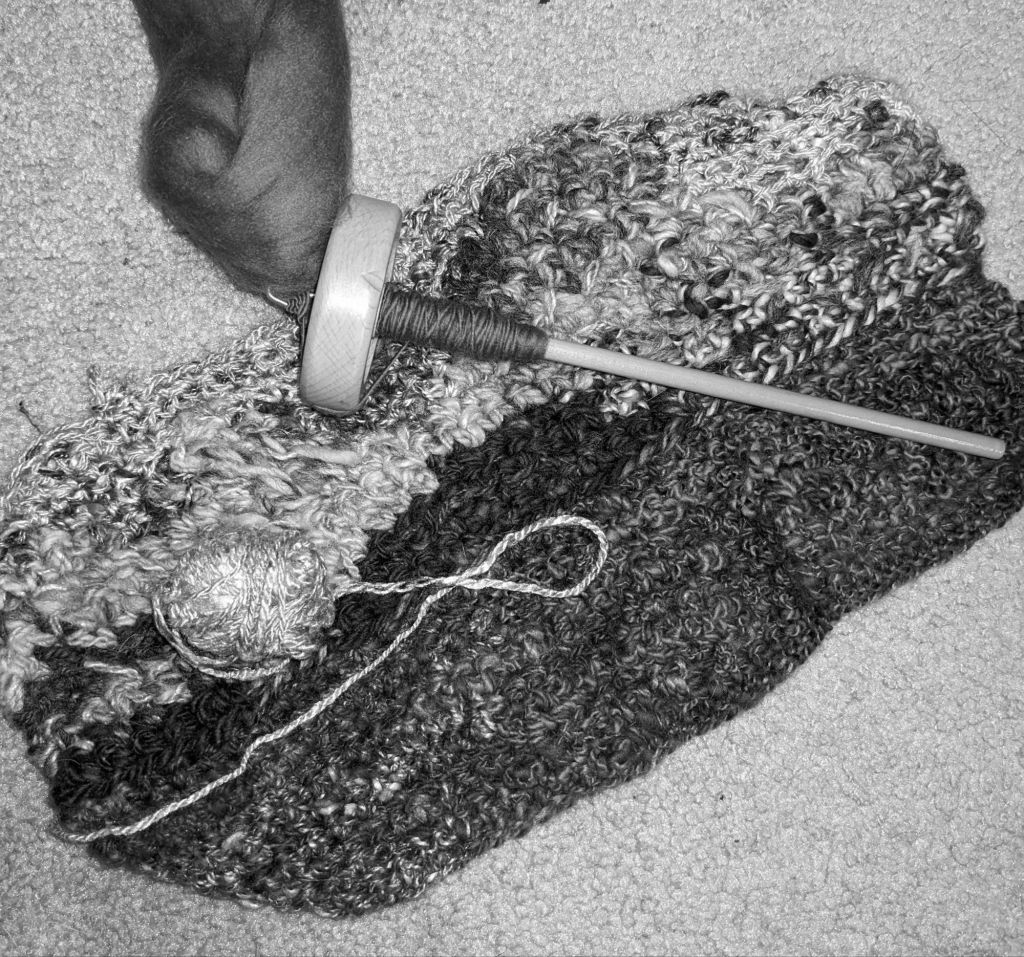
I took a weaving class where we were able to take the loom home for a week, and capitalized on this moment to (a) finish this project, and (b) see if this type of loom is useful for tapestry weaving (that’s not its primary use). It was a successful proof of concept for using this type of loom for tapestry, but I think I’m going to pursue purchasing a different kind of loom for some more flexibility and growth potential.
upside down on the loom! I wove the sky first because I knew it would be a solid weaving instead of doing a bunch of color changes… and weaving upside down made me less stressed about getting it perfect
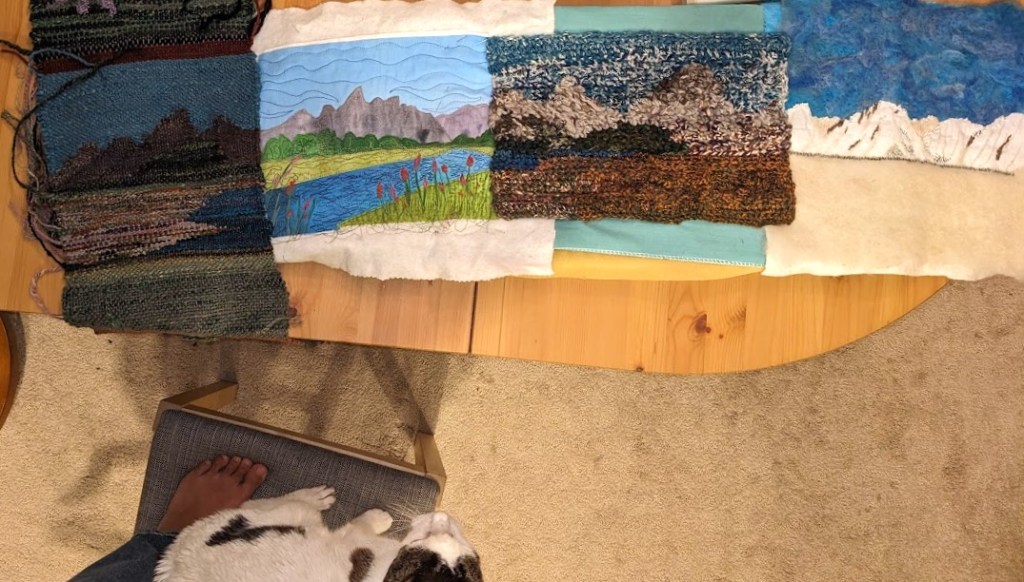
this is the first time I saw all four panels together, they’re pinned to a mini ironing board 🙂
I used some extra fiber to needle felt over the seams between the panels, and then did a border to secure everything together.
My main challenge in finishing this up was getting the crochet to sit the way I wanted it to. I ended up gluing it to some stiff scrap fabric to stabilize it, which went well…. Until I started sewing the fabric frame on. Hot glue and sewing machine needle is not a good pair. 🙂 But I took my time, learned my lesson, and got it done.
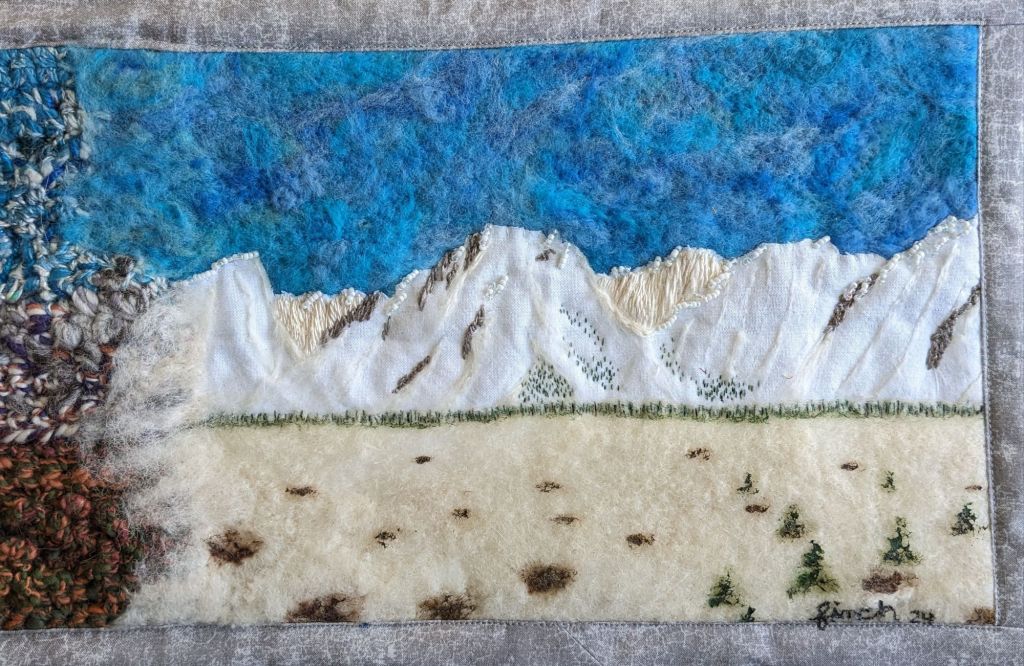
Spring! My favorite part to make was the field in the foreground, I improvised all of the color changes and just had a good timeSummer 🙂 so glad I bought this and kicked off this project. I really like the wavy lake quilting with variegated threadAutumn! I really enjoyed spinning all this yarn, and I have a lot left over for future projects. I’m pretty happy with the shading on Mt. Moran (on the right) and the weird bumpy texture of the sagebrush in the foreground Winter! I really like the contrast between the line-y-ness of the embroidery and the fuzzy needle felting, and I proved to myself that I can spin yarn to embroider with🙂 finished
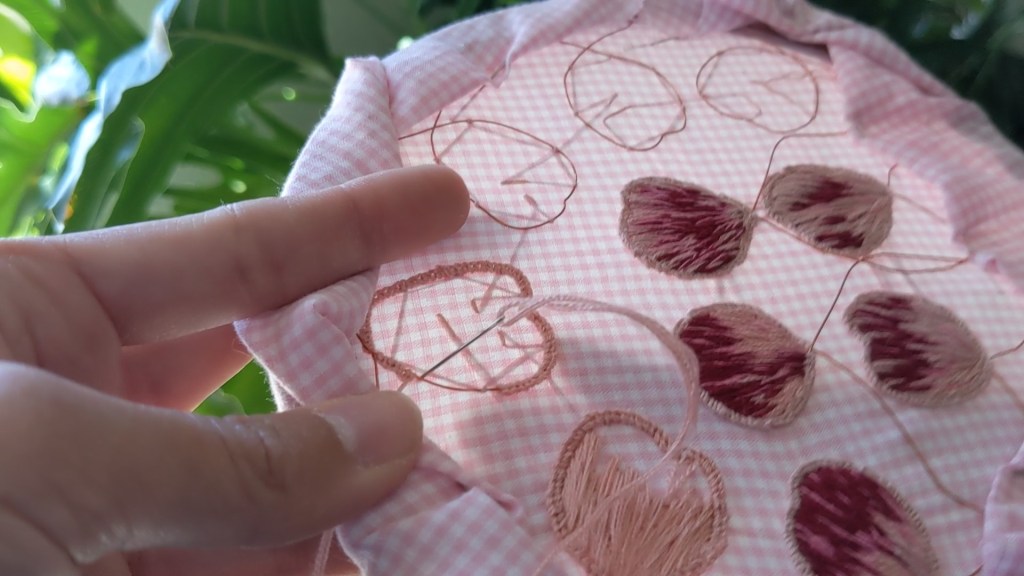
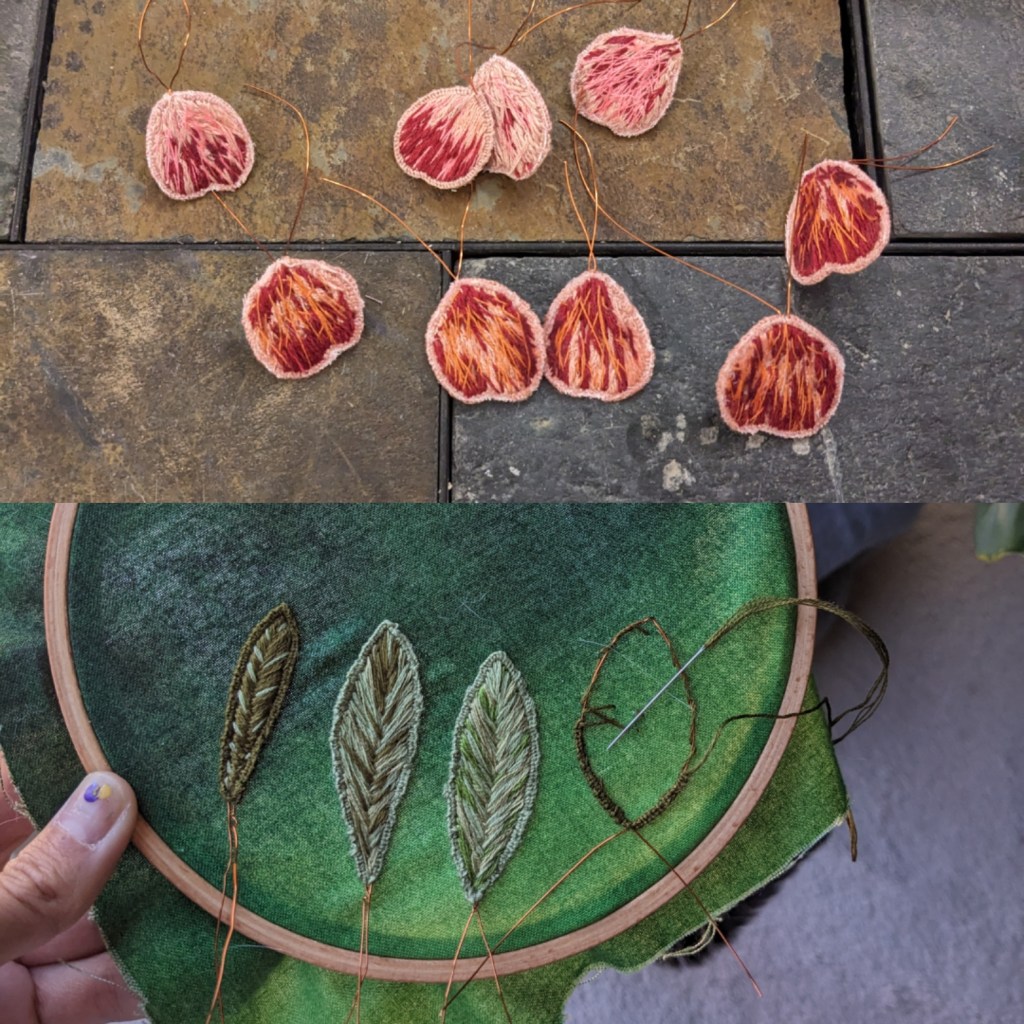
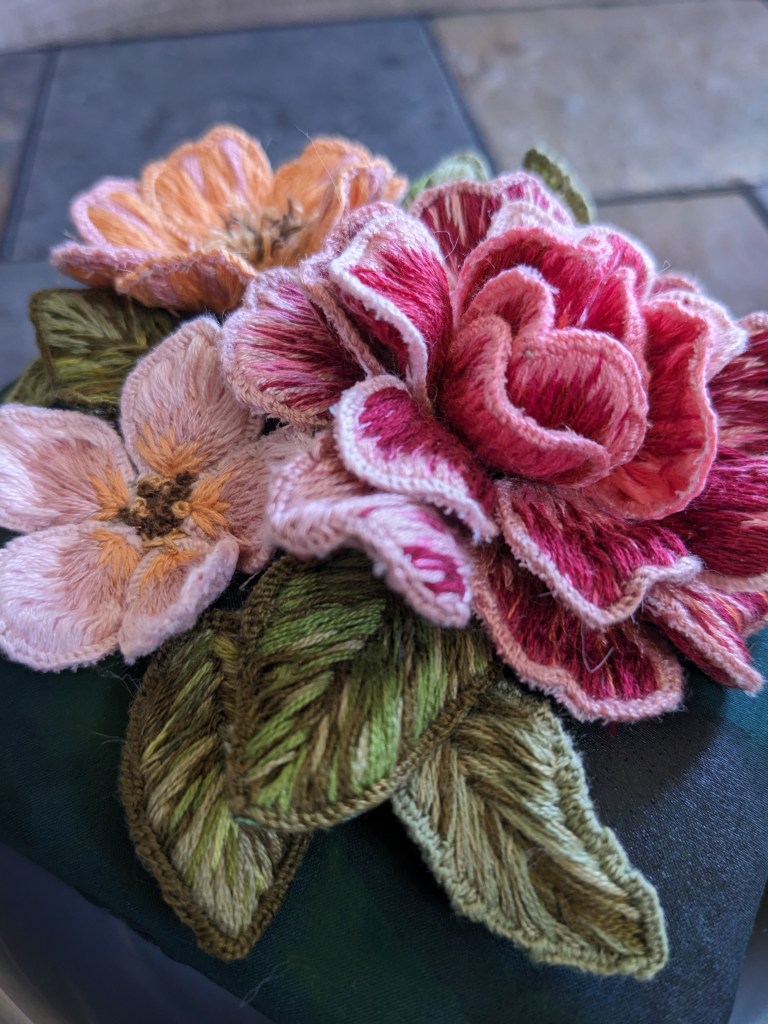
I made these for my friend and her husband, based on their “Save the Date” stationery 🙂 it was super fun to revisit the wired slips technique and bring these flowers to the third dimension.
My reference! I was originally planning to do all the flowers here, plus one from the front of the invitation, but I decided to invest my time in doing three flowers well and being patient with the color blending.
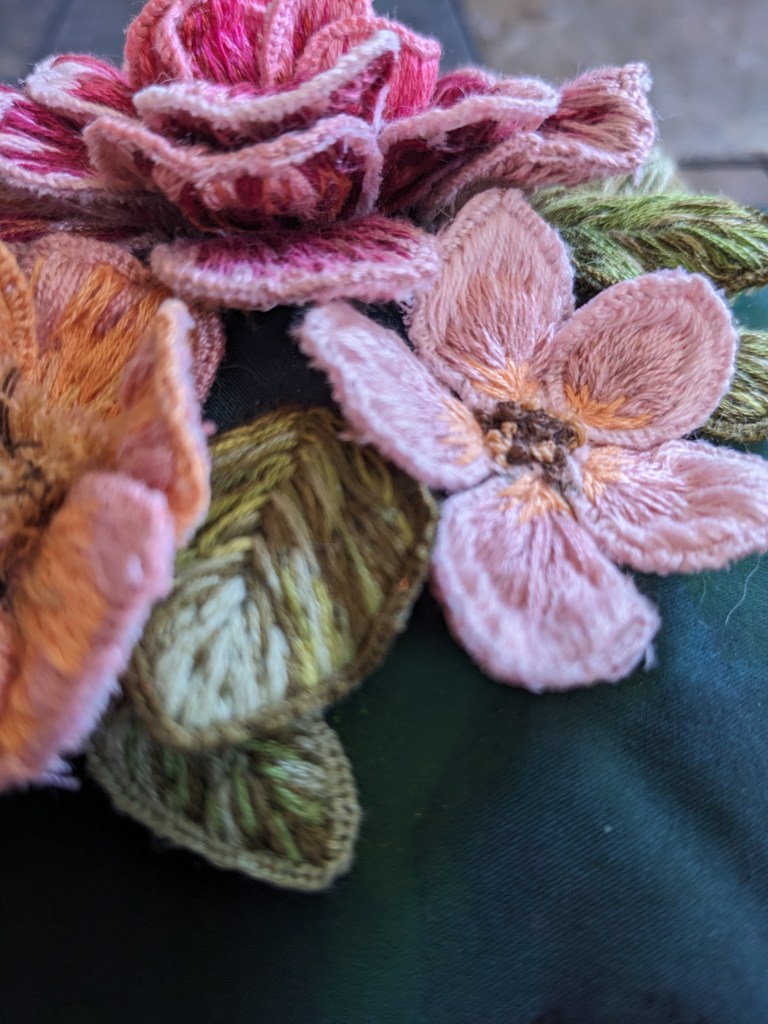
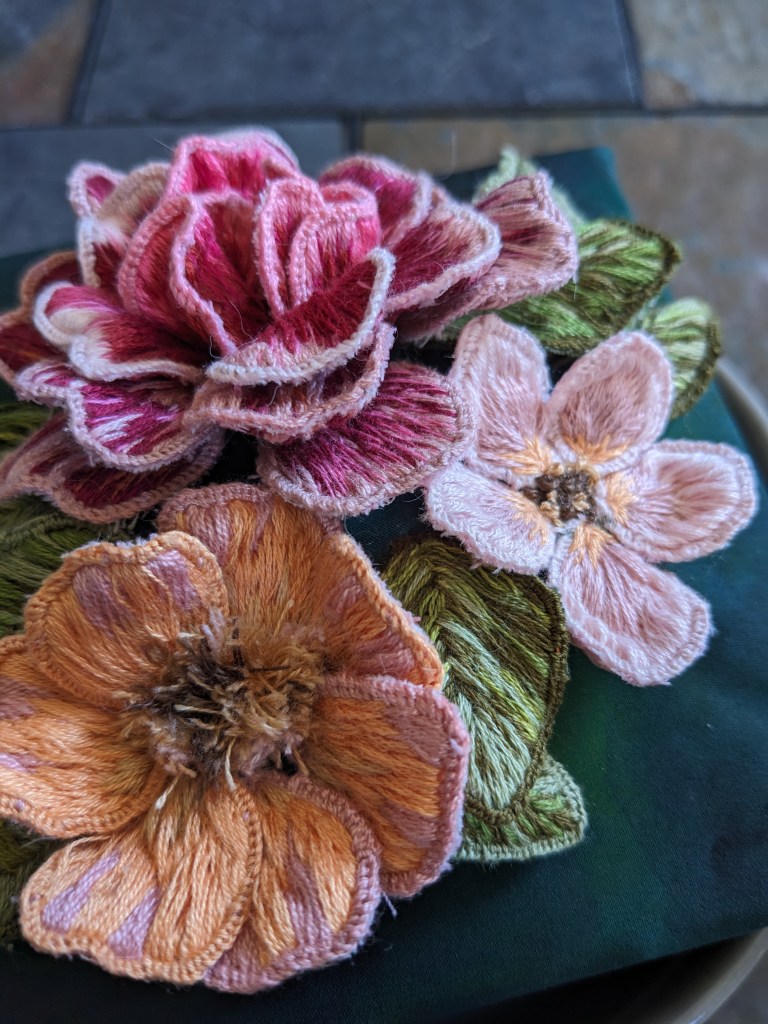
I made three different flowers; one with 5 petals (the one on the right), one with 7 petals (in the middle), and one with 20 petals (bottom left). I wanted to have different colors and textures across the flowers, and different petal shapes. The 5-petal flower has teardrop petals that come to a point, the 7-petal flower has petals with flat tops, and the 20-petal flower has rectangular heart shaped petals.
Working around the border of a petal with buttonhole stitchTop: back of petals that are cut out and ready; Bottom: leaves still on the hoop
I poked the petals into one layer of fabric and folded the ends up, then embroidered the center stamens and pistils onto the fabric and anchored the petals to the fabric. Then I added in the leaves and made tiny stitches between petals and leaves and into the base fabric to secure all the elements together. I added another layer of fabric underneath the base fabric for some structural stability, and glued the entire assembly to a square canvas. The plain background ended up too plain, so I added some watercolor to the background to spruce it up and give it the idea of more leaves in the distance.
IT IS FINISHED!!!!! And oh, I do love it. When I look at it, I’m reminded of the hard work and enjoyment that sewing and quilting have given me, and that I’ve given myself. It reminds me that I enjoy hand sewing and machine sewing for different reasons, and they both have their place in my creative endeavors.
It was a lot of work, but it was spread out. And very worth it. This project brought me back to college when I was only doing hand sewing, since I didn’t own a machine. It was a slow and relaxing project, which was wonderful – I’d work on it whenever I felt like it, whether that was on the train to the city or sitting on the couch with my cat.
gluing fabric to hexagons
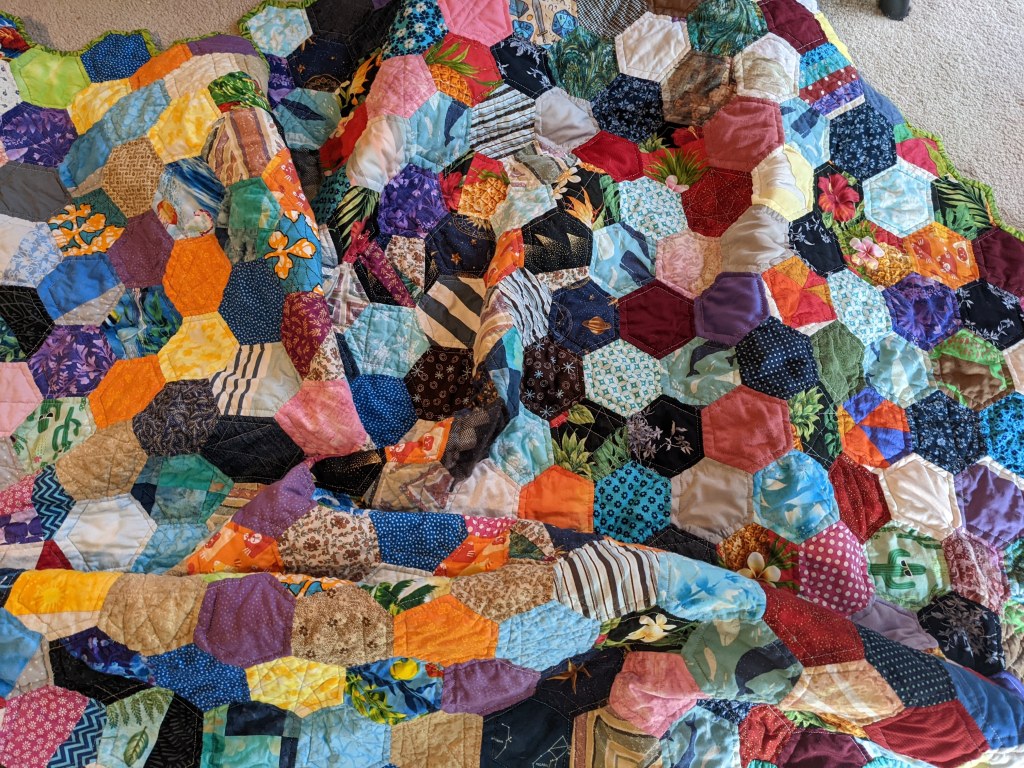
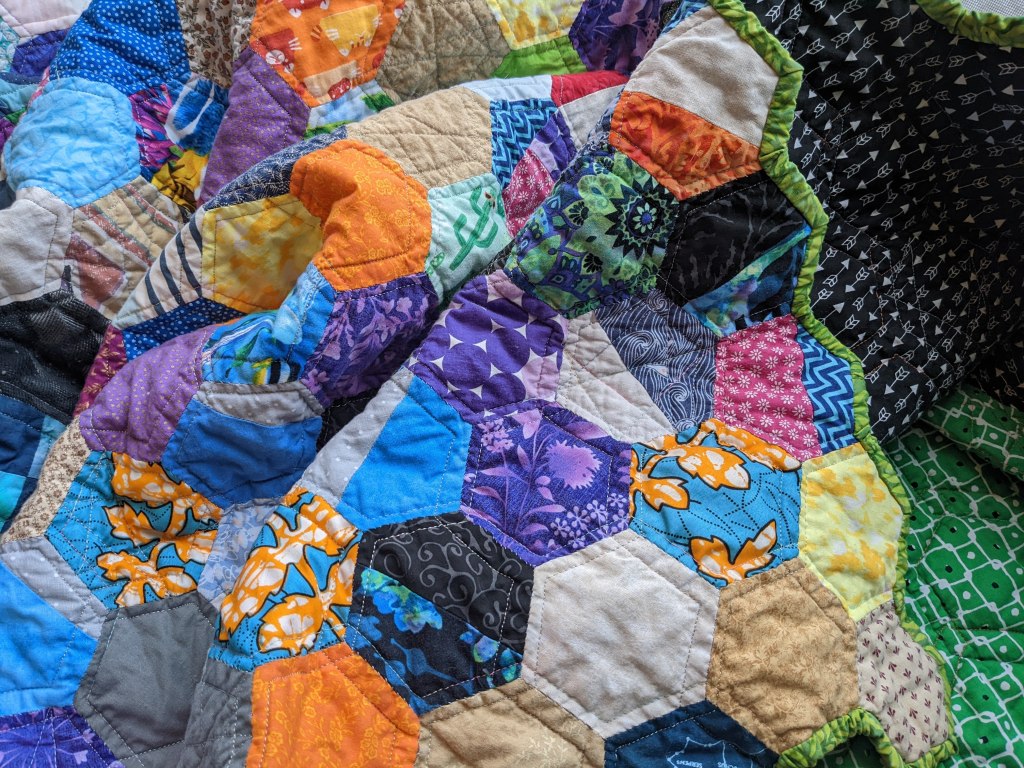
I wanted to keep the quilting really simple and highlight the fabrics themselves, since there are so many fun ones in this quilt! I decided to echo the hexagons, and made three passes across the quilt, echoing two sides at a time (three passes, two sides at a time – all six sides covered!). This allowed me to quilt long, uninterrupted lines, which is most effective. Quilting is pretty AND increases the structural integrity of the entire sandwich, so long lines are preferable to “isolated” designs that require cutting the thread. For a little fun, I added in my “random geometric” design in some hexagons.
Quilting by aligning the ruler against the edge of the hexagon and following it, creating a quarter-inch echo line. You can see here that I’m on my third pass, four of the sides are already echoed and I’m following the last two sides (easiest to see in the light blue heart block or light pink on the left).
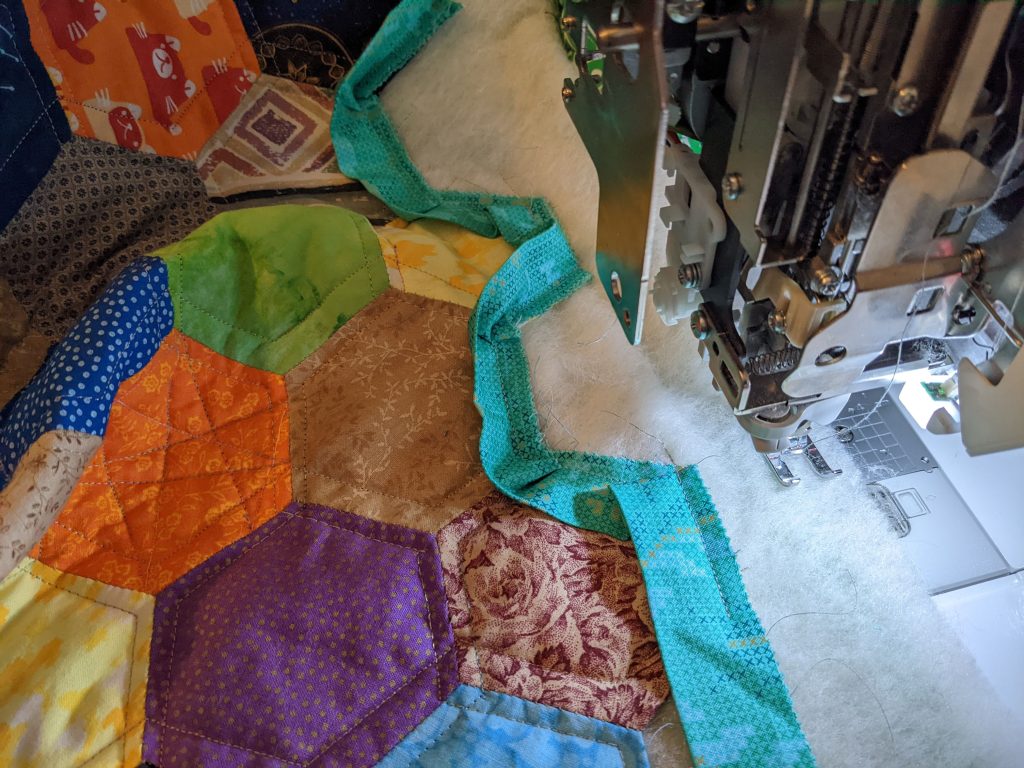
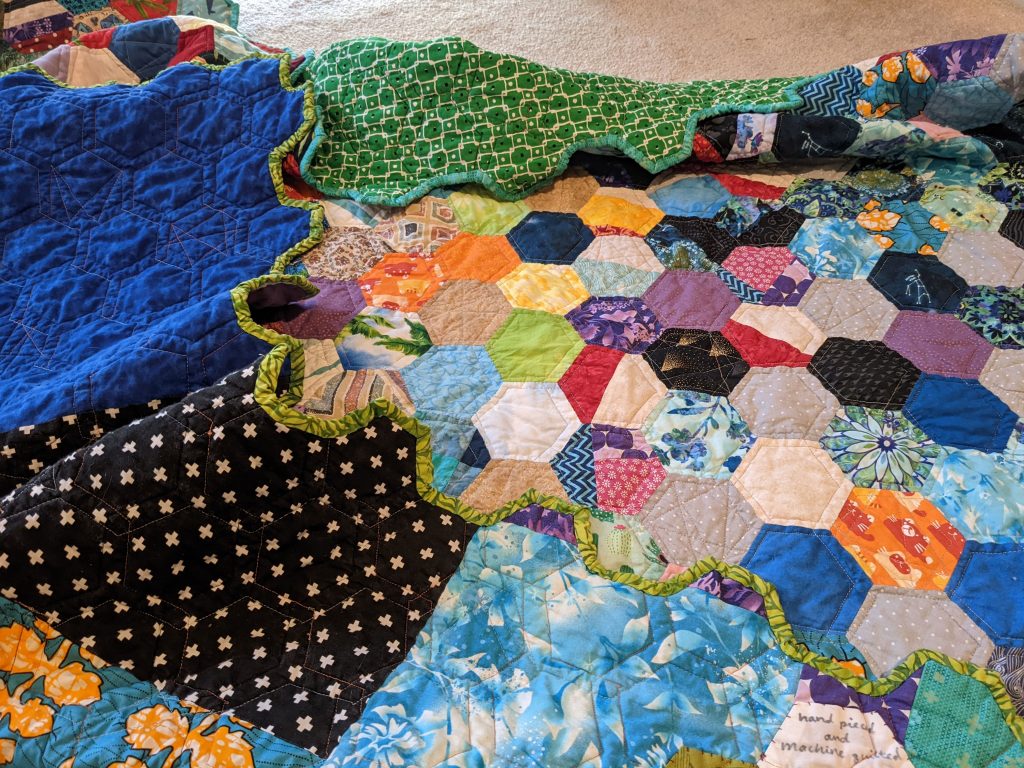
I decided that I would keep the hexagons on the border instead of cutting the quilt to rectangular, so I looked up how to apply binding to all the angles. It was a bit fussy, and I realized that I would have to then hand sew the binding to the back, but… it looks really cool. And it was nice to finish the quilt by hand, honoring the work I put in to the top.
Applying the binding with the machine
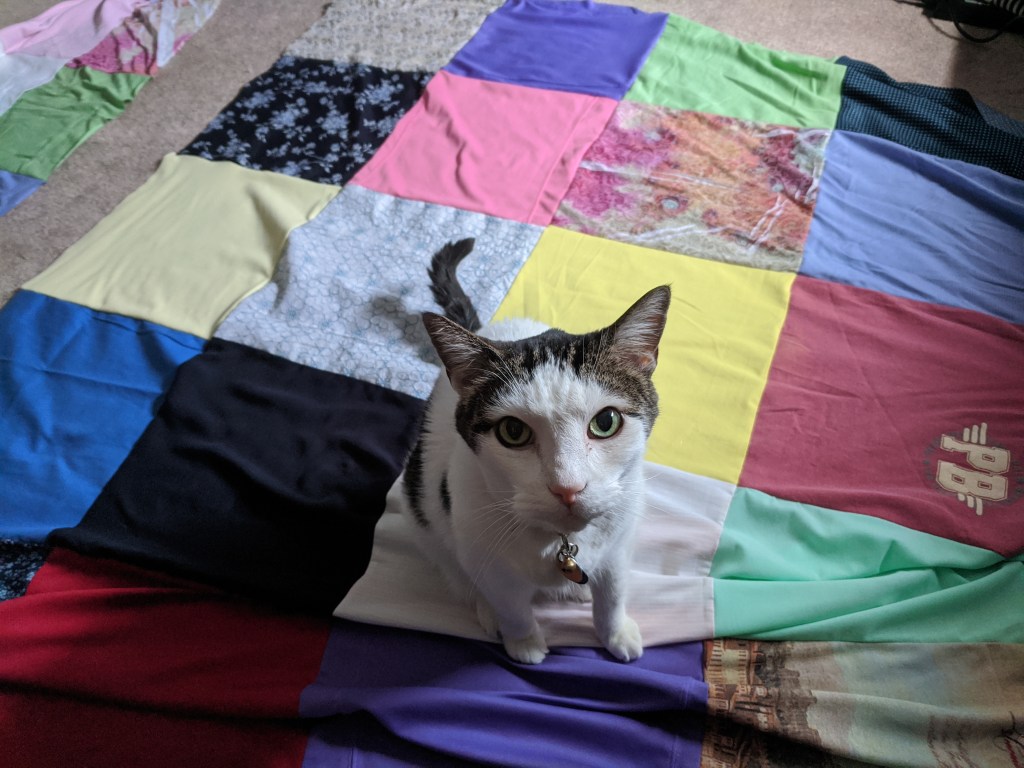
Hand sewing the binding to the back, with my friendly helper.scraps from the backThis quilt’s resting place – the analog room / reading chair ❤ It is wonderful and warm and cozy… and a project for me, of me, from me.
Project completed January 9, 2022.
Fabrics – so many. Sourced from MSQC, Joann, Bluprint, Etsy, eBay, thrift store, Spoonflower, memory quilt scraps
Batting – scraps, mostly cotton and cotton/poly blends
I didn’t buy any supplies for this quilt except machine needles. Which!! I figured out why my thread kept breaking all those times. Just need to use a bigger needle. 🙂 But it was a true joy to create something “for free”.
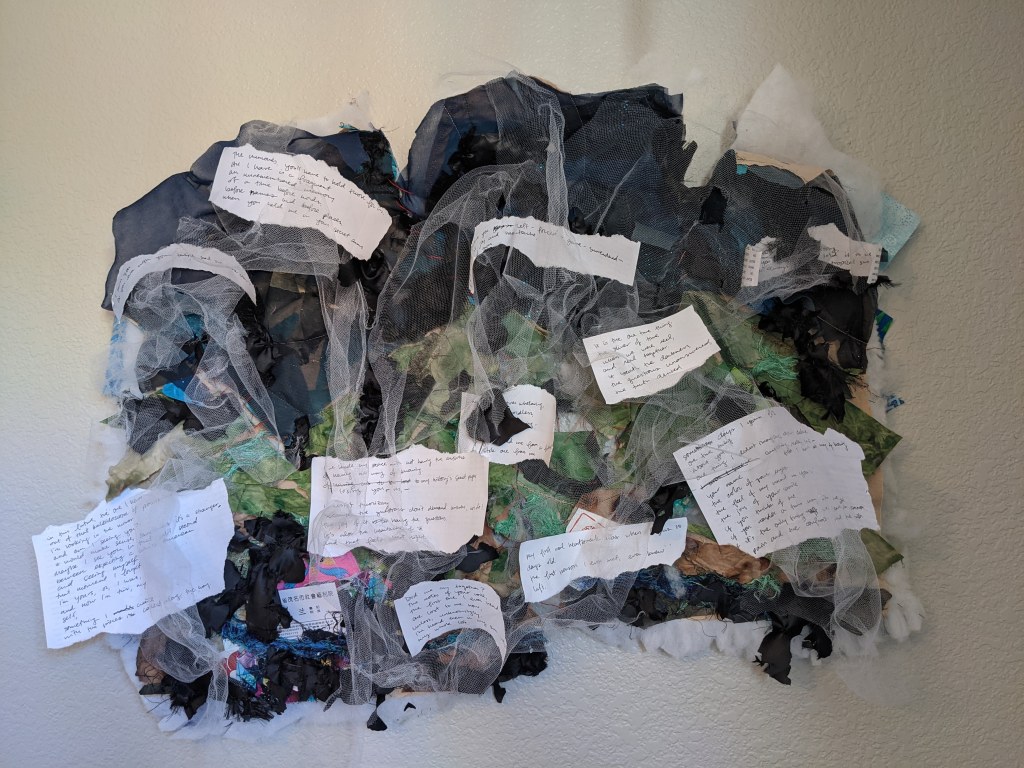
Over the past year, I’ve been exploring my feelings and memories and thoughts about my adoption. And with the support of my therapist and adoptee support group, I have created something that really encompasses this nebulous, complex…. experience I’ve had.
This is my attempt at telling, creating, authoring part of my story, and trying to communicate what it’s felt like to have this story and move into writing it myself.
I bought white fabric, dyed it with tea, and then painted it. Created the colors and used scissors and my hands to create the shape.
I took already made fabric and pulled it apart into bundles of thread and pieces with holes and frayed edges.
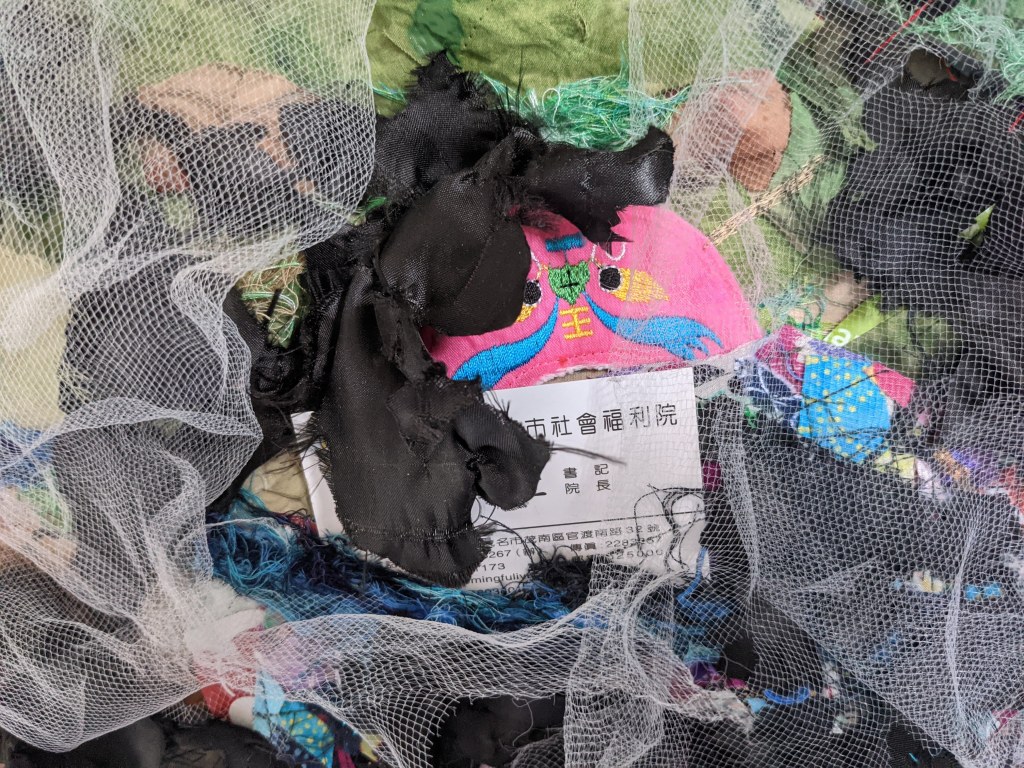
I incorporated the business card from the orphanage I spent time at, and little baby shoes I found in my parent’s basement. And some tea wrappers, as drinking tea is one of the ways I’m engaging with my heritage right now.
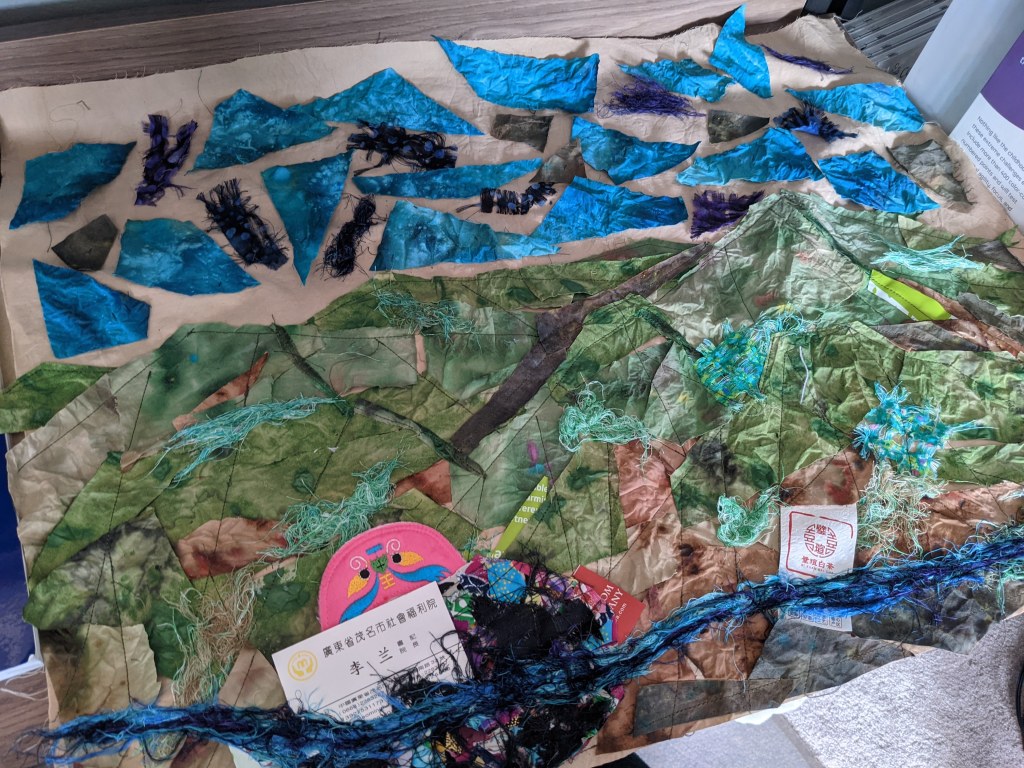
I created a landscape based on research from Google Earth of the surrounding hills and the city I was found in using this imprecise, bits-and-pieces applique.
I wanted to stop here. I had a piece I liked looking at, and it was what I had imagined. But it wasn’t the story I want to tell, the whole story, the true story. So I made it messy and complicated and disjointed, like adoption is, how adoption feels. To be cut off from the first person you ever met and knew, who grew you, to be separated from people who look like you, who you heard while you were waiting to be born. To have an origin story you can’t remember and can’t ever know. To be out of context, displaced… Displaced to somewhere nice, with good people, but to always be a branch grafted onto the family tree.
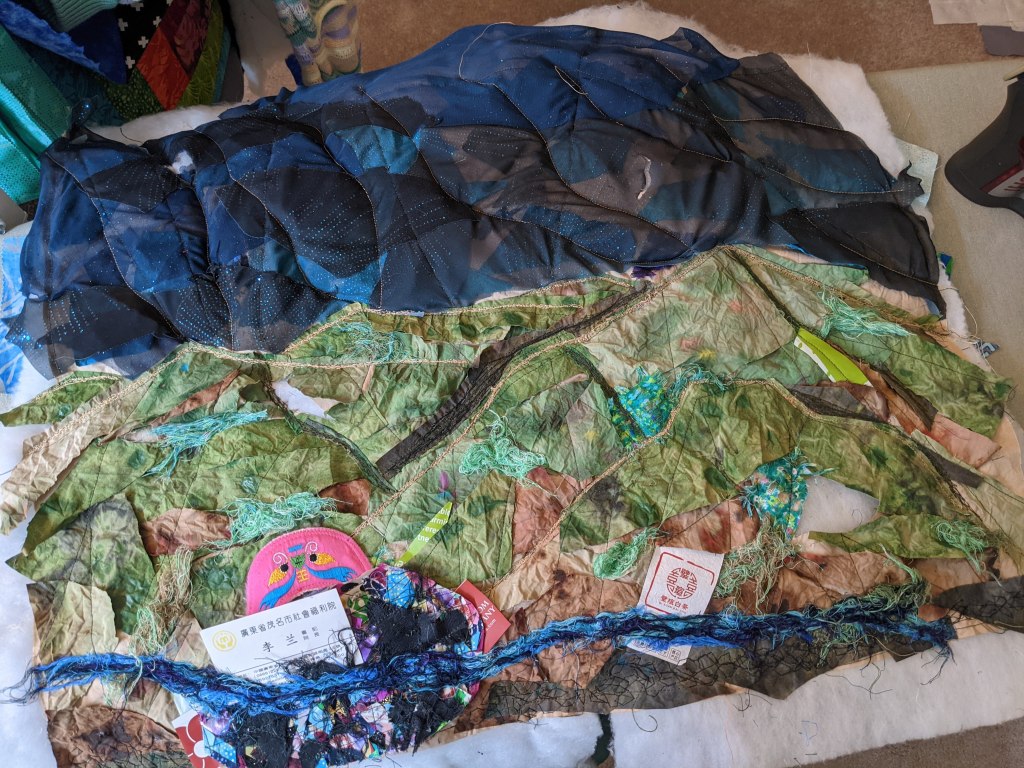
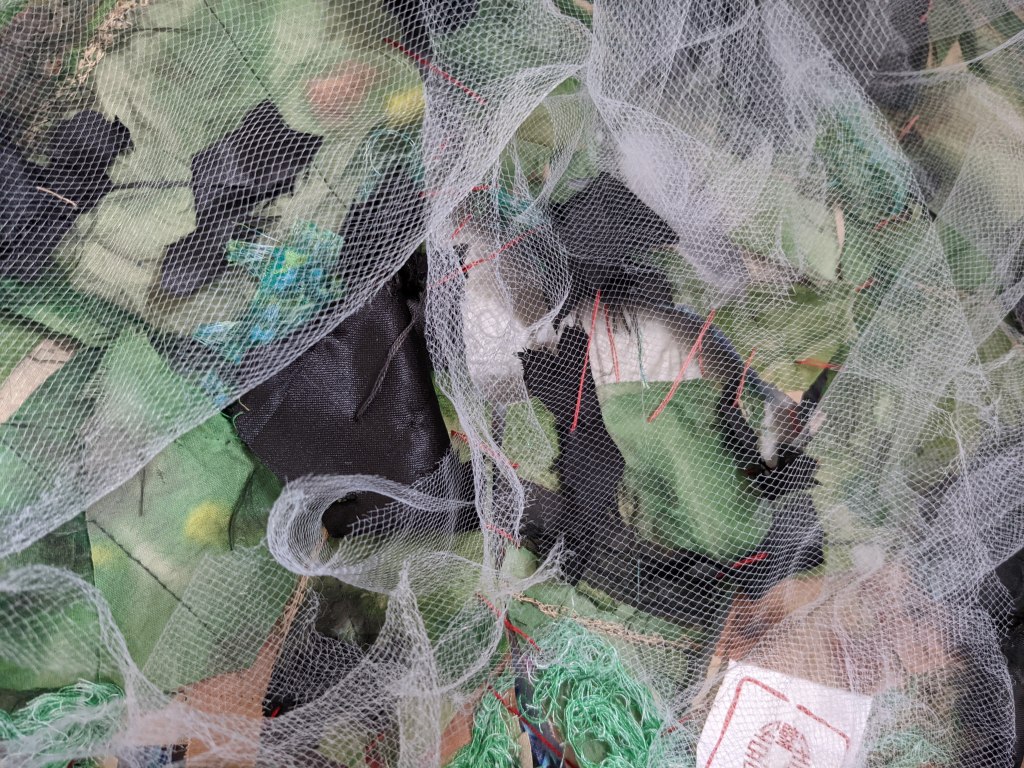
And so I covered it with black bits of fabric, obscuring it.
And cut it up and fit it together in the wrong places and stitched it together again.
And undid stitches and pulled pieces of fabric up and cut into it.
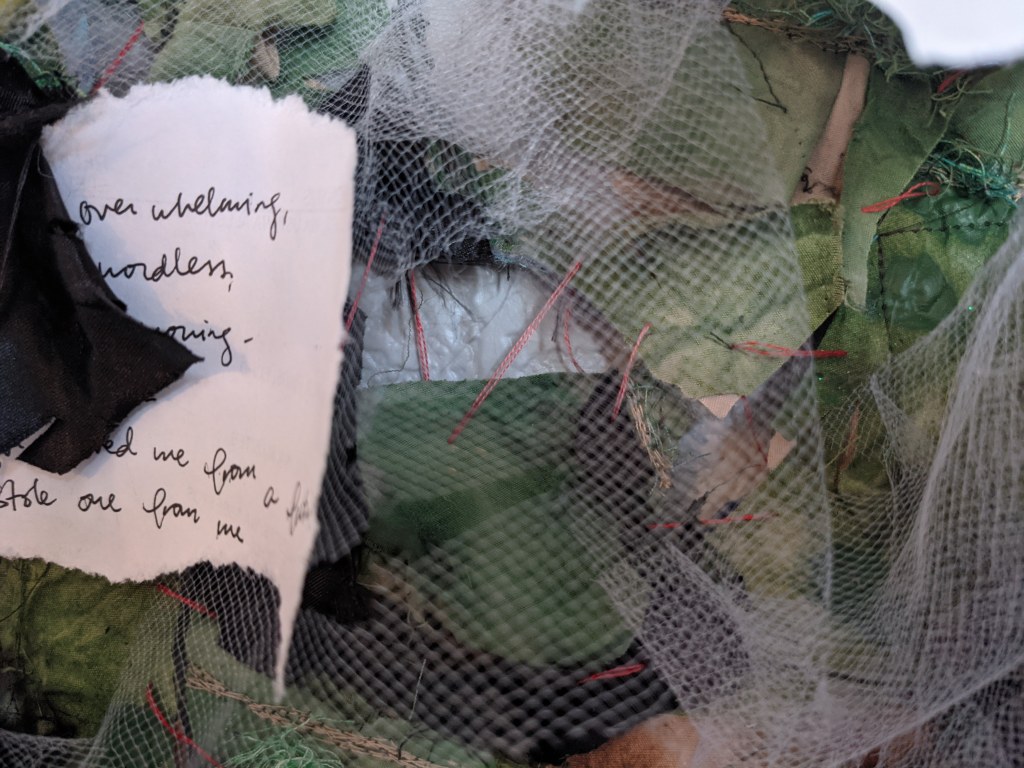
And covered it with ripped pieces of mesh tulle, covering it in more haze.
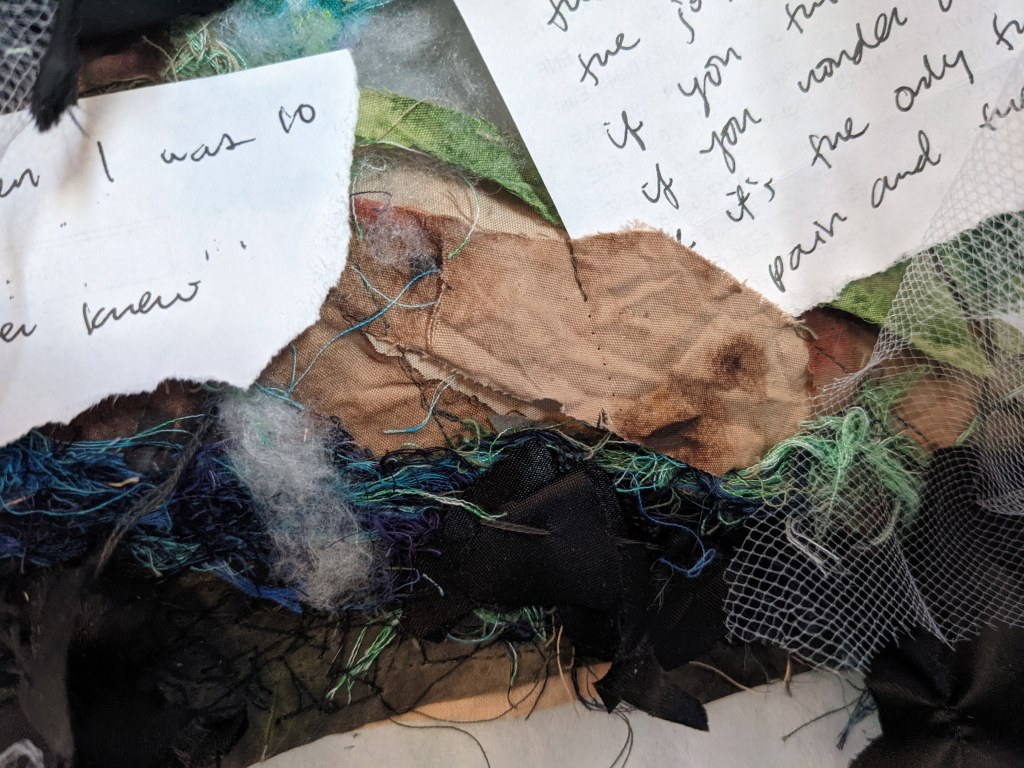
And, finally, fit the pieces of a poem I amalgamated from my bits of writing about adoption into the shredded edges. It doesn’t feel like closure, but I did need to express it. It was so strange to make a quilt that is not a grid and angles and 1/4″ seams. In the beginning it was daunting, and I instinctively tried to make it pretty, but that’s not what I feel and not what I wanted it to be.
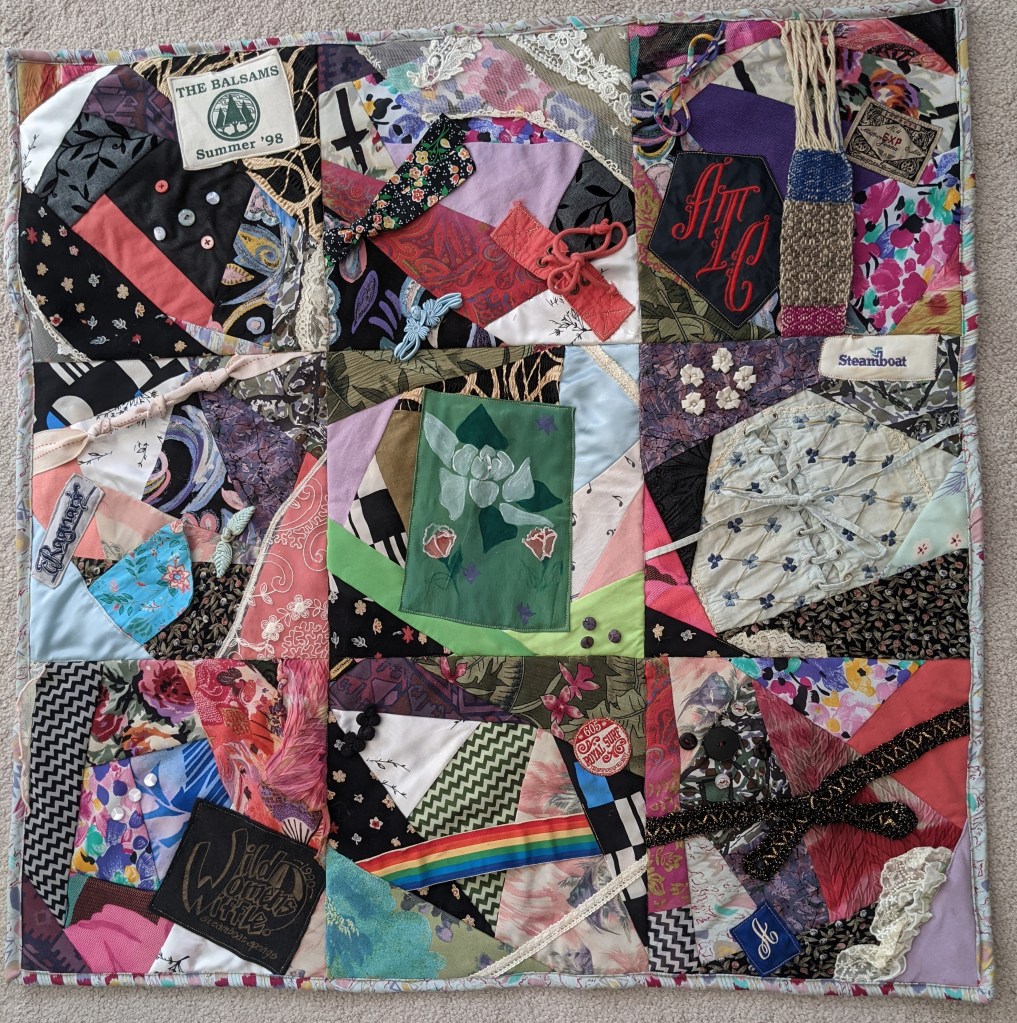
This memory quilt for my cousin was my other big project of 2020, finished in this first month of 2021. My cousin provided her mother’s clothes, which are incredibly fun and colorful. I knew I wanted to do a crazy quilt for my cousin, since she didn’t want something too big, and her mom’s clothes are truly too fun to do something simple with.
First, I inventoried all the fabric and cut off buttons and fasteners and other 3d elements I wanted to include. I chose a 3×3 layout for the back of 9 graphic t-shirts, and figured I’d do the crazy-pieced blocks to match on the front. Through the process, the front blocks ended up a bit smaller but it wasn’t a big deal.
For the piecing, I cut pieces with an uneven number of sides (a tip from the museum employee) for the center piece. Then I added on new fabric to each side, and continued until it was the right size. Since a lot of the fabric was stretchy and textured itself, I used some scrap fabric behind the block to stabilize everything.
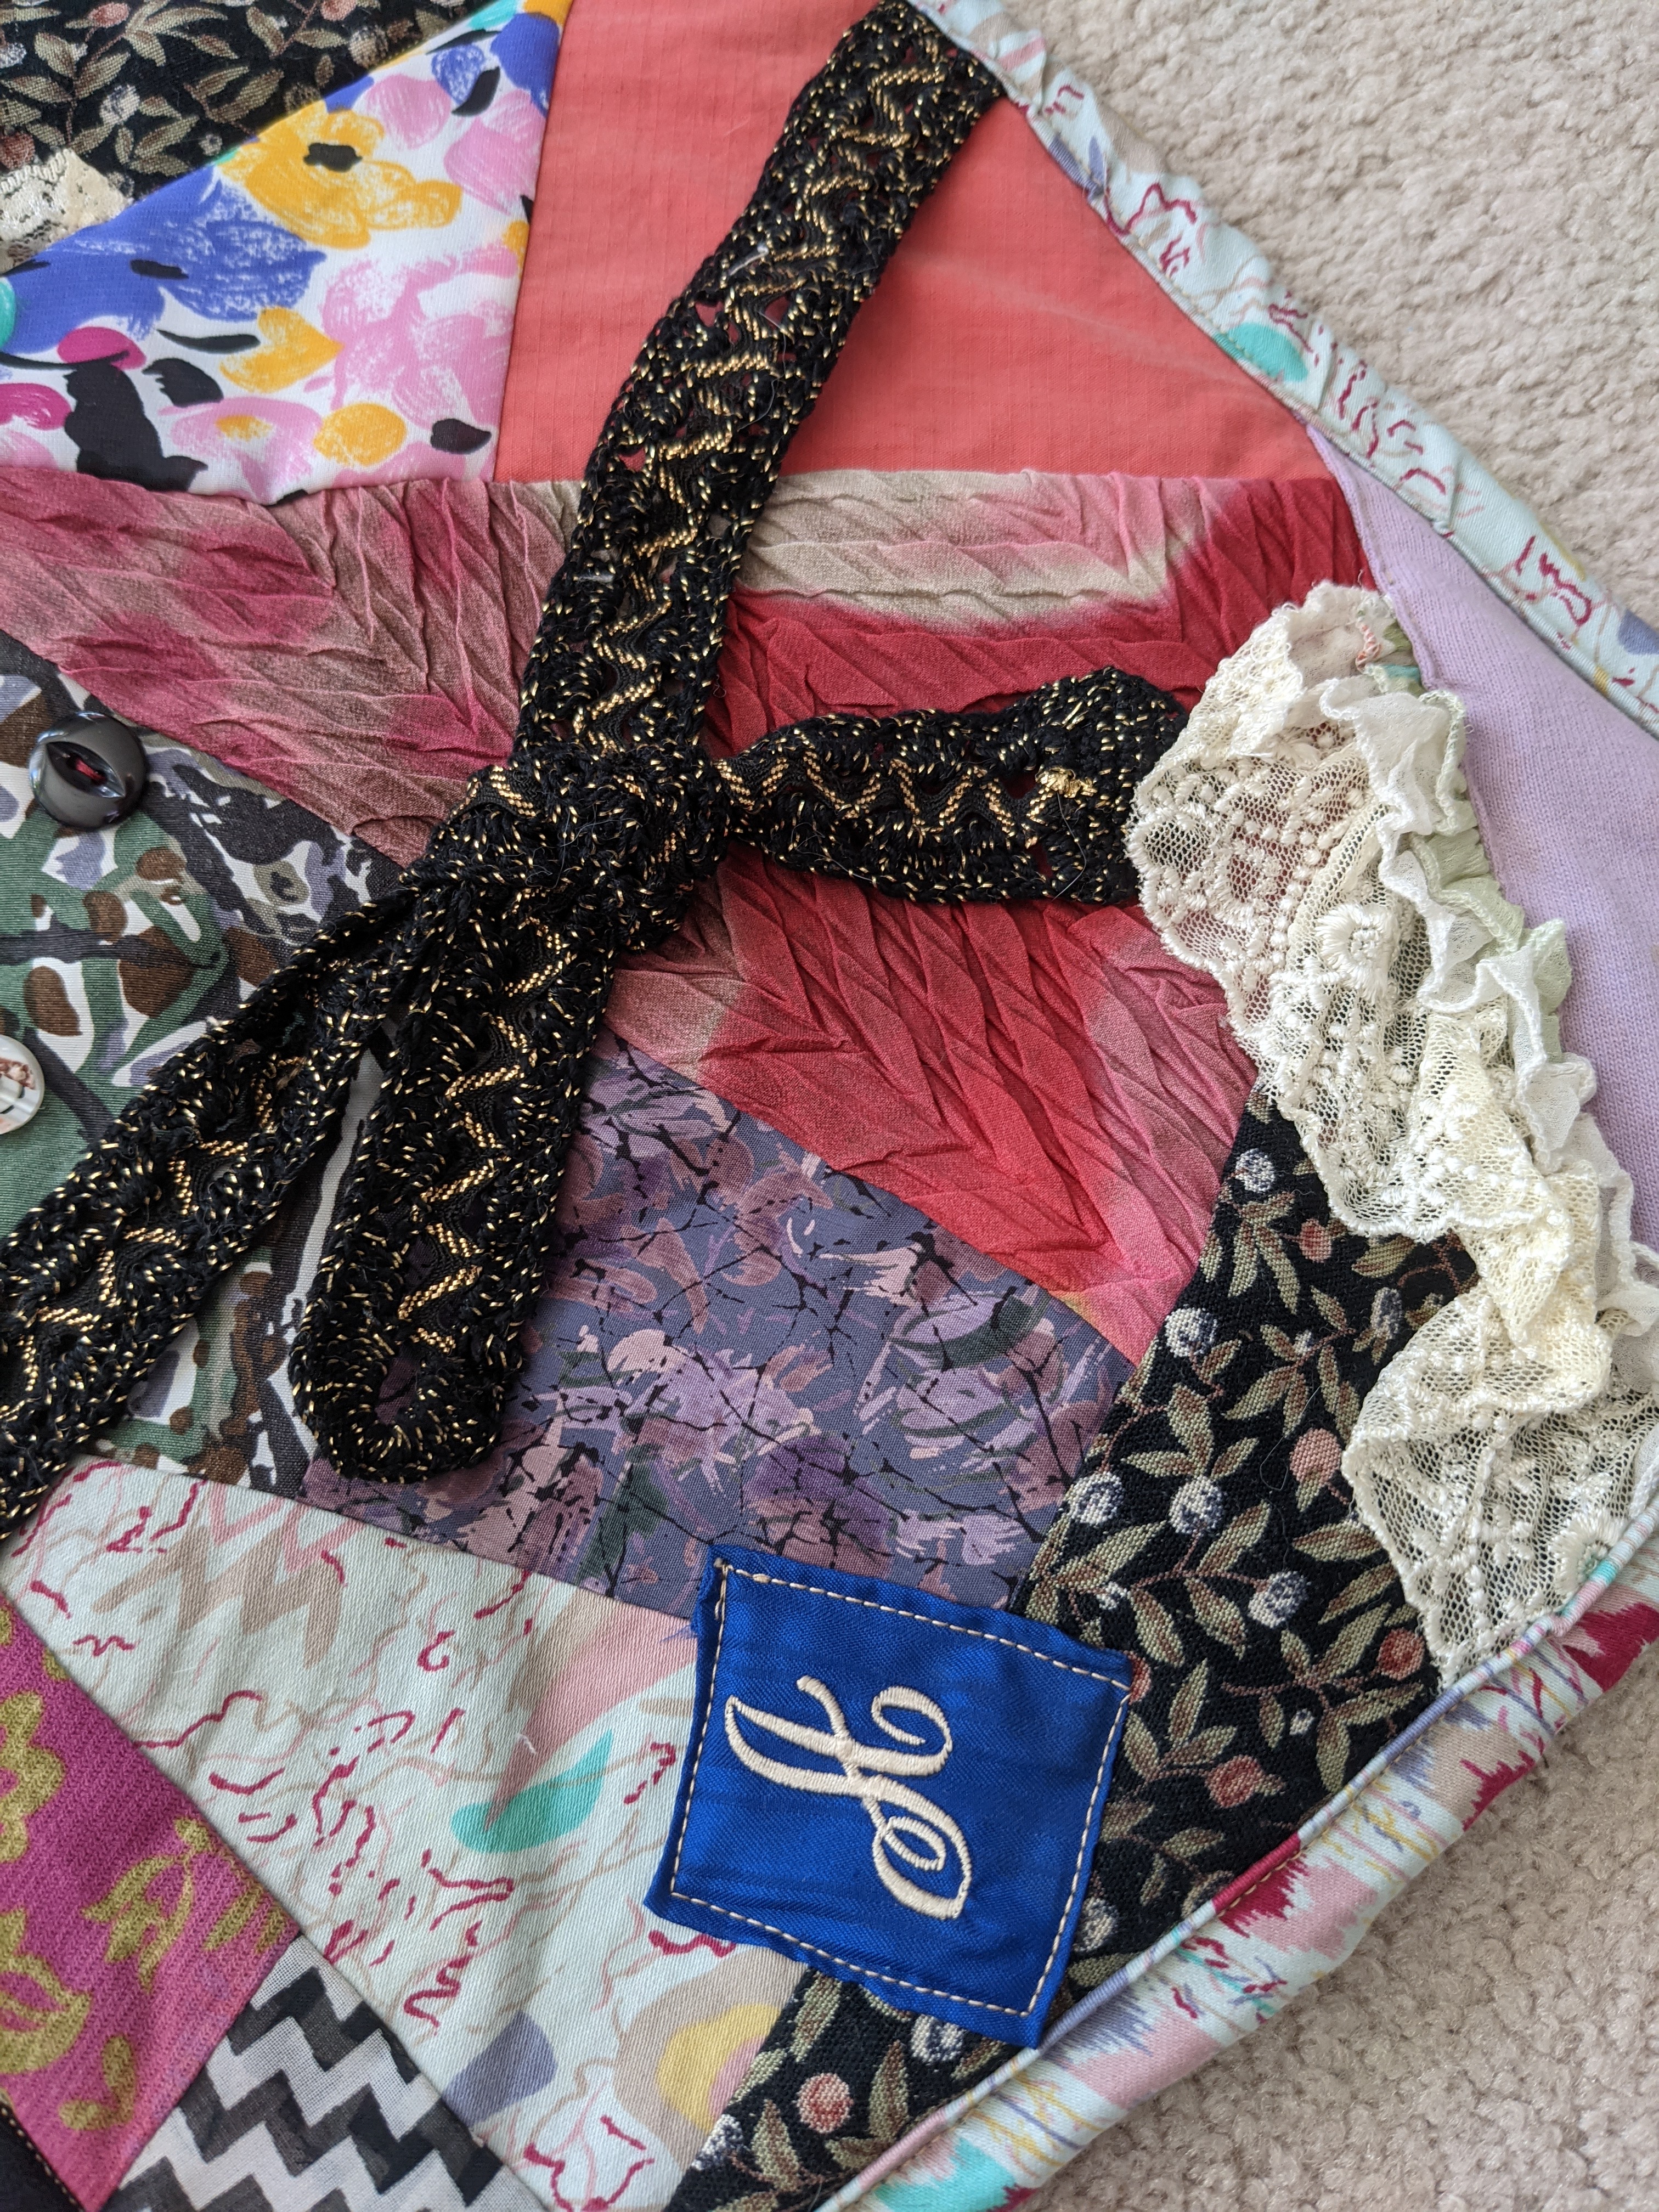
I chose some logos to applique, just like my other memory quilt. I appliqued them on the blocks, prior to piecing the 9 blocks together. At this point I also added some lace, belts/scarves, and other ties by machine.
Black and gold belt, some lace, and appliqued logo
Then I pieced it together because I wanted to add the buttons and fasteners between some blocks. I added the buttons and such by hand, since they’re a bit fiddly on the machine.
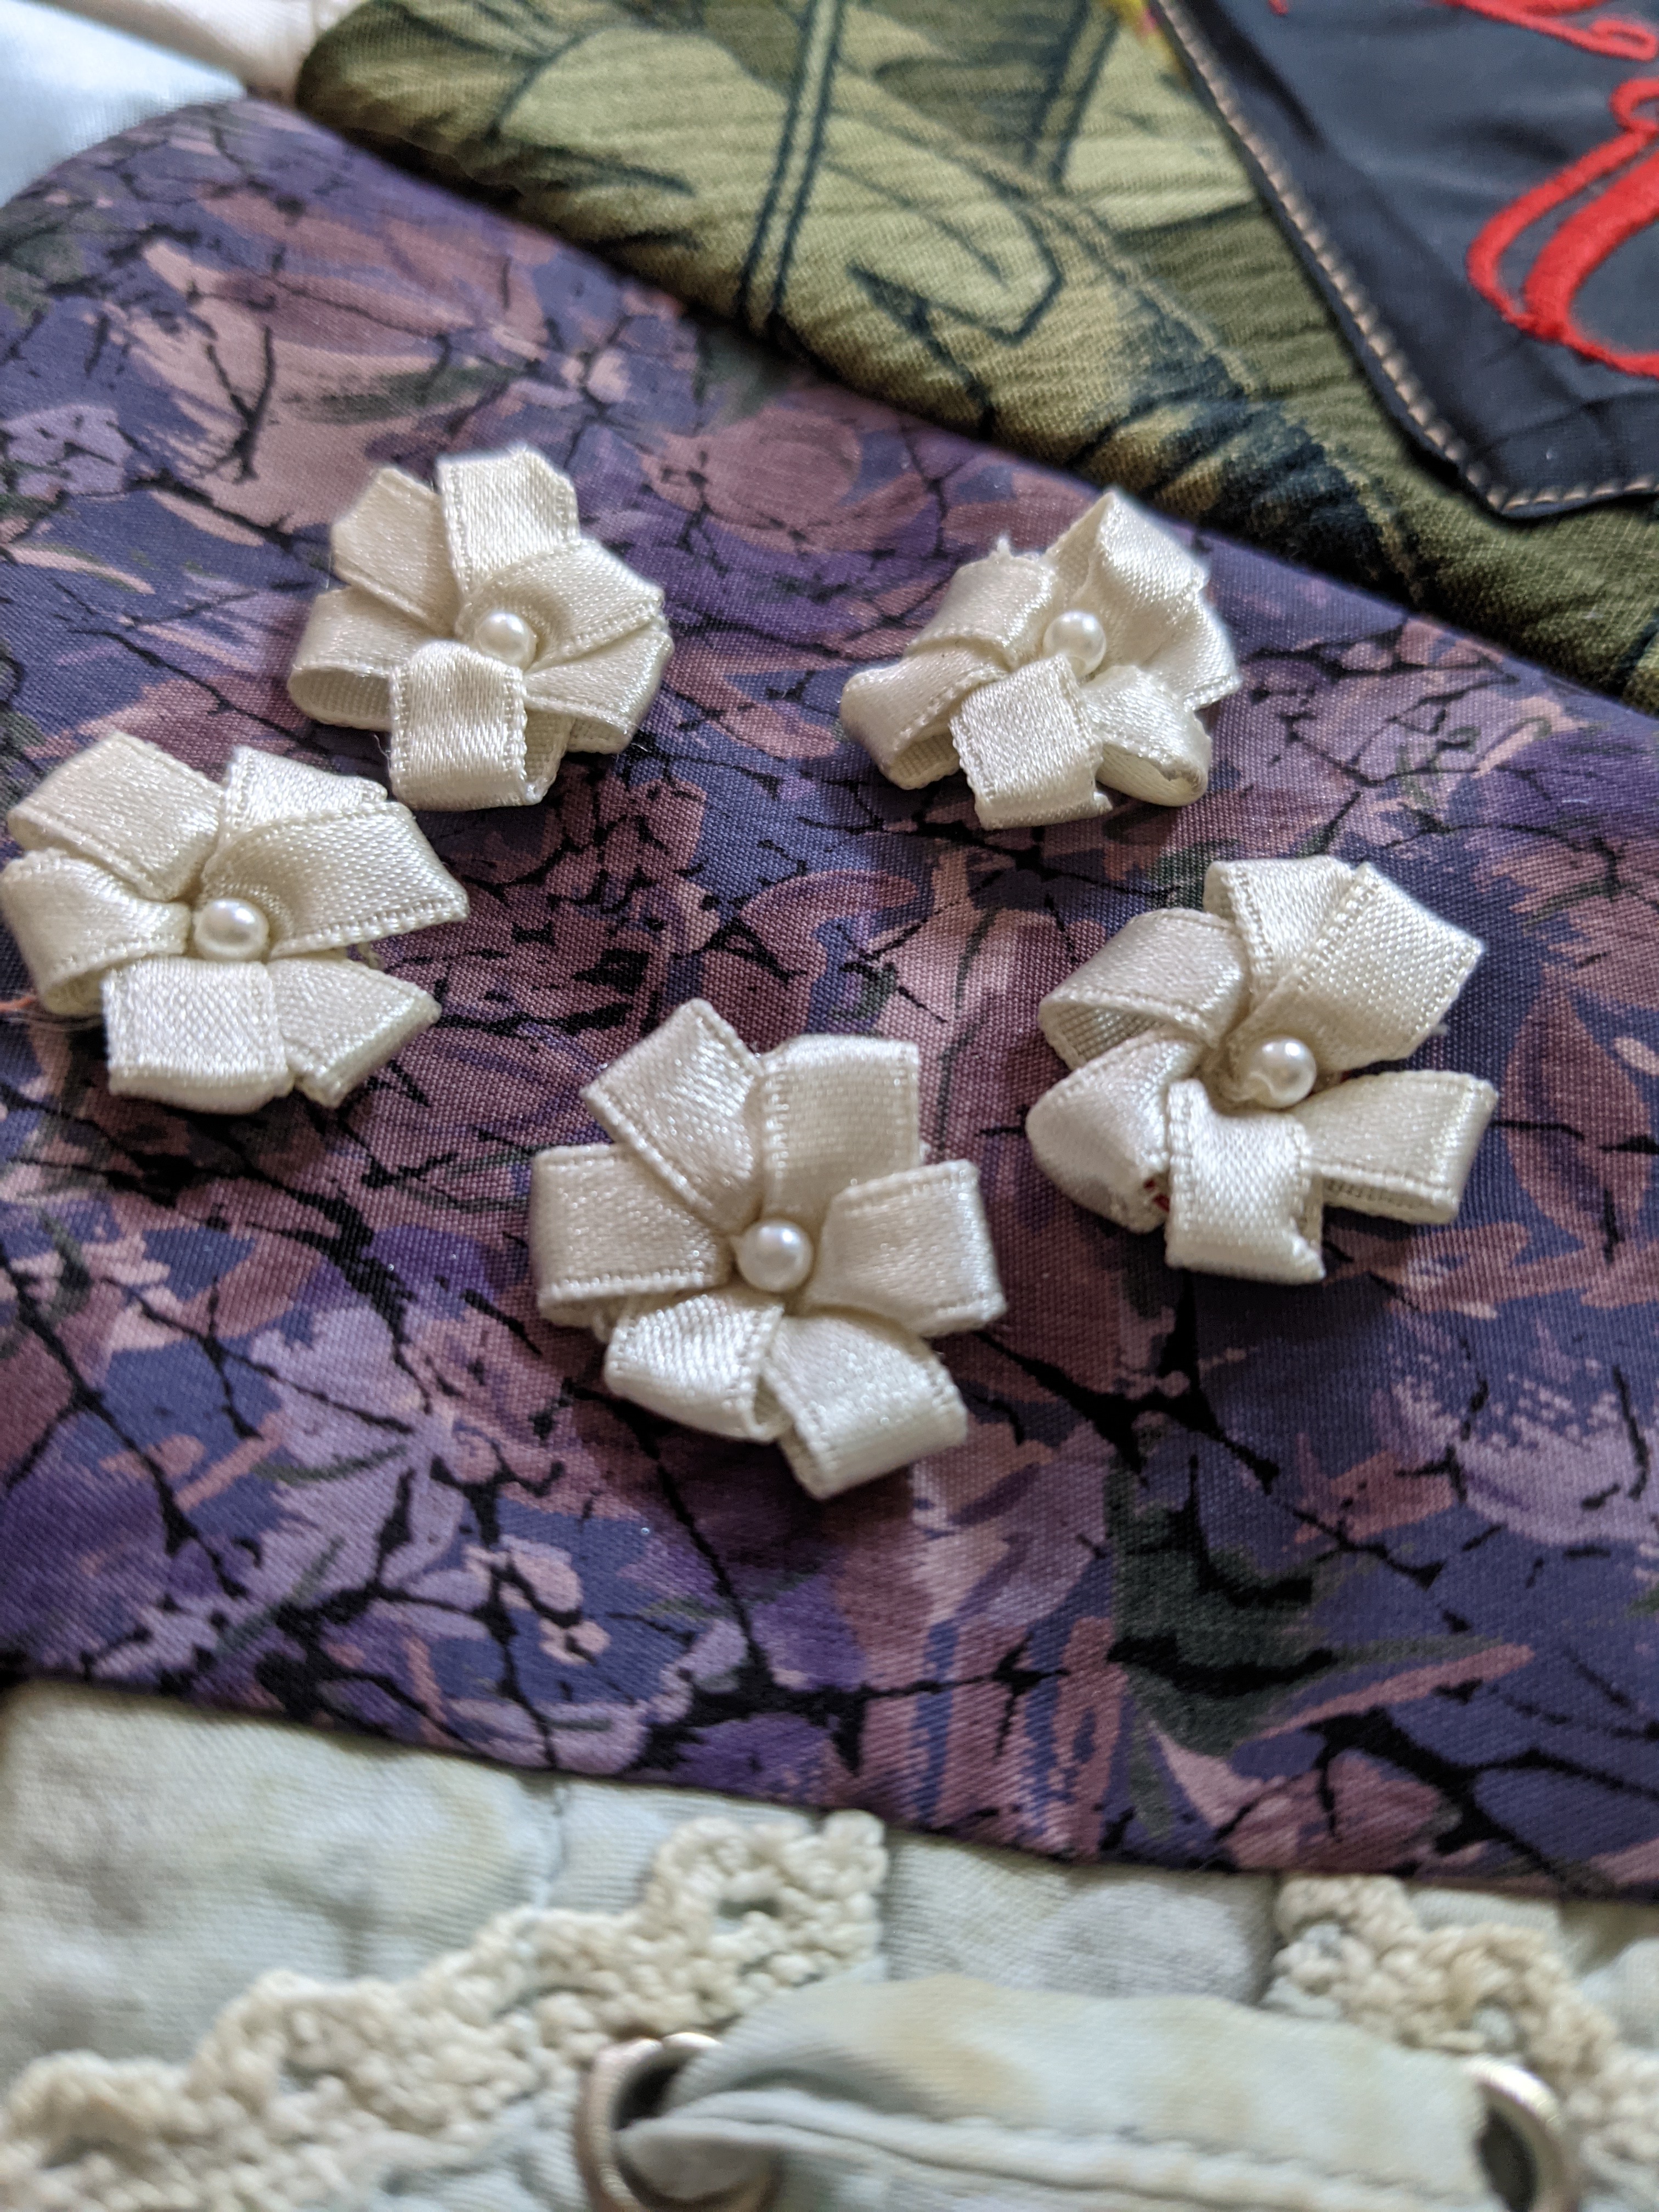
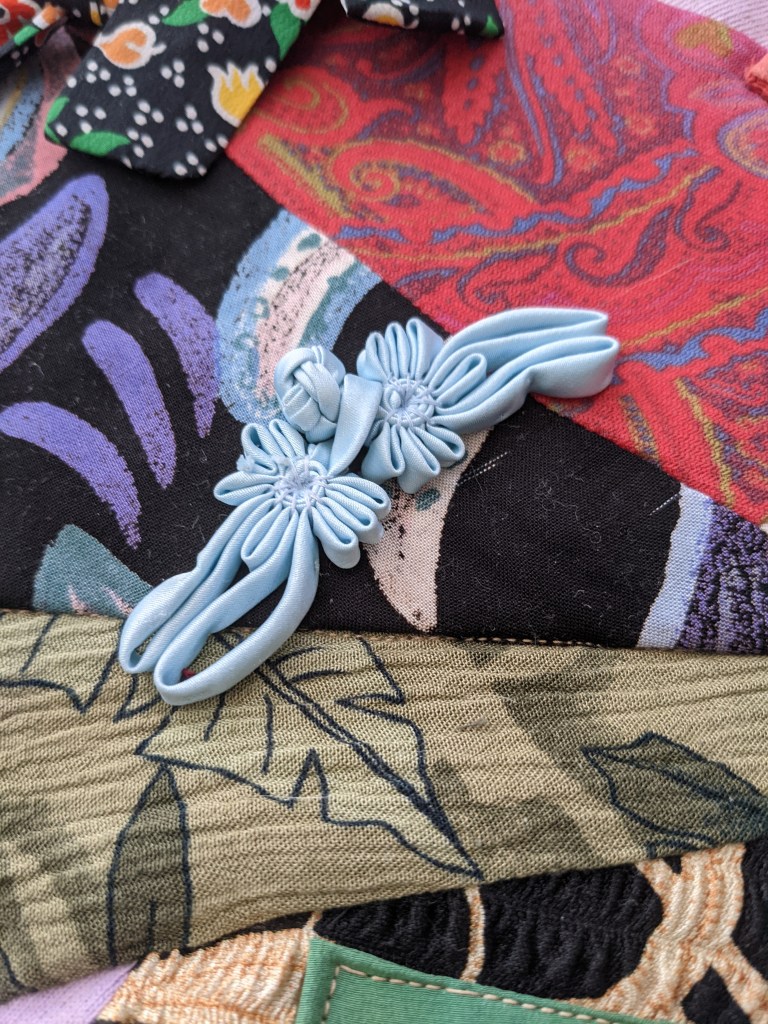
These were the buttons of the shirt seen in the background of the picture below 🙂These ribbon flowers were already part of a sweater, so I extracted them from the sweater and sewed them on! Cute little fastener from the leg of pajama pants
My cousin wanted to feature her mom’s beautifully hand painted wedding dress, so I appliqued one of the main flowers on the middle block and on the back of the quilt. I did simple stitch in the ditch quilting, since the top was already very busy.
I used jean pants pockets to allow my cousin to hang up the quilt if she ever chooses.
My uncle lost his wife in 2018 and I wanted to honor her with a memory quilt out of her old shirts. My uncle provided a bunch of bright polo shirts and other shirts of hers, which I made into a quilt for him. I wanted to keep it really simple and soft, so I cut out big squares from the shirts and laid them out in a grid pattern.
Layout with my friendly helper
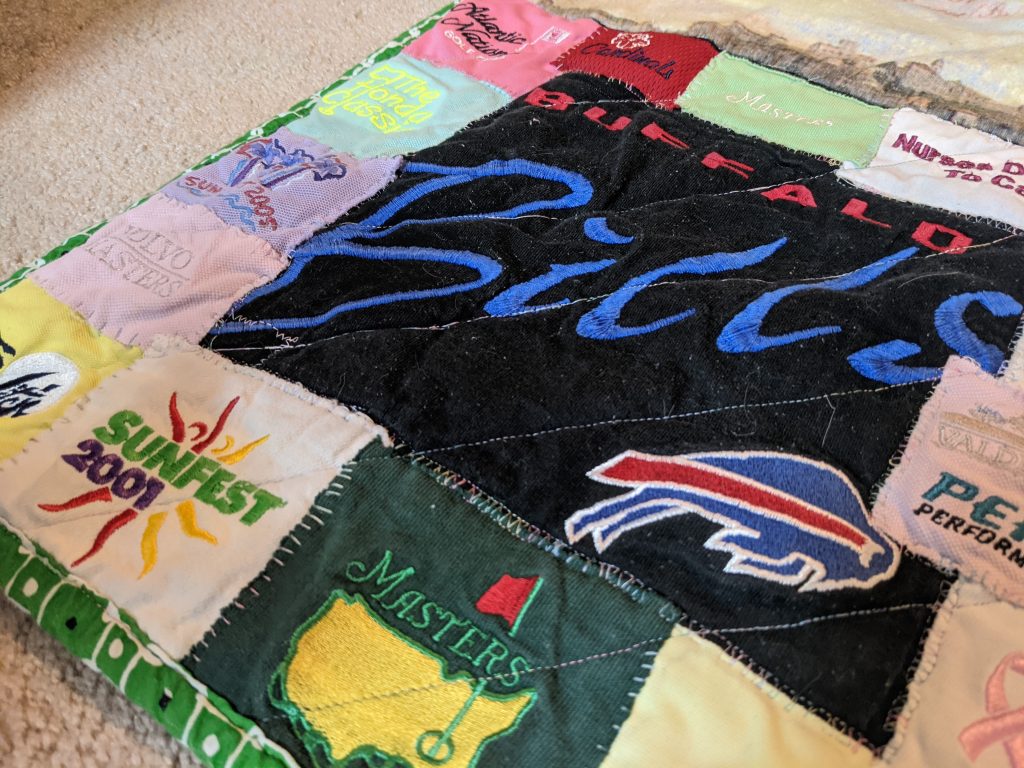
Most of the polos had awesome logos on them, which I wanted to include in some way. I thought a bit about applique-ing them to a border, but I didn’t want there to be lumpy or hard parts throughout the quilt. I decided to put all the logos together in one corner and applique-d them onto a square that already had the Buffalo Bills logo on it. I tacked them down with my sewing machine and then hand stitched around each one to really make sure they don’t go anywhere.
I kept the quilting really simple, two sets of diagonal lines. I used rainbow thread since my aunt was so bright and colorful.
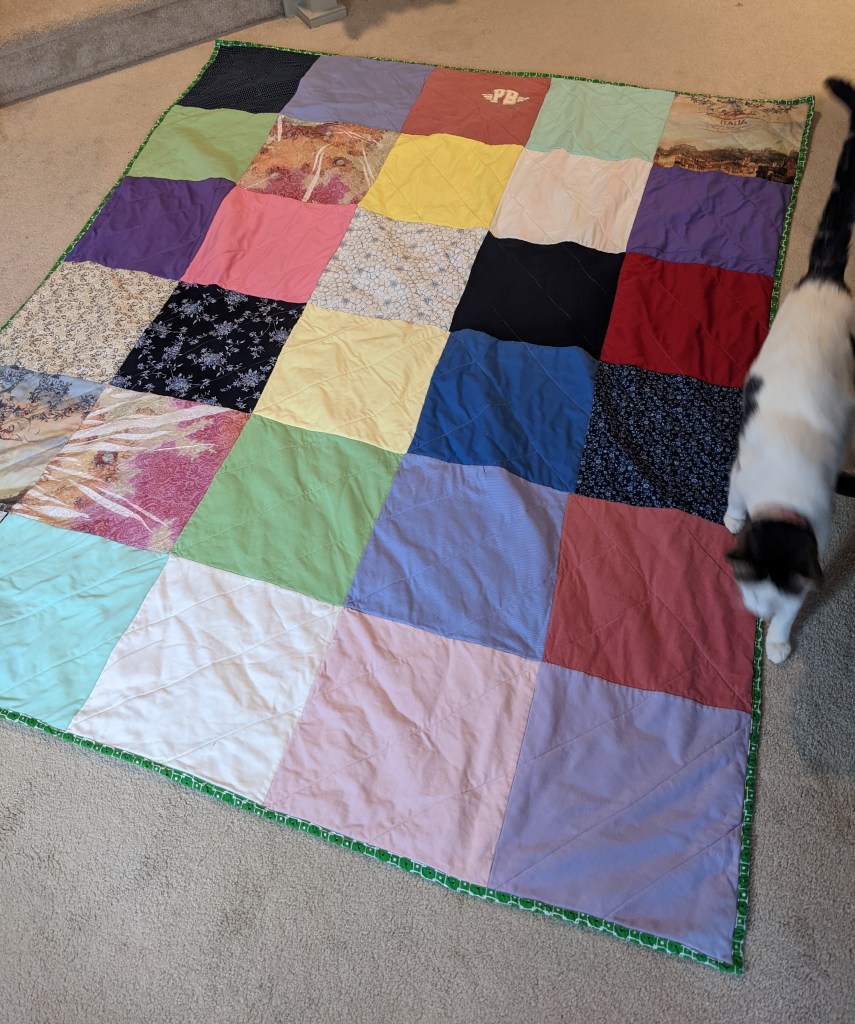
Finished quilt with my cat for scale
This was my big project of 2020 and I’m so glad I was able to deliver it to my uncle before the year’s end. 2020 has been tough on all of us and I’ve struggled to get into my sewing room as often as I’d like, but I chipped away at this project little by little and I’m really happy with the result. I sent it off to my uncle and he sent me back a picture of it with his cat 🙂
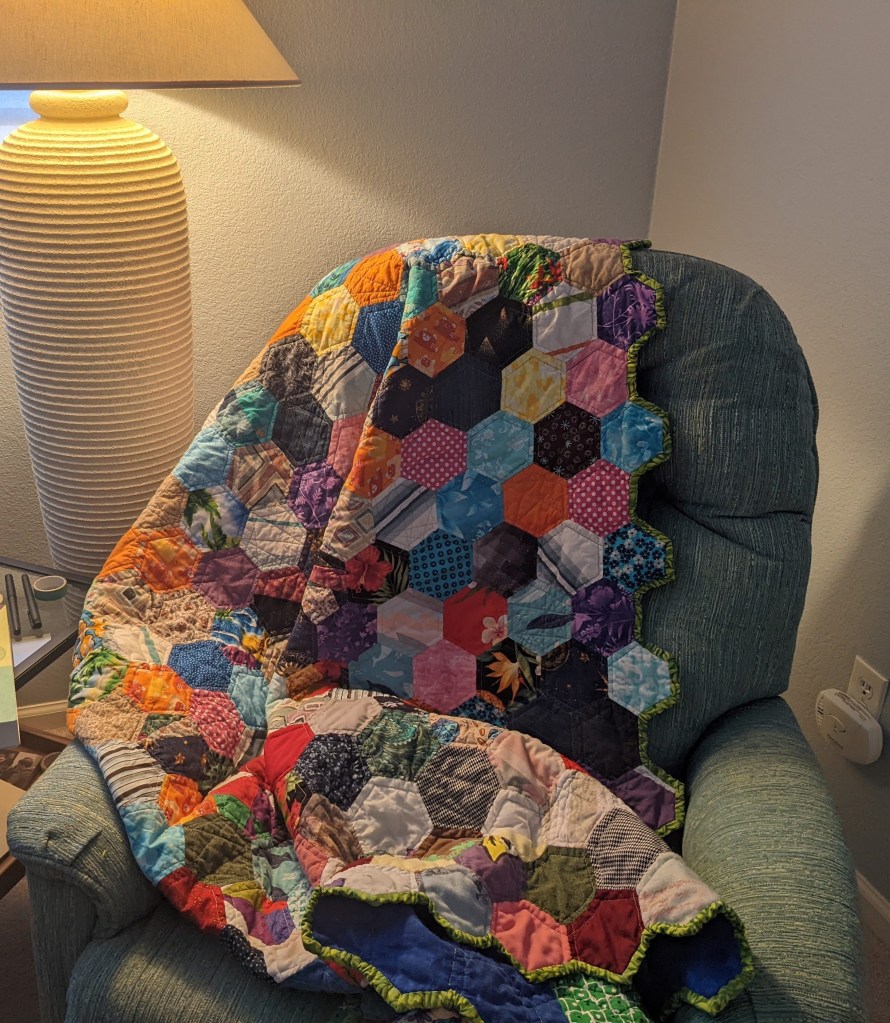
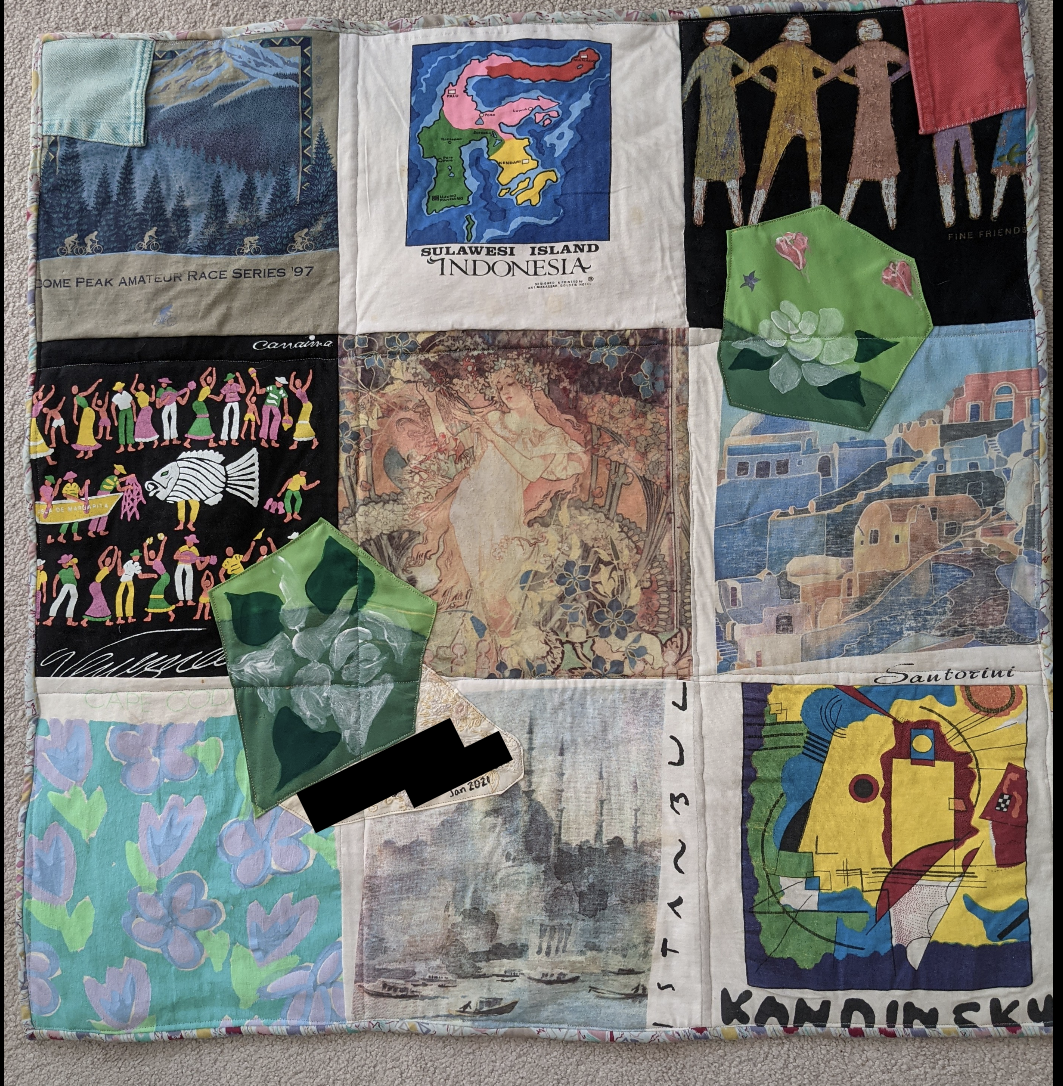
I’m still working on my scrappy hexagon quilt – it’s been a while since I laid it out, and I’m pleasantly surprised it’s so big now! Honestly it’s getting to the point where I should start adding to the sides so it doesn’t become too rectangular!
I’m still not sure what I want this quilt to be – a wall hanging? A couch quilt? I’m not sure. I started this back in January and it’s fun to see the scraps of my projects all in one place. It’s a sort of historical record, an archive of projects past.
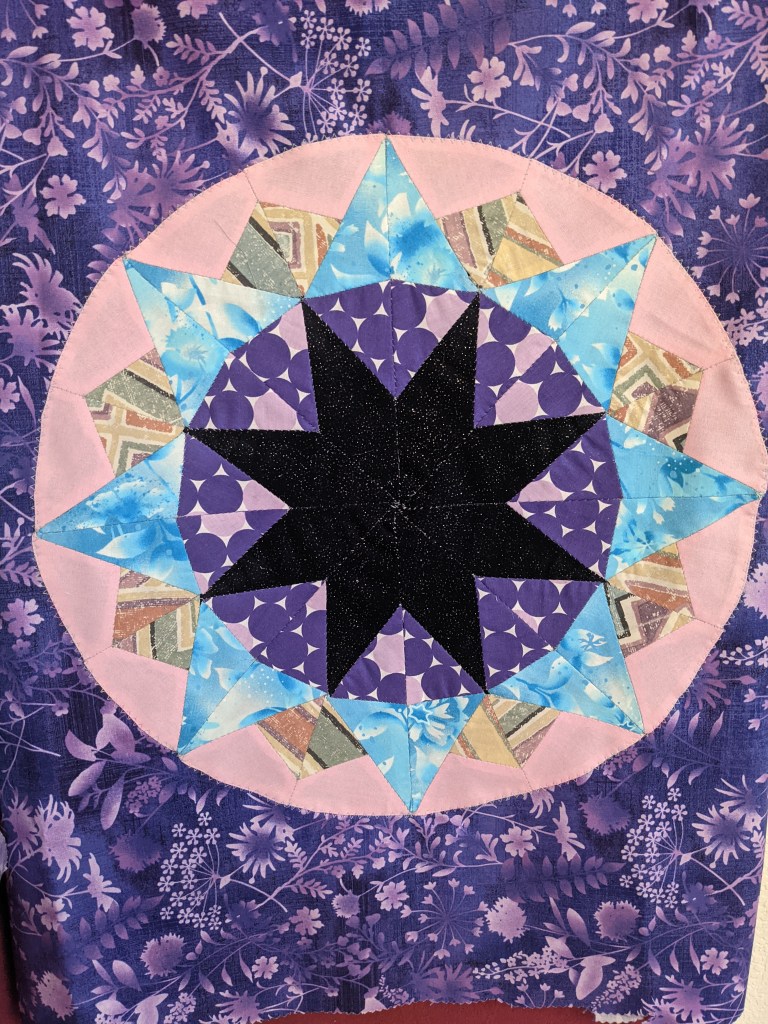
I also bought an English paper piecing kit for a star pattern, and whipped it up in a couple days. They provided the papers and plastic templates to make it easier to cut your fabric, which was nice.
Star has approximately 16″ diameter
It was weird to work with acute angles and smaller pieces, but I like how it turned out! This was my tester version, so I just used random scraps, but I think a sunset would be really cool, a nebula type shape, maybe fabric that looks more like stained glass? Some of the intersections aren’t perfectly aligned, so I want to work on that next time.
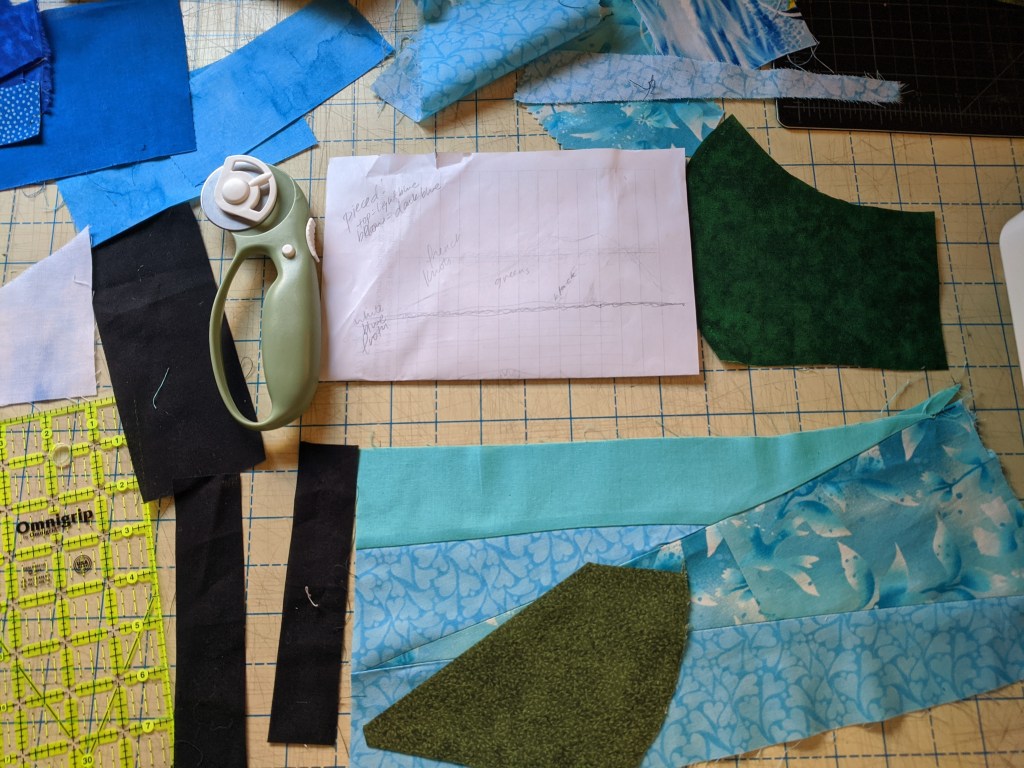
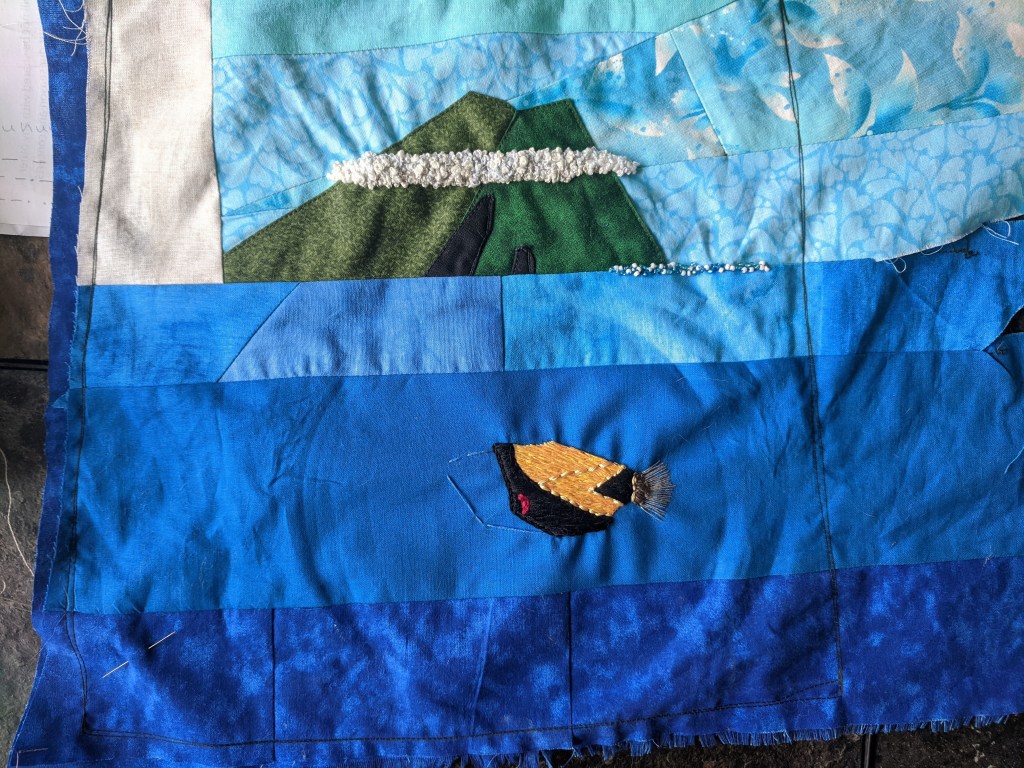
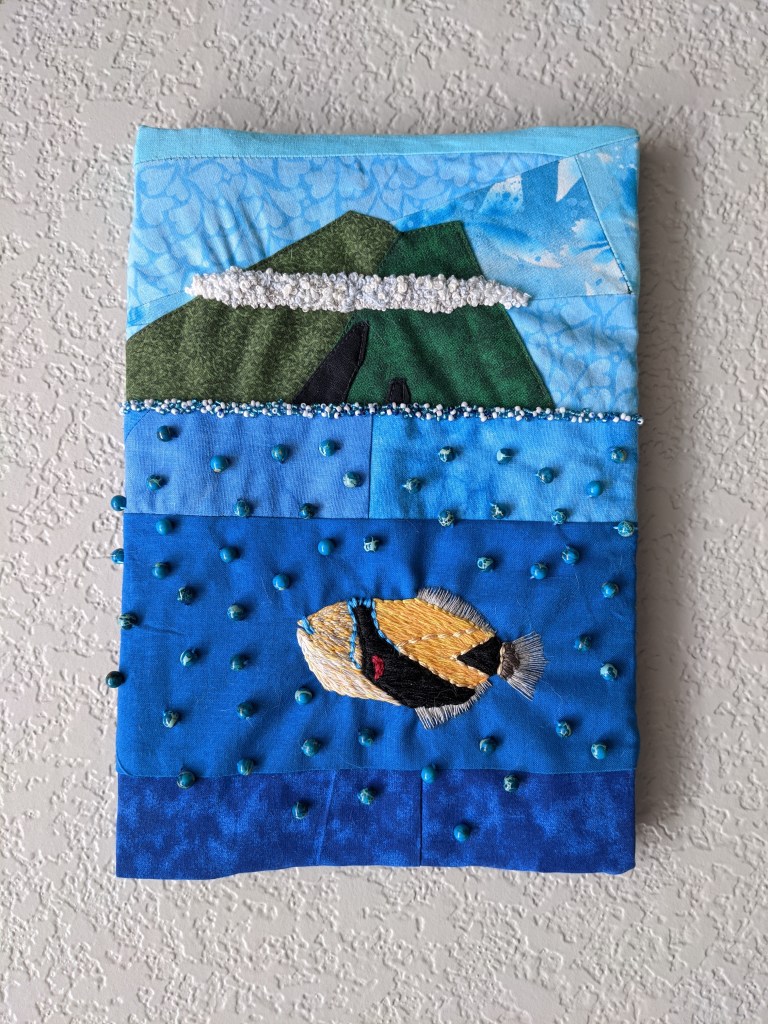
A year ago, some friends and I went to Hawaii and I bought these really cool ocean beads for an embroidery project. I wanted to have a humuhumunukunukuapua’a with Maui in the background to honor all our snorkeling adventures 🙂
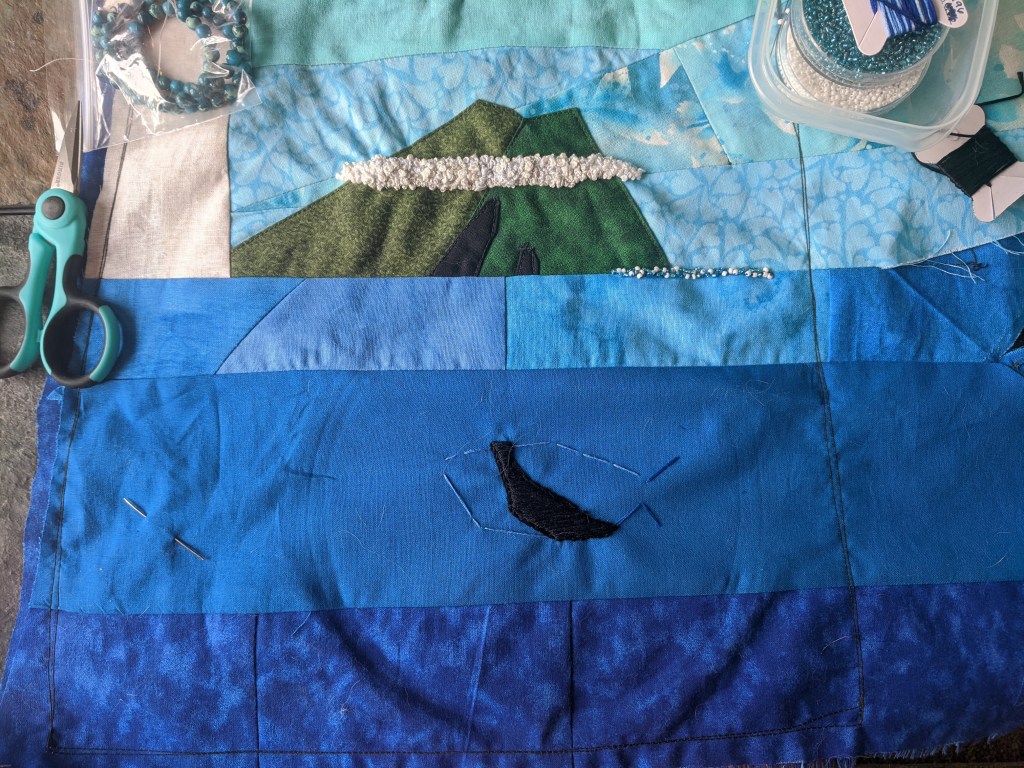
I pieced some scraps together to make the background, and appliqued the black lava flows on. Using lots of layers made the whole thing a bit thick, plus I sewed a backing stabilizing layer onto the back to help with limiting stretch from the embroidery hoop. Luckily I didn’t have to do much embroidery over the thickest parts.
This was my first time doing beadwork, and it was very labor intensive but fun. I used blue and white beads to make seafoam. For whatever reason, I have a stockpile of random beads that’s lived in my craft box forever, so it was nice to use some up. Plus, since I used scraps and thread I already owned, the only cost of this project was the beads themselves.
I used French knots for the ever-present cloud layer around Haleakala, mixing some white and gray threads.
Once upon a time I bought some gradient thread, which finally came in handy for giving the humuhumu texture in the orangey-yellow portions.
And then I added all my ocean/bubble beads! I tried to be as random as possible and the back of this looks like complete chaos 🙂 I cut some yardsticks to size and glued them into a frame. Embroidery often gets displayed in a circle hoop, but I knew from the beginning this piece was meant to be a rectangle. It sits next to my bird embroidery on my stairwell 🙂
Project completed September 2020.
This is what the back looks like! Thread tie offs, criss crosses, and chaos 🙂